Java 基础
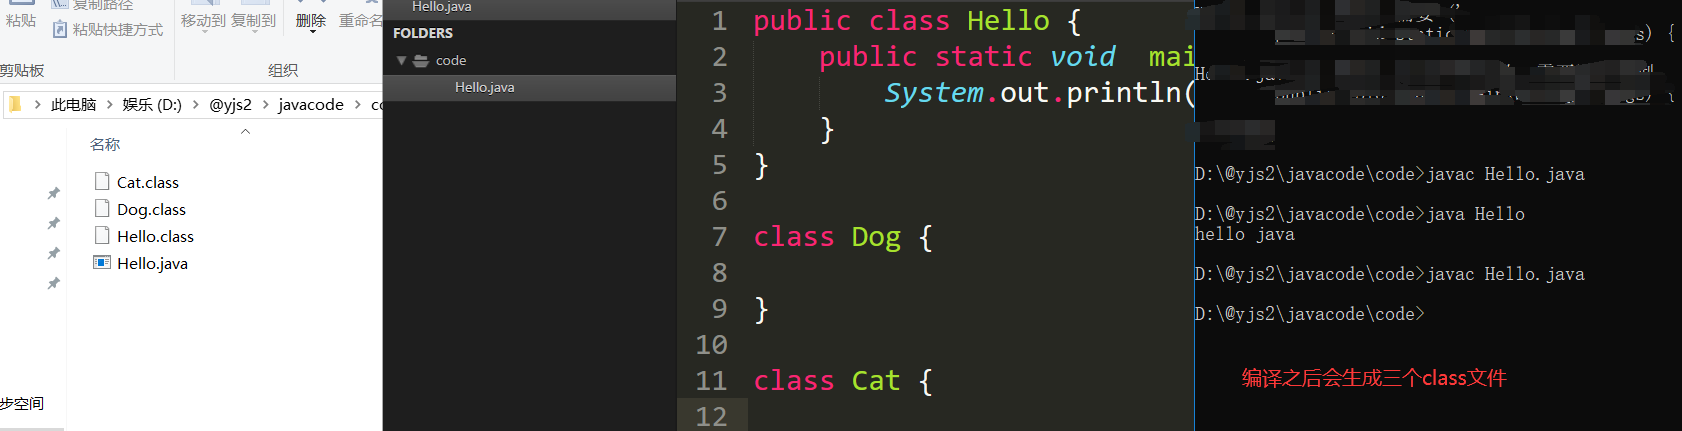
如果有多个public,会生成多个class文件(字节码文件)
JDK,JRE JDK 基本介绍
JDK 的全称(Java Development Kit Java 开发工具包)
JDK = JRE + java 的开发工具 [java, javac,javadoc,javap 等]
JDK 是提供给 Java 开发人员使用的,其中包含了 java 的开发工具,也包括了 JRE。所以安装了 JDK,就不用在单独 安装 JRE 了。
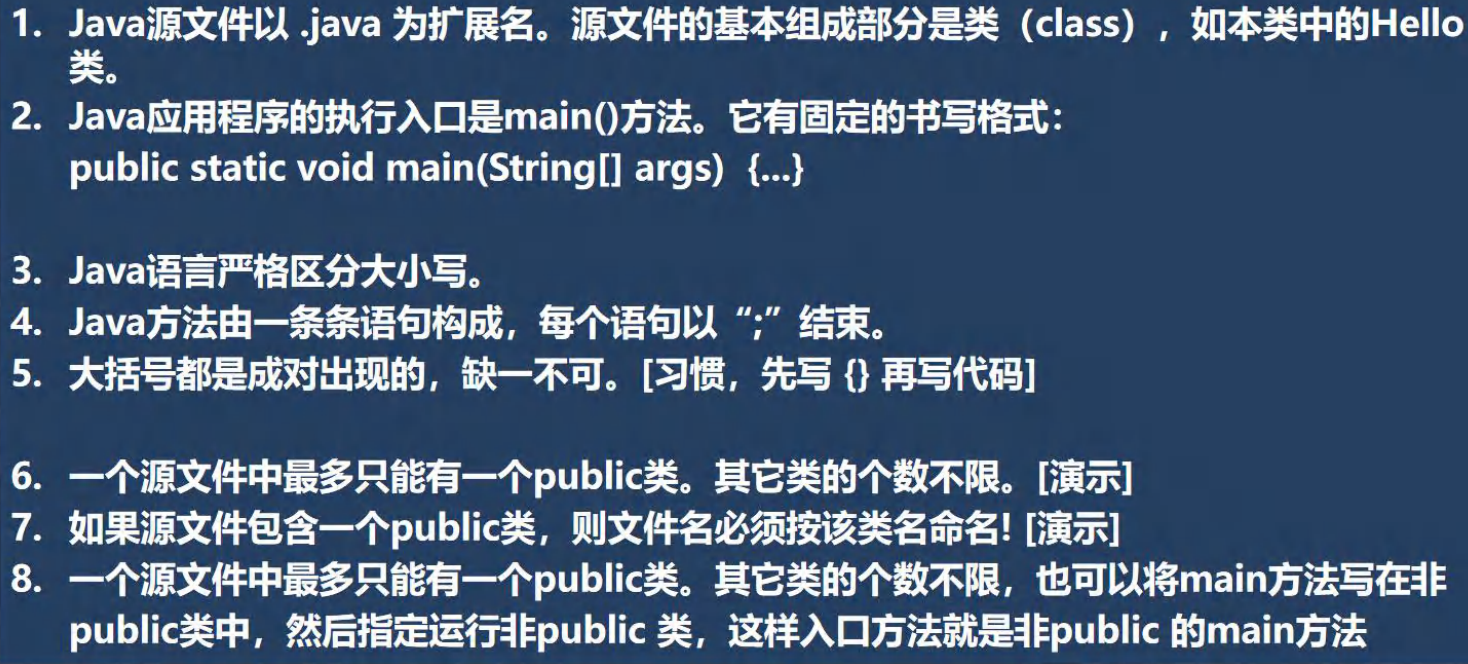
JRE 基本介绍
JRE(Java Runtime Environment Java 运行环境)
JRE = JVM + Java 的核心类库[类]
包括 Java 虚拟机(JVM Java Virtual Machine)和 Java 程序所需的核心类库等,如果想要运行一个开发好的 Java 程序, 计算机中只需要安装 JRE 即可。
JDK、JRE 和 JVM 的包含关系
JDK = JRE + 开发工具集 (例如 Javac,java 编译工具等)
JRE = JVM + Java SE 标准类库 (java 核心类库)
如果只想运行开发好的 .class 文件 只需要 JRE
转义字符 \t :一个制表位,实现对齐的功能
\n :换行符
\\:一个\
\" :一个”
\' :一个’
\r :一个回车
注释 Java 中的注释类型
单行注释 //
多行注释 /* */
文档注释 /** */
被注释的文字,不会被 JVM(java 虚拟机)解释执行
多行注释里面不允许有多行注释嵌套
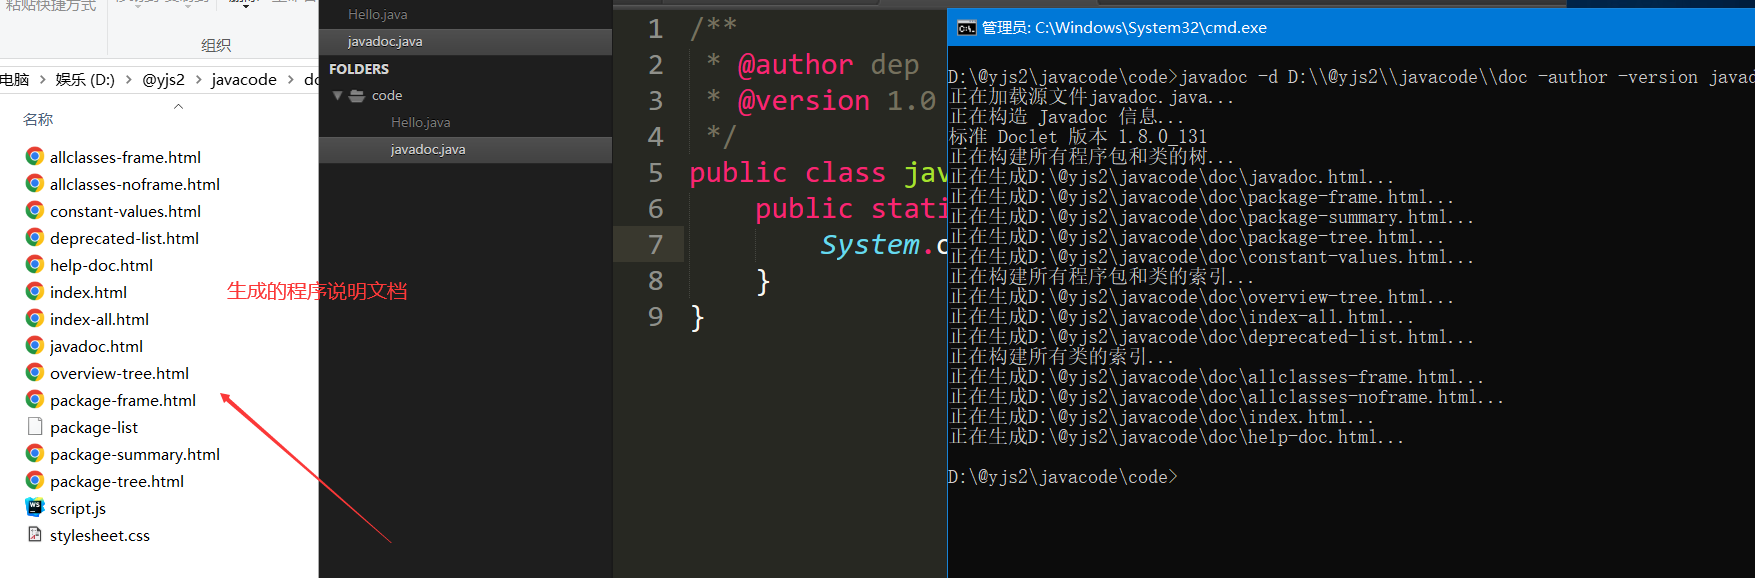
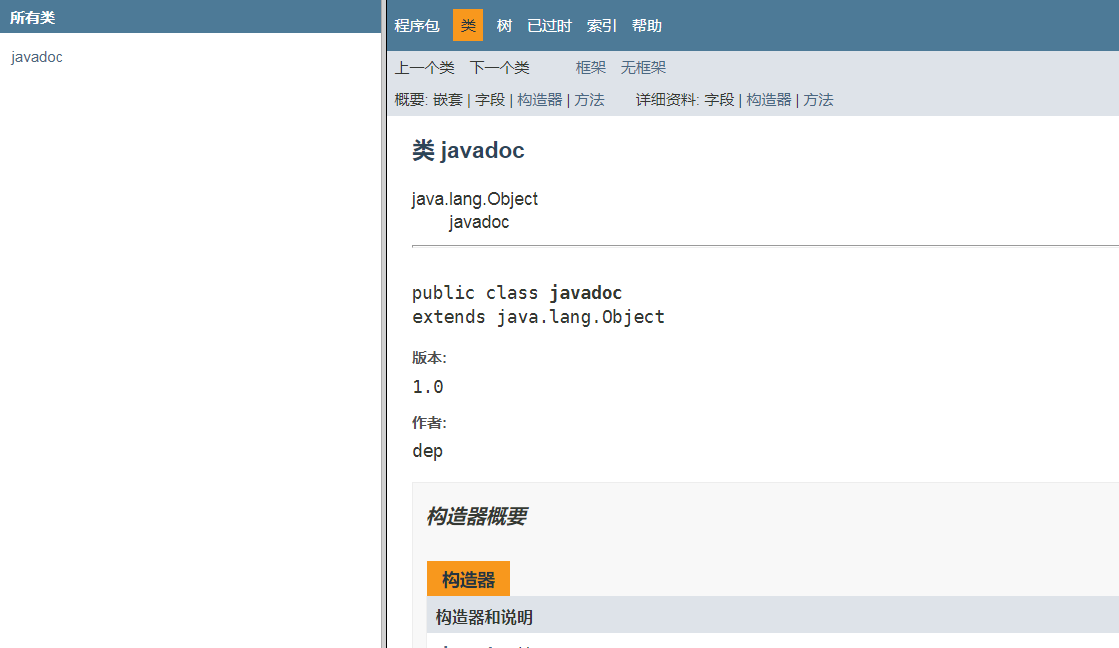
文档注释:
生成程序的说明文档,
1
2
javadoc -d 输出目录 -author -version (要输出的信息) java文件
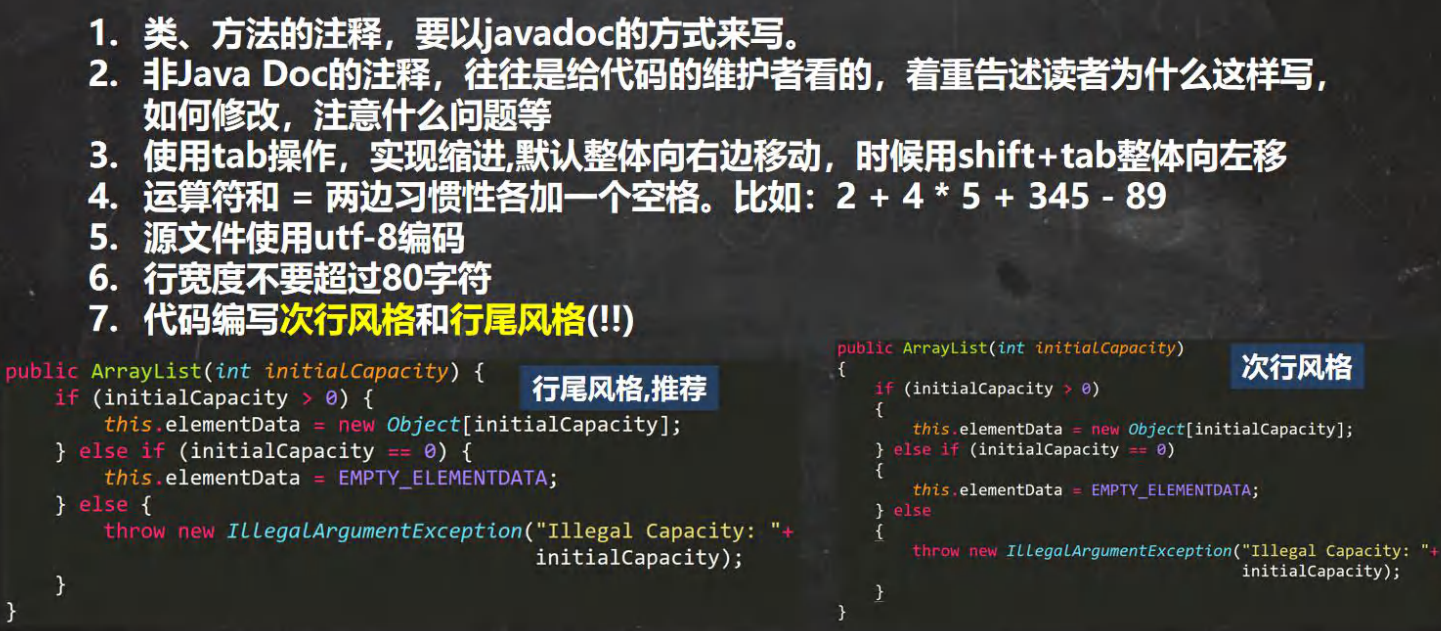
代码规范 两种风格都可以
DOS 命令
常用的 dos 命令
查看当前目录是有什么内容 dir
dir
dir d:\abc2\test200
切换到其他盘下:盘符号 cd : change directory
案例演示:切换到 c 盘
cd /D c:
切换到当前盘的其他目录下 (使用相对路径和绝对路径演示), ..\表示上一级目录
案例演示: cd d:\abc2\test200 cd ....\abc2\test200
切换到上一级:
案例演示: cd ..
切换到根目录:cd \
案例演示:cd \
查看指定的目录下所有的子级目录 tree
清屏 cls
退出 DOS exit
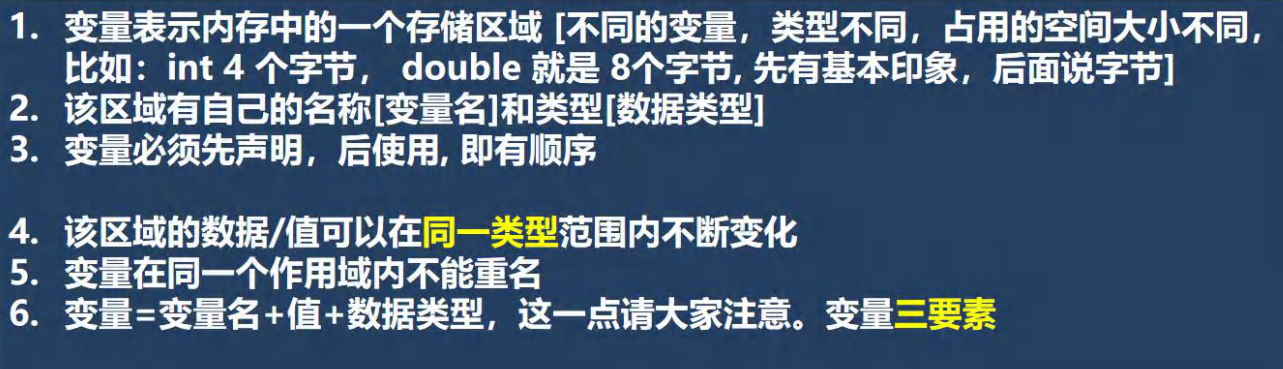
变量
+号的使用
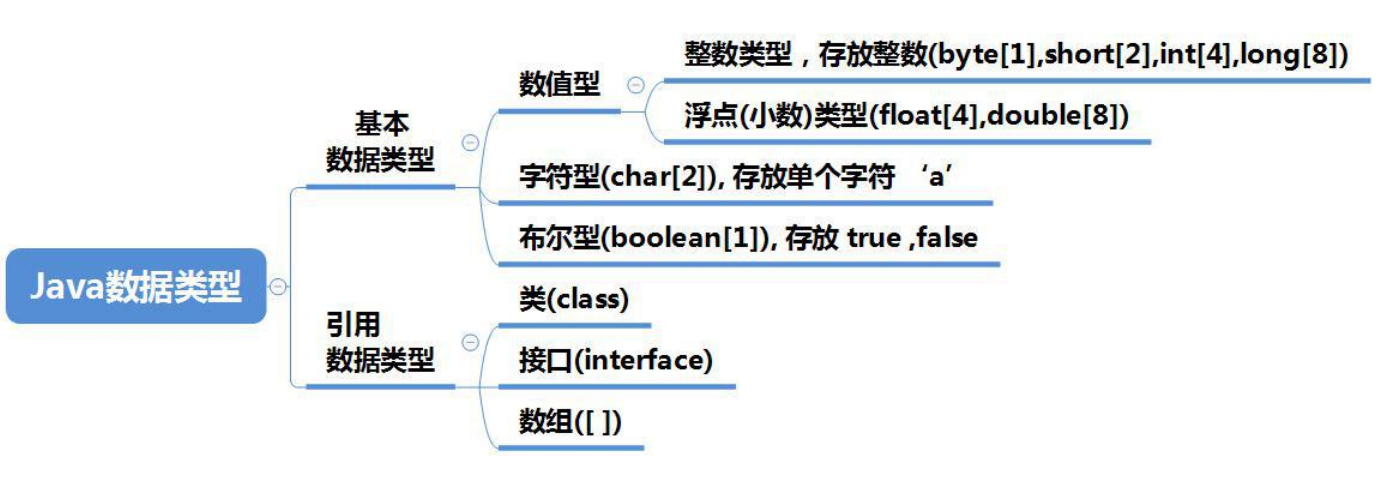
数据类型
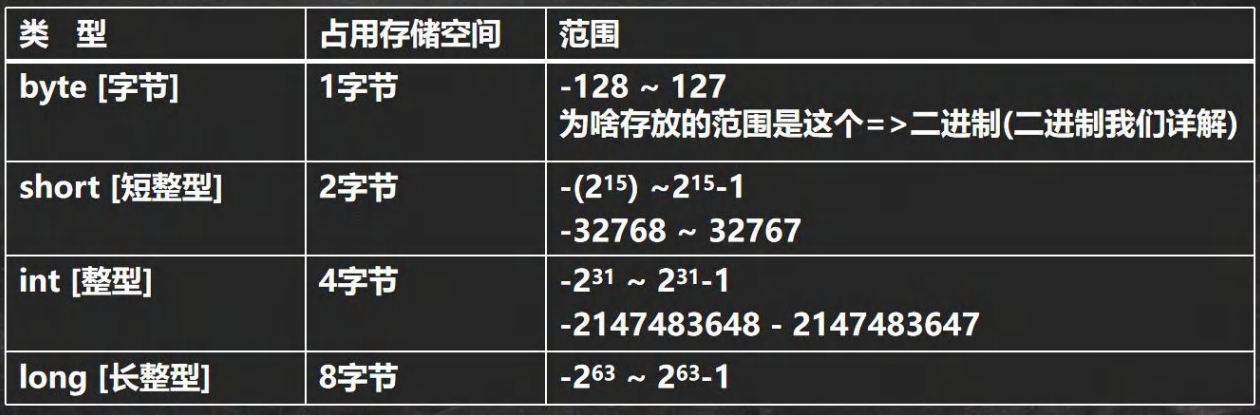
整数类型
整型的使用细节
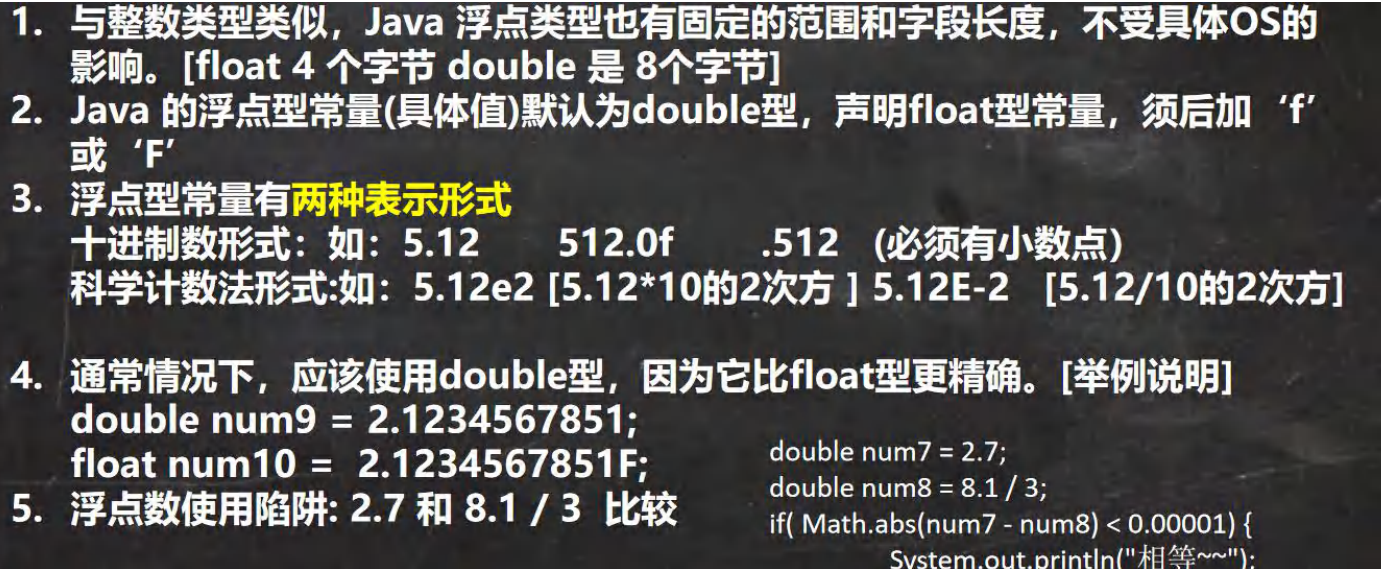
浮点类型
关于浮点数在机器中存放形式的简单说明,浮点数=符号位+指数位+尾数位
尾数部分可能丢失,造成精度损失(小数都是近似值)。
浮点型使用细节
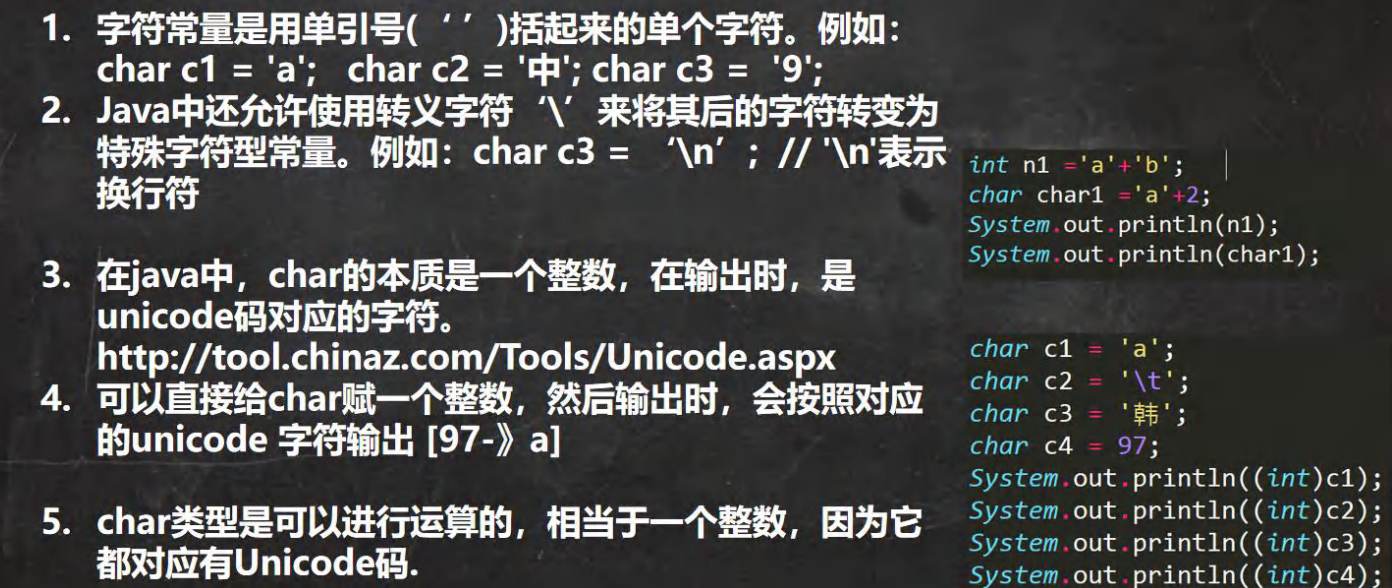
字符类型(char) 字符类型可以表示单个字符,字符类型是 char,char 是两个字节(可以存放汉字),多个字符我们用字符串 String
在 java 中,char 的本质是一个整数,在默认输出时,是 unicode 码对应的字符
1 2 3 4 5 6 7 8 9 10 11 12 13 14 char c1 = 97 ; char c2 = 'a' ; int )c2); 'a' + 10 );char c5 = 'b' + 1 ;int )c5);
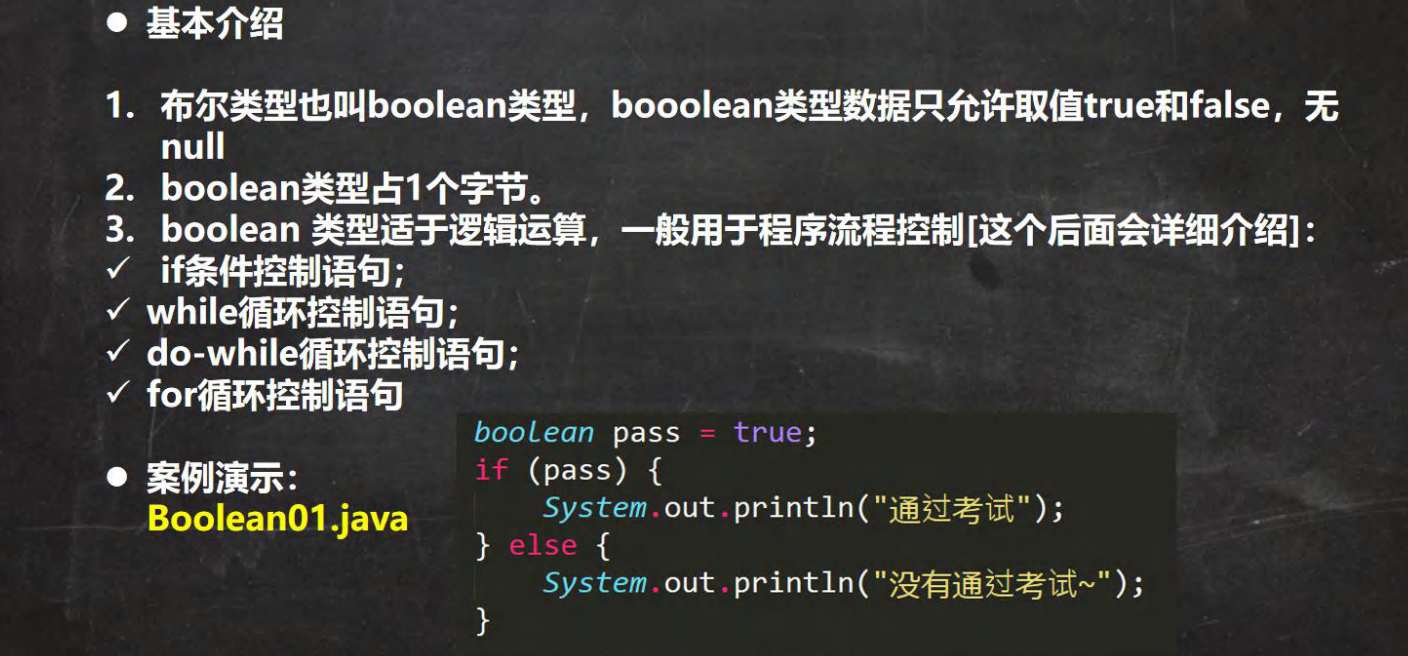
布尔类型:boolean
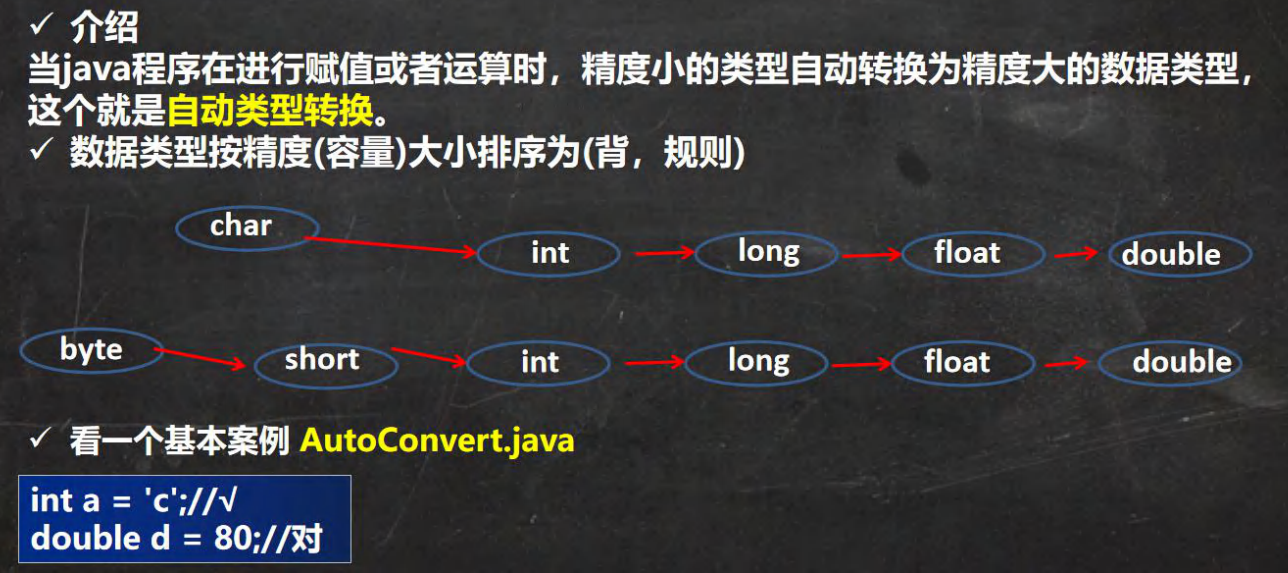
基本数据类型转换 自动类型转换
1 2 3 4 5 6 7 8 9 10 11 12 13 14 15 16 17 18 19 20 21 22 23 24 25 26 27 28 29 30 31 32 33 34 35 36 37 38 39 public class AutoConvertDetail {public static void main (String[] args) {int n1 = 10 ; double d1 = n1 + 1.1 ;float d1 = n1 + 1.1F ;byte b1 = 10 ; byte b2 = 1 ; byte b3 = 2 ; short s1 = 1 ; int s2 = b2 + s1;boolean pass = true ;
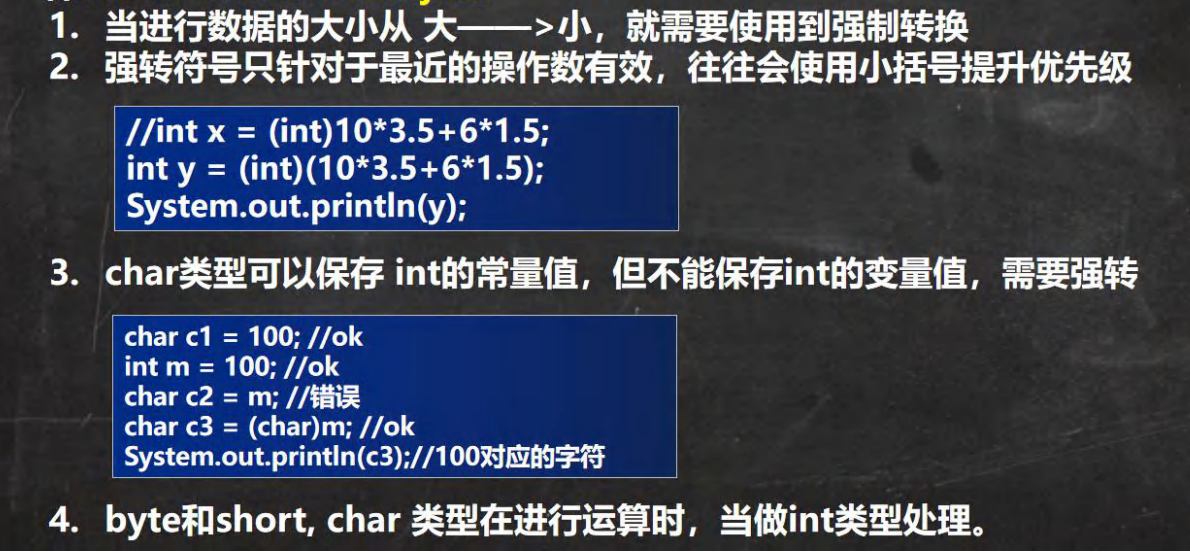
强制类型转换 自动类型转换的逆过程,将容量大的数据类型转换为容量小的数据类型 。使用时要加上强制转换符 ( ),但可能造成 精度降低或溢出 ,格外要注意。
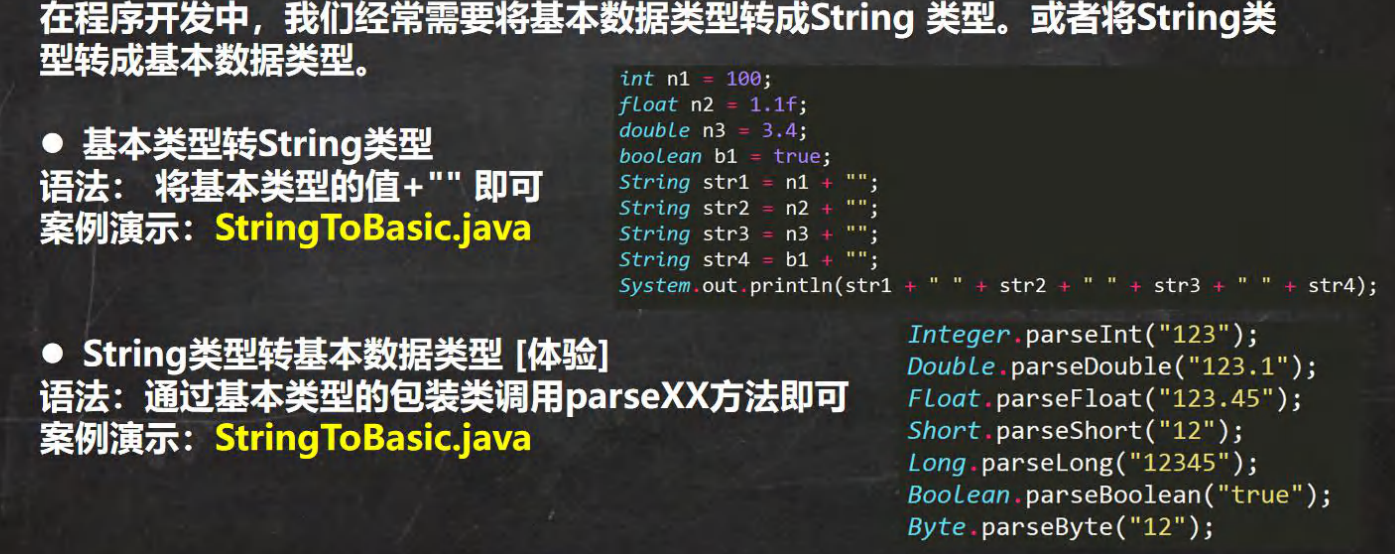
基本数据类型和 String 类型的转换
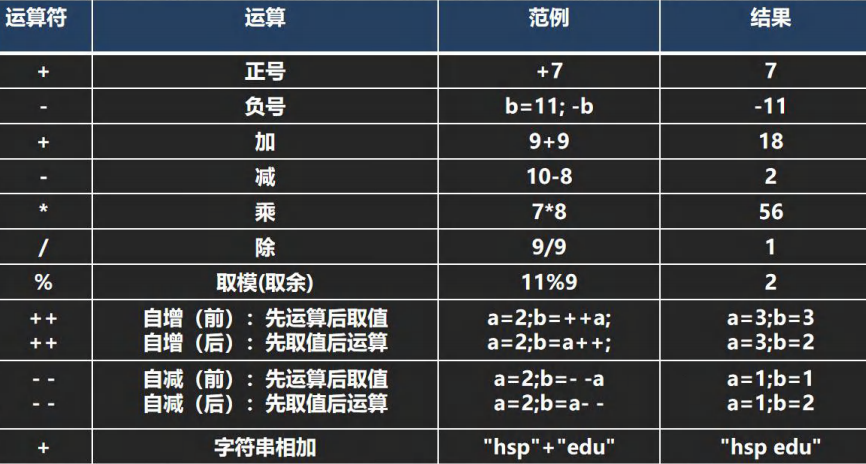
运算符 1) 算术运算符
1 2 3 4 5 6 7 8 9 10 11 12 13 14 15 16 17 18 19 20 21 22 23 24 25 26 27 28 29 30 31 32 33 34 35 36 37 38 39 public class ArithmeticOperator {public static void main (String[] args) {10 / 4 ); 10.0 / 4 ); double d = 10 / 4 ;10 % 3 ); 10 % 3 ); 10 % -3 ); 10 % -3 );int i = 10 ;int j = 8 ; int k = j++; "k=" + k + "j=" + j);
2) 赋值运算符
运算顺序从右往左
int num = a + b + c;
赋值运算符的左边 只能是变量,右边 可以是变量、表达式、常量值
int num = 20; int num2= 78 * 34 - 10; int num3 = a;
复合赋值运算符等价于下面的效果
比如:a+=3;等价于 a=a+3; 其他类推
复合赋值运算符会进行类型转换。
byte b = 2; b+=3; b++;
1 2 3 4 byte b = 3 ;2 ;
3) 关系运算符 [比较运算符]
关系运算符的结果都是 boolean 型,也就是要么是 true,要么是 false
关系表达式 经常用在 if 结构的条件中或循环结构的条件中
4) 逻辑运算符
用于连接多个条件(多个关系表达式),最终的结果也是一个 boolean 值。
逻辑运算规则:
a&b : & 叫逻辑与:规则:当 a 和 b 同时为 true ,则结果为 true, 否则为 false
a&&b : && 叫短路与:规则:当 a 和 b 同时为 true ,则结果为 true,否则为 false
a|b : | 叫逻辑或,规则:当 a 和 b ,有一个为 true ,则结果为 true,否则为 false
a||b : || 叫短路或,规则:当 a 和 b ,有一个为 true ,则结果为 true,否则为 false
!a : 叫取反,或者非运算。当 a 为 true, 则结果为 false, 当 a 为 false 是,结果为 true
a^b: 叫逻辑异或,当 a 和 b 不同时,则结果为 true, 否则为 false
&和&&的区别
&&短路与:如果第一个条件为 false,则第二个条件不会判断,最终结果为 false,效率高
& 逻辑与:不管第一个条件是否为 false,第二个条件都要判断,效率低
开发中, 我们使用的基本是使用短路与&&, 效率高
|| 和 | 使用区别
||短路或:如果第一个条件为 true,则第二个条件不会判断,最终结果为 true,效率高
| 逻辑或:不管第一个条件是否为 true,第二个条件都要判断,效率低
开发中,我们基本使用 ||
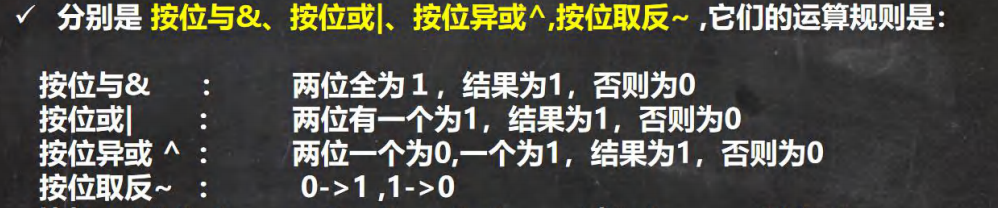
5) 位运算符 [需要二进制基础] 点击进入二进制
java 中有 7 个位运算(&、|、^、~、>>、<<和 >>>)
算术右移 >>:低位溢出,符号位不变,并用符号位补溢出的高位
算术左移 <<: 符号位不变,低位补 0
逻辑右移也叫无符号右移,运算规则是: 低位溢出,高位补 0
特别说明:没有 <<< 符号
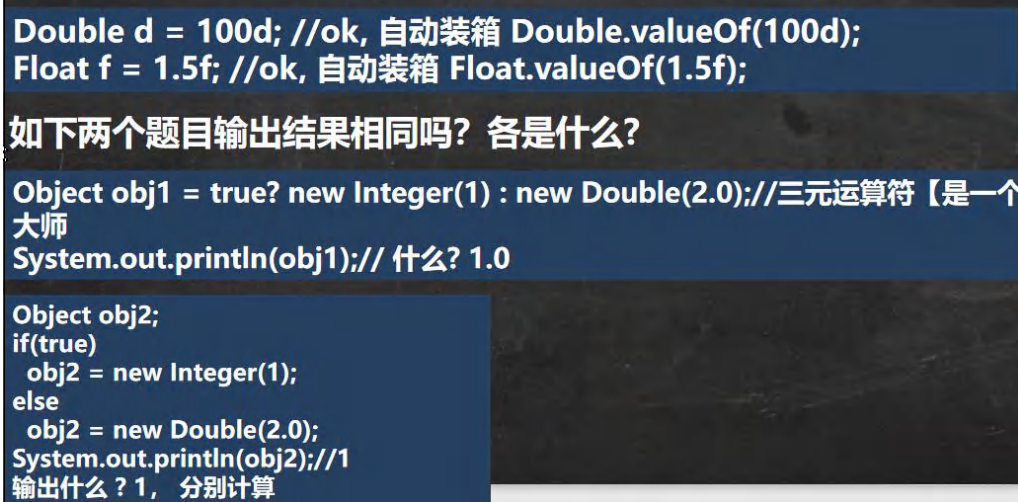
6) 三元运算符 条件表达式 ? 表达式 1: 表达式 2;
运算规则:
如果条件表达式为 true,运算后的结果是表达式 1;
如果条件表达式为 false,运算后的结果是表达式 2;
1 2 3 4 5 6 int a = 3 ;int b = 8 ;int c = a > b ? (int )1.1 : (int )3.4 ;double d = a > b ? a : b + 3 ;
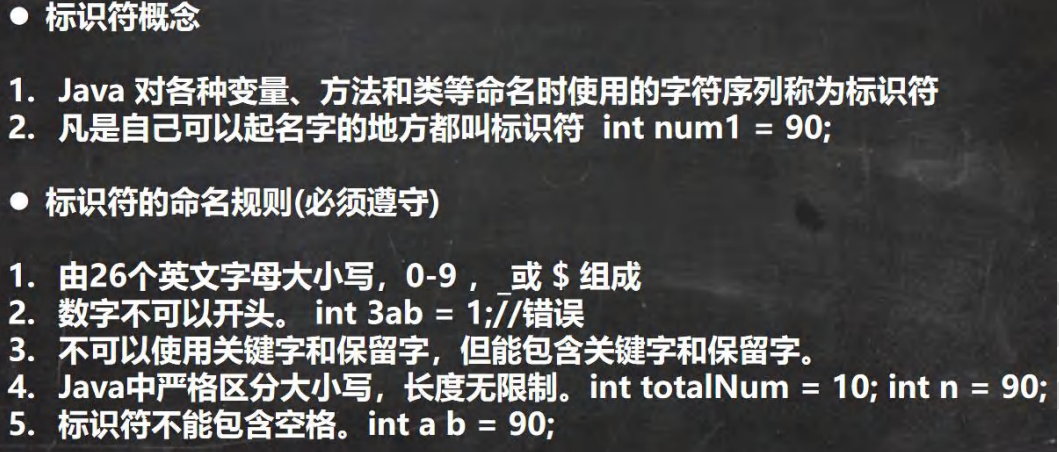
标识符的命名规则和规范
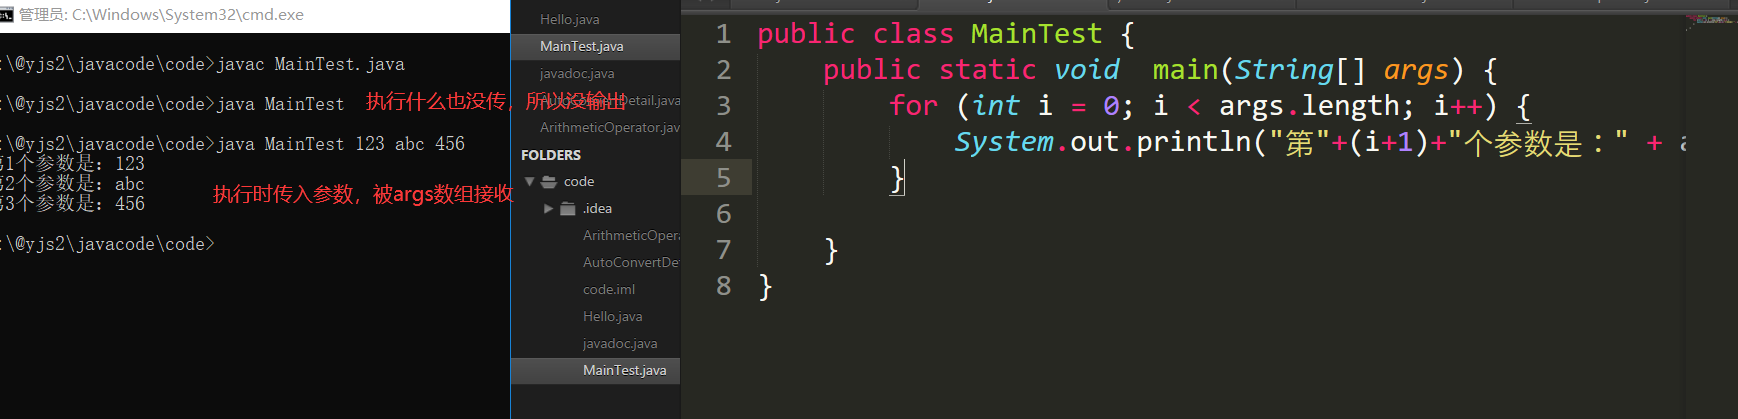
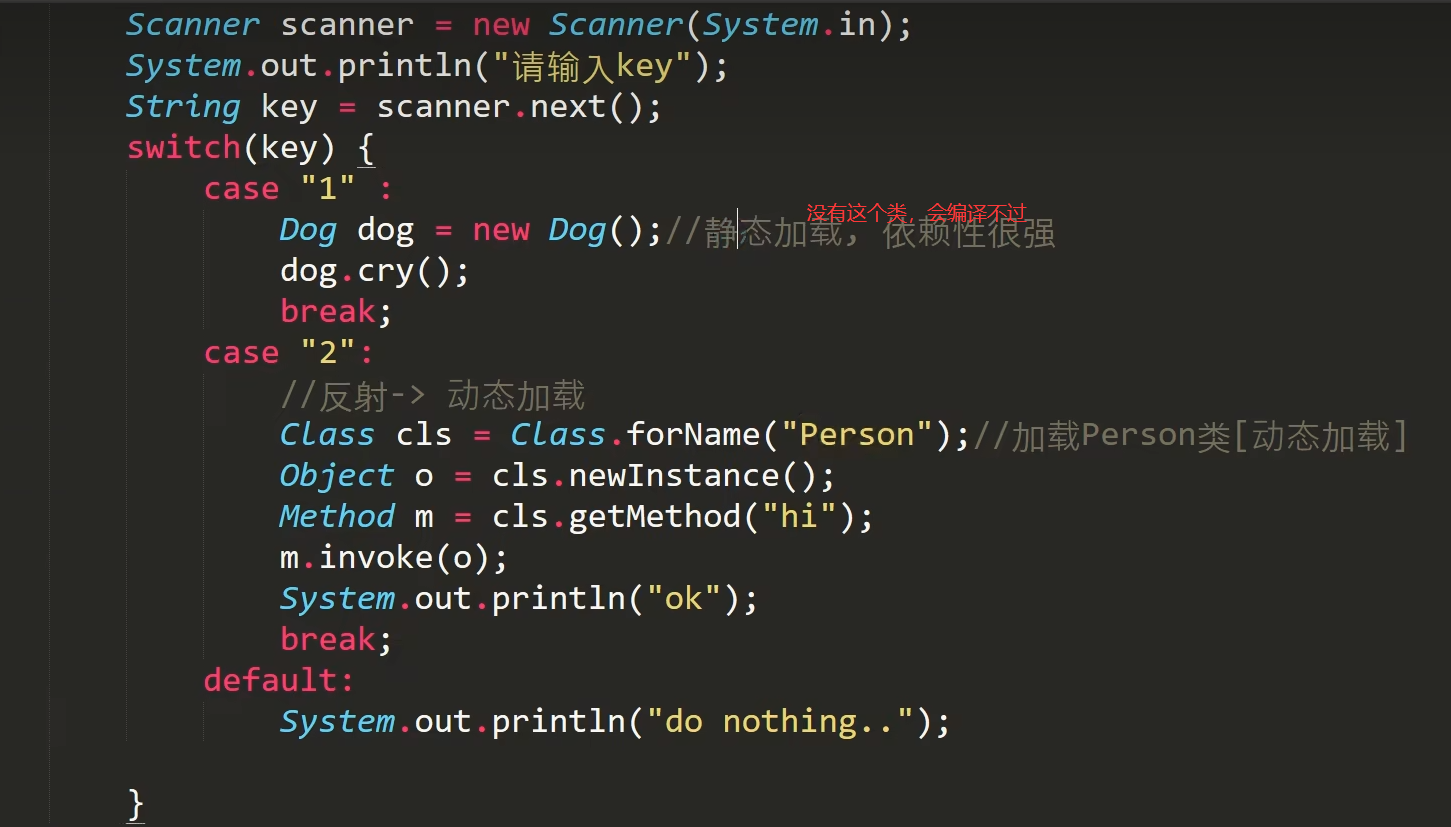
键盘输入语句 在编程中,需要接收用户输入的数据,就可以使用键盘输入语句来获取。Input.java , 需要一个 扫描器(对象), 就是 Scanner
1
2
3
4
5
6
7
8
9
10
11
12
13
14
15
16
public static void main (String[] args) {Scanner myScanner = new Scanner (System.in);"请输入姓名" );String name = myScanner.next(); "请输入年龄" );Integer age = myScanner.nextInt(); "请输入工资" );Double salary = myScanner.nextDouble(); "姓名:" + name + ", 年龄:" + age + ", 工资:" + salary);
进制 对于整数,有四种表示方式:
二进制:0,1 ,满 2 进 1.以 0b 或 0B 开头。
十进制:0-9 ,满 10 进 1。
八进制:0-7 ,满 8 进 1. 以数字 0 开头表示。
十六进制:0-9 及 A(10)-F(15),满 16 进 1. 以 0x 或 0X 开头表示。此处的 A-F 不区分大小写。
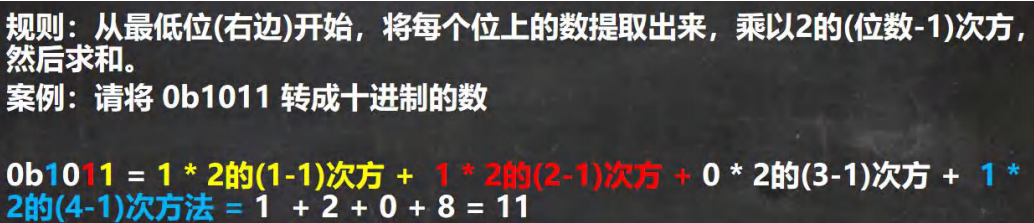
进制的转换 二进制转换成十进制
八进制转换成十进制
十六进制转换成十进制 规则:从最低位(右边)开始,将每个位上的数提取出来,乘以 16 的(位数-1)次方,然后求和。
案例:请将 0x23A 转成十进制的数
0x23A = 10 * 16^0 + 3 * 16 ^ 1 + 2 * 16^2 = 10 + 48 + 512 = 570
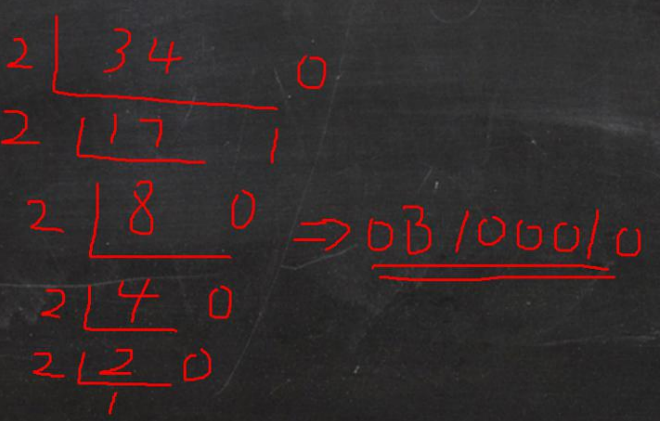
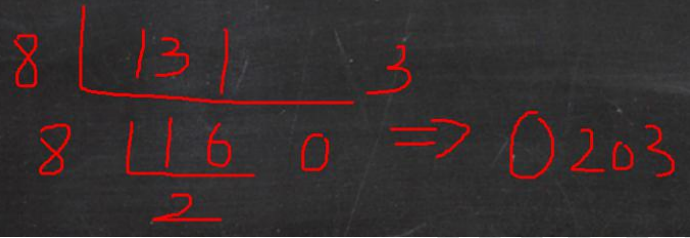
十进制转换成二进制 规则:将该数不断除以 2,直到商为 0 为止,然后将每步得到的余数倒过来,就是对应的二进制。
案例:请将 34 转成二进制 = 0B00100010
十进制转换成八进制 规则:将该数不断除以 8,直到商为 0 为止,然后将每步得到的余数倒过来,就是对应的八进制。
案例:请将 131 转成八进制 => 0203
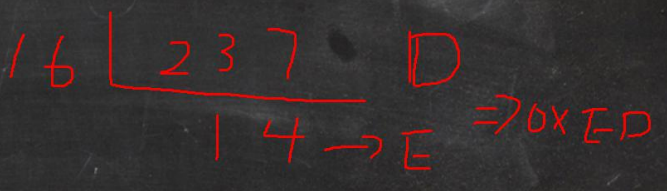
十进制转换成十六进制 规则:将该数不断除以 16,直到商为 0 为止,然后将每步得到的余数倒过来,就是对应的十六进制。
案例:请将 237 转成十六进制 => 0xED
二进制转换成八进制 规则:从低位开始,将二进制数每三位一组,转成对应的八进制数即可。
案例:请将 ob11010101 转成八进制 ob11(3)010(2)101(5) => 0325
二进制转换成十六进制 规则:从低位开始,将二进制数每四位一组,转成对应的十六进制数即可。
案例:请将 ob11010101 转成十六进制 ob1101(D)0101(5) = 0xD5
八进制转换成二进制 规则:将八进制数每 1 位,转成对应的一个 3 位的二进制数即可。
案例:请将 0237 转成二进制 02(010)3(011)7(111) = 0b10011111
十六进制转换成二进制 规则:将十六进制数每 1 位,转成对应的 4 位的一个二进制数即可。
案例:请将 0x23B 转成二进制 0x2(0010)3(0011)B(1011) = 0b001000111011
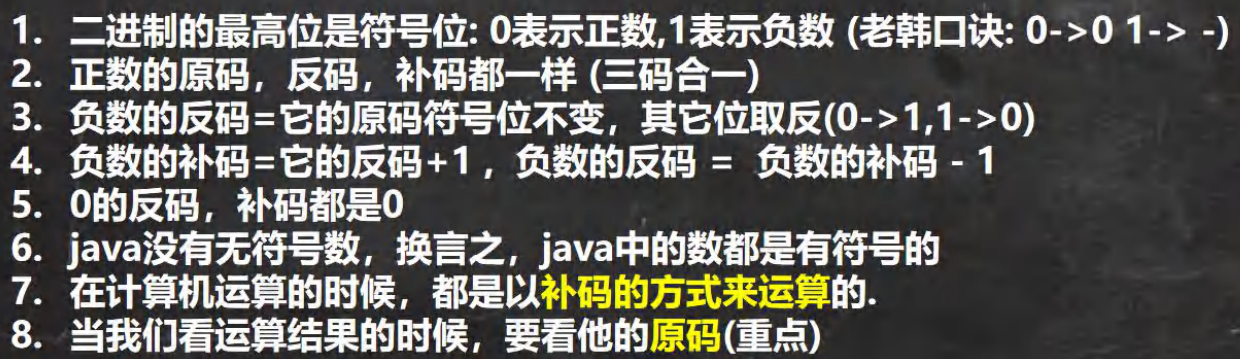
原码、反码、补码
数组
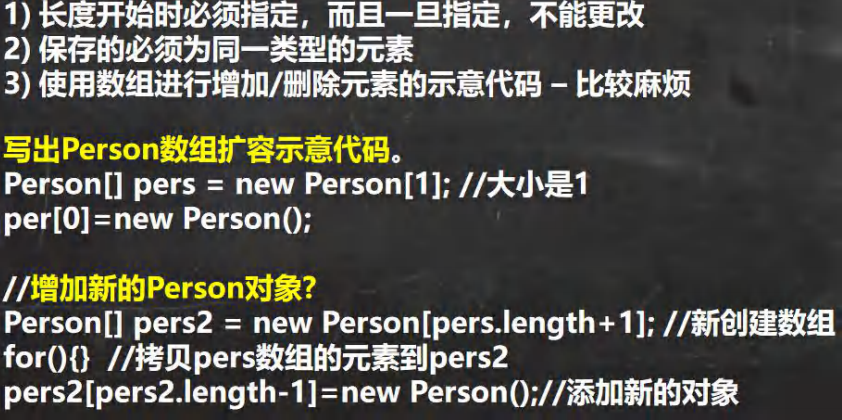
数组是多个相同类型数据的组合,实现对这些数据的统一管理
数组中的元素可以是任何数据类型,包括基本类型和引用类型,但是不能混用。
数组创建后,如果没有赋值,有默认值
int 0,short 0, byte 0, long 0, float 0.0,double 0.0,char \u0000,boolean false,String null
使用数组的步骤 1. 声明数组并开辟空间 2 给数组各个元素赋值 3 使用数组
数组的下标是从 0 开始的 。
数组下标必须在指定范围内使用,否则报:下标越界异常
数组属引用类型,数组型数据是对象(object)
1
2
3
4
5
6
7
8
9
10
11
12
13
14
15
16
17
18
19
20
21
22
23
24
25
26
27
28
29
30
31
32
package com.ep;import java.util.Scanner;public class Array1 {public static void main (String[] args) {double scores[]; new double [5 ]; Scanner myScanner = new Scanner (System.in);for ( int i = 0 ; i < scores.length; i++) {"请输入第" + (i+1 ) +"个元素的值" );"==数组的元素/值的情况如下:===" );for ( int i = 0 ; i < scores.length; i++) {"第" + (i+1 ) +"个元素的值=" + scores[i]);int [] arr = {1 ,2 ,3 ,4 ,5 };
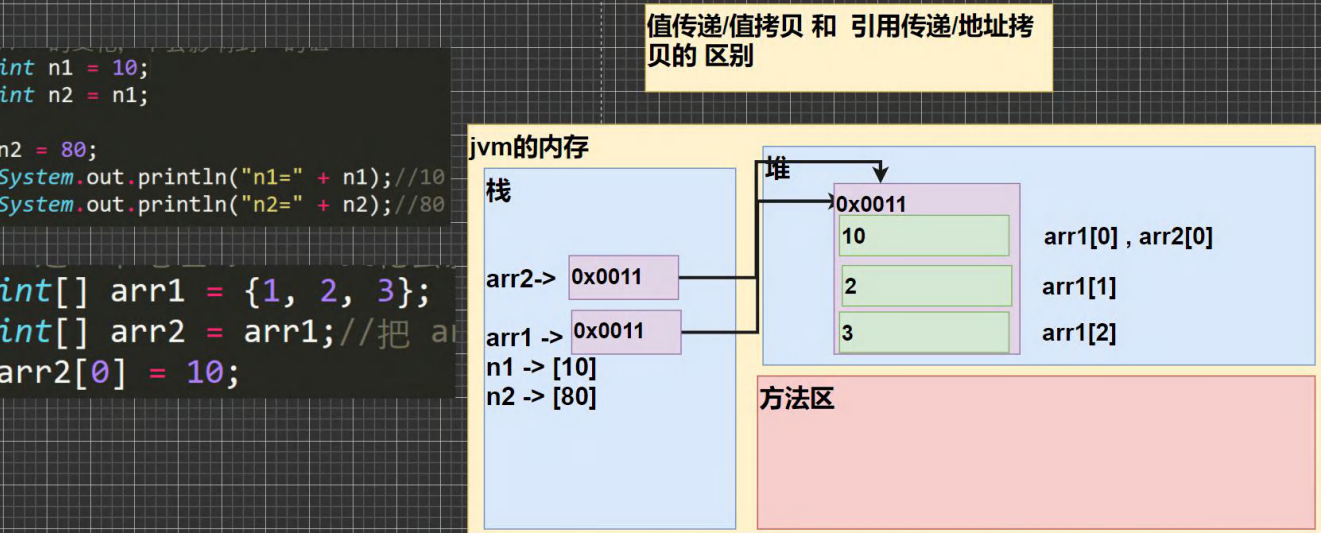
数组赋值机制
基本数据类型赋值,这个值就是具体的数据,而且相互不影响。
int n1 = 2; int n2 = n1;
数组在默认情况下是引用传递,赋的值是地址。
看一个案例,并分析数组赋值的内存图(重点, 难点. )。
//代码 ArrayAssign.java
int[] arr1 = {1,2,3};
int[] arr2 = arr1;
二维数组 1 2 3 int arr[][] = new int [2 ][3 ]; int [][] arr = new int [3 ][]; int [][] arr = {{1 ,1 ,1 }, {8 ,8 ,9 }, {100 }};
类和对象 区别:
类是抽象的,概念的,代表一类事物,比如人类,猫类.., 即它是数据类型.
对象是具体的,实际的,代表一个具体事物, 即 是实例.
类是对象的模板,对象是类的一个个体,对应一个实例
中级部分 IDEA常用快捷键
删除当前行, 默认是 ctrl + Y 自己配置 ctrl + d
复制当前行, 自己配置 ctrl + alt + 向下光标
补全代码 alt + /
添加注释和取消注释 ctrl + / 【第一次是添加注释,第二次是取消注释】
导入该行需要的类 先配置 auto import , 然后使用 alt+enter 即可
快速格式化代码 ctrl + alt + L
快速运行程序 自己定义 alt + R
生成构造器等 alt + insert [提高开发效率]
查看一个类的层级关系 ctrl + H [学习继承后,非常有用]
将光标放在一个方法上,输入 ctrl + B , 可以定位到方法 [学继承后,非常有用]
自动的分配变量名 , 通过 在后面假 .var [老师最喜欢的]
还有很多其它的快捷键…
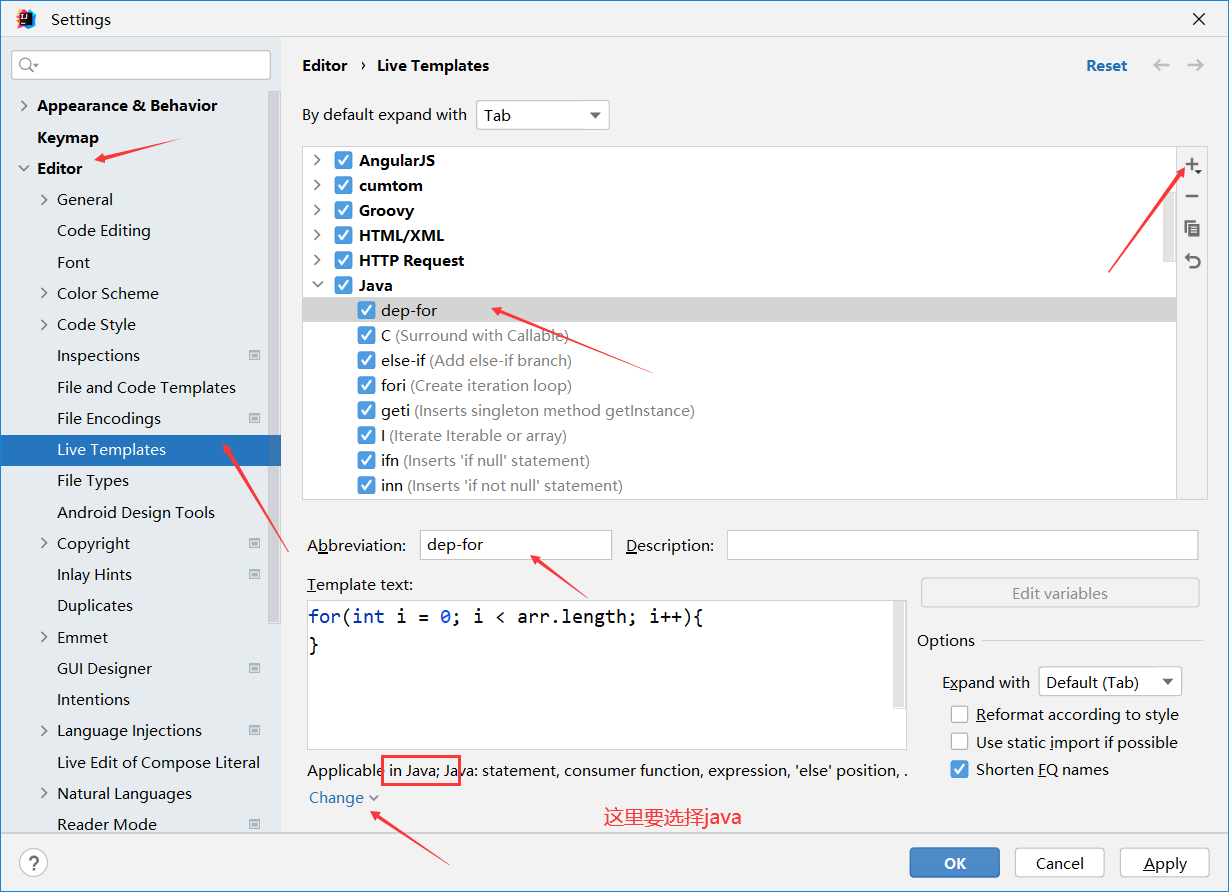
自定义模板 File -> settings -> editor -> live templates ->
常用的包
java.lang.* //lang 包是基本包,默认引入,不需要再引入.
java.util.* //util 包,系统提供的工具包, 工具类,使用 Scanner
java.net.* //网络包,网络开发
java.awt.* //是做 java 的界面开发,GUI
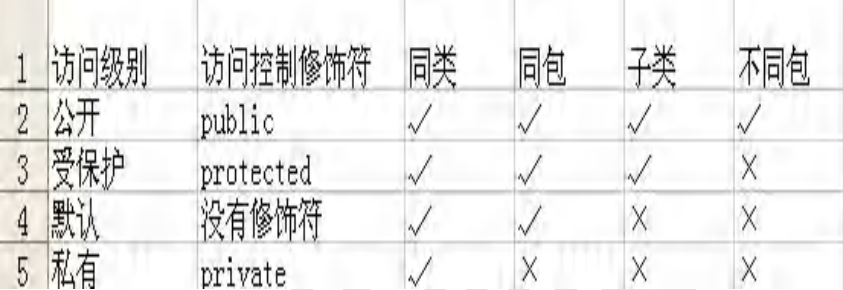
访问修饰符 java 提供四种访问控制修饰符号,用于控制方法和属性(成员变量)的访问权限(范围):
公开级别:用 public 修饰,对外公开
受保护级别:用 protected 修饰,对子类和同一个包中的类公开
默认级别:没有修饰符号,向同一个包的类公开.
私有级别:用 private 修饰,只有类本身可以访问,不对外公开
继承
子类继承了所有的属性和方法,非私有的属性和方法可以在子类直接访问, 但是私有属性和方法不能在子类直接访 问,要通过父类提供公共的方法去访问
子类必须调用父类的构造器, 完成父类的初始化 (子类无参构造函数默认会调用super()方法,所以就调用了父类的无参构造方法)
当创建子类对象时,不管使用子类的哪个构造器,默认情况下总会去调用父类的无参构造器,如果父类没有提供无 参构造器,则必须在子类的构造器中用 super 去指定使用父类的哪个构造器完成对父类的初始化工作,否则,编译不会通过(怎么理解。) [举例说明]
如果希望指定去调用父类的某个构造器,则显式的调用一下 : super(参数列表)
super 在使用时,必须放在构造器第一行(super 只能在构造器中使用 )
super() 和 this() 都只能放在构造器第一行,因此这两个方法不能共存在一个构造器
java 所有类都是 Object 类的子类, Object 是所有类的基类.
父类构造器的调用不限于直接父类!将一直往上追溯直到 Object 类(顶级父类)
子类最多只能继承一个父类(指直接继承),即 java 中是单继承机制。
思考:如何让 A 类继承 B 类和 C 类? 【A 继承 B, B 继承 C】
不能滥用继承,子类和父类之间必须满足 is-a 的逻辑关系
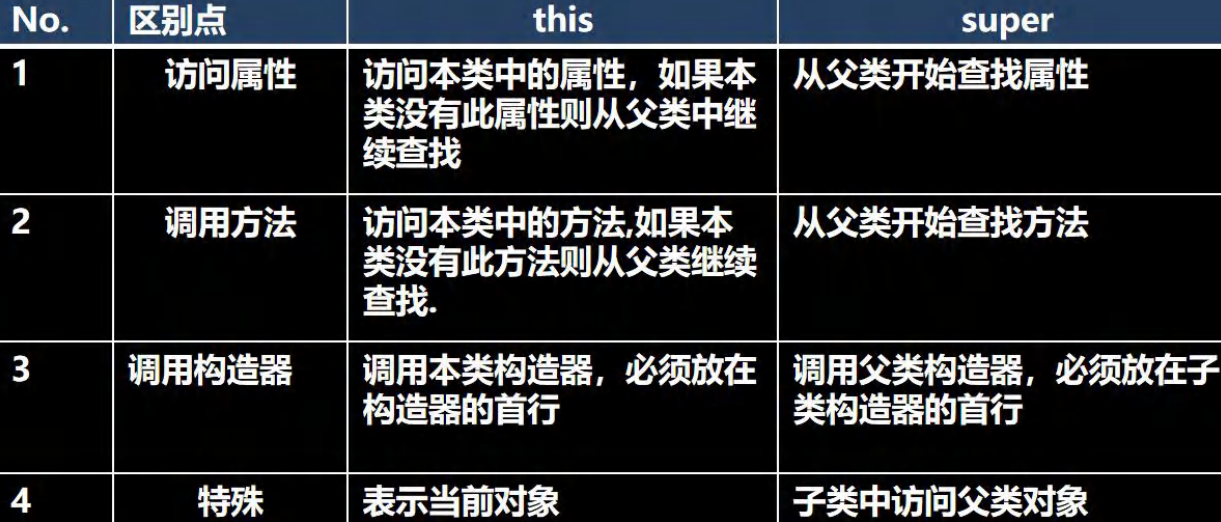
super 关键字
super和this的比较
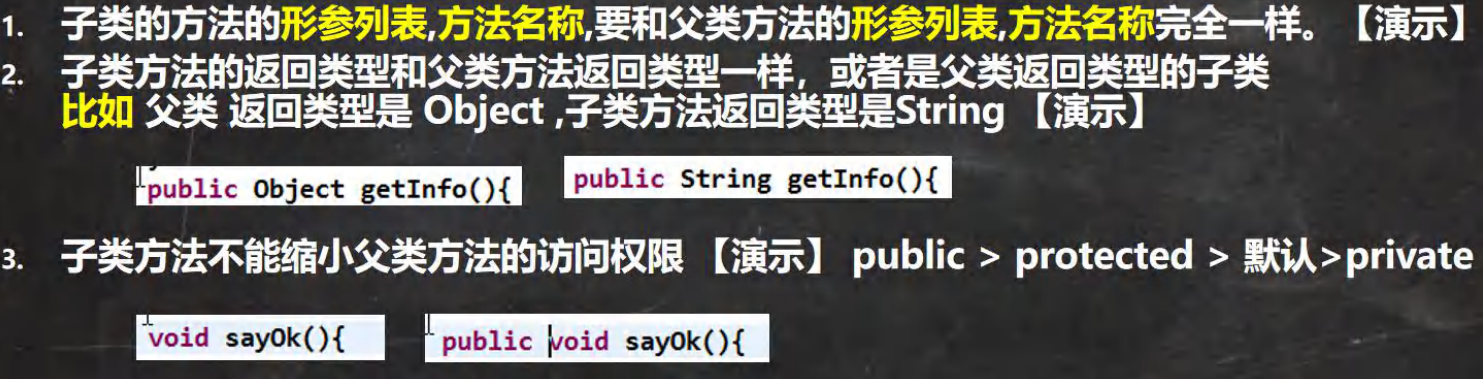
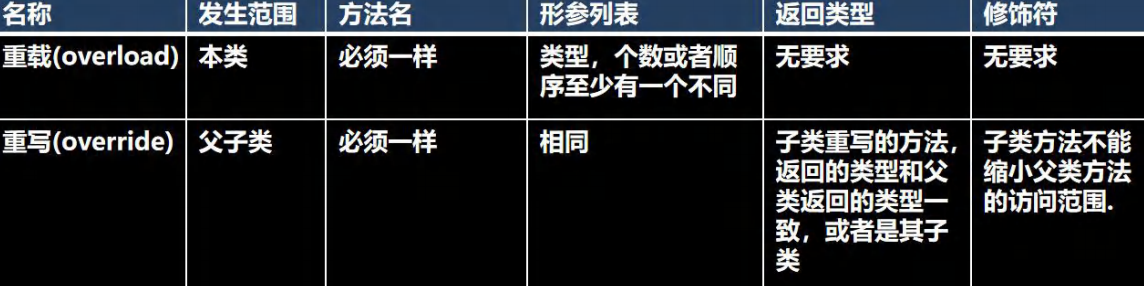
重写
重写和重载
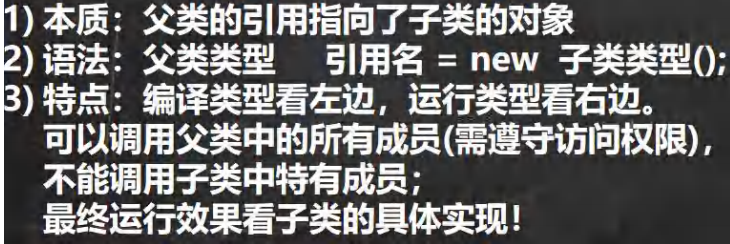
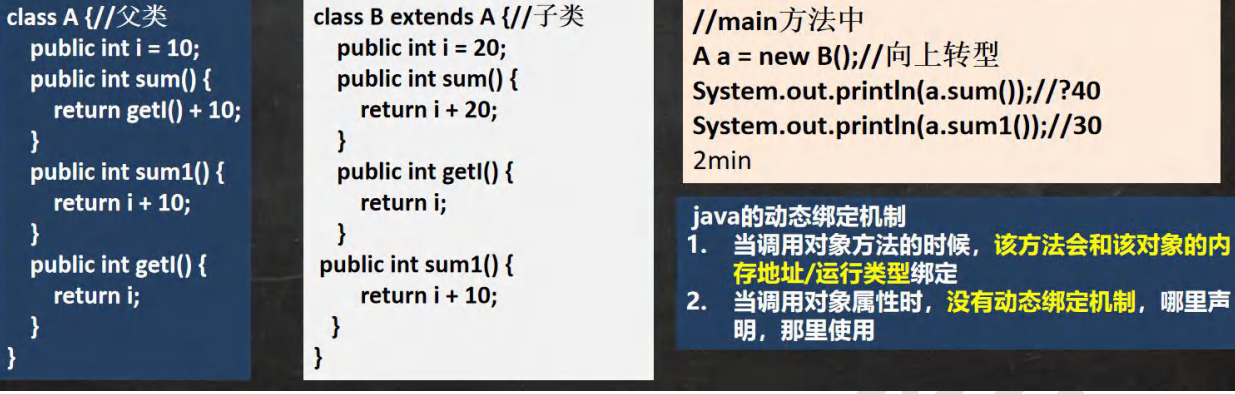
多态 多态的前提是 :两个对象(类)存在继承关系
多态的向上转型
多态向下转型
1 2 3 4 5 6 7 8 9 10 11 12 13 14 15 16 17 18 19 20 21 22 23 24 25 26 27 28 29 30 31 32 33 34 35 36 37 38 39 40 41 42 43 44 45 46 47 48 49 50 51 52 53 54 package com.ep;public class DuoTai {public static void main (String[] args) {Animal animal = new Cat ();Object object = new Cat (); Cat cat = (Cat)animal;class Animal {String name = "动物" ;int age = 10 ;public void sleep () {"睡" );public void eat () {"吃" );class Cat extends Animal {@Override public void eat () {"猫吃鱼" );public void eatMOuse () {"吃老鼠" );class Dog extends Animal {@Override public void eat () {"狗吃肉" );public void eatBone () {"吃骨头" );
instanceOf 比较操作符,用于判断对象的运行类型是否为 XX 类型或 XX 类型的子类型
1 2 3 4 5 6 7 8 9 10 11 12 13 14 15 16 17 18 19 20 21 22 23 24 25 26 27 28 29 package com.ep;public class InstanceofTest {public static void main (String[] args) {Zi zi = new Zi ();instanceof Zi); instanceof Fu); Fu fu = new Zi ();instanceof Zi); instanceof Fu); Object obj = new Object ();instanceof Fu); String str = "hello" ;instanceof Object); class Fu { class Zi extends Fu {
动态绑定机制
多态数组 1 2 3 4 5 6 7 8 9 10 11 12 13 14 15 16 17 18 19 20 21 22 23 24 25 26 package com.ep.polyArray;public class PolyArray {public static void main (String[] args) {new Person [5 ];0 ] = new Person ("jack" , 20 );1 ] = new Student ("mary" , 18 , 100.0 );2 ] = new Student ("smith" , 19 , 30.1 );3 ] = new Teacher ("scott" , 30 , 20000.0 );4 ] = new Teacher ("king" , 50 , 25000.0 );for (int i = 0 ; i < persons.length; i++) {if (persons[i] instanceof Student) {Student student = (Student) persons[i];else if (persons[i] instanceof Teacher){Teacher teacher = (Teacher) persons[i];
多态参数 1 2 3 4 5 6 7 8 9 10 11 12 13 14 15 16 17 18 19 20 21 22 23 24 25 26 27 package com.ep.polyParameter;public class PolyPrarmeter {public static void main (String[] args) {Worker tom = new Worker ("tom" , 1 );Manager milan = new Manager ("milan" , 2 , 10 );PolyPrarmeter polyPrarmeter = new PolyPrarmeter ();public void showEmpAnnual (Employee e) {public void testWork (Employee e) {if (e instanceof Worker){else if (e instanceof Manager) {
Object类
alt + 7 打开Structure窗口
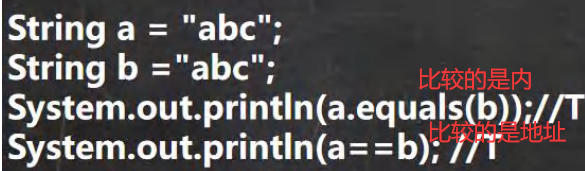
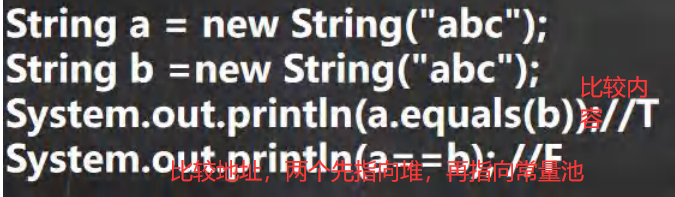
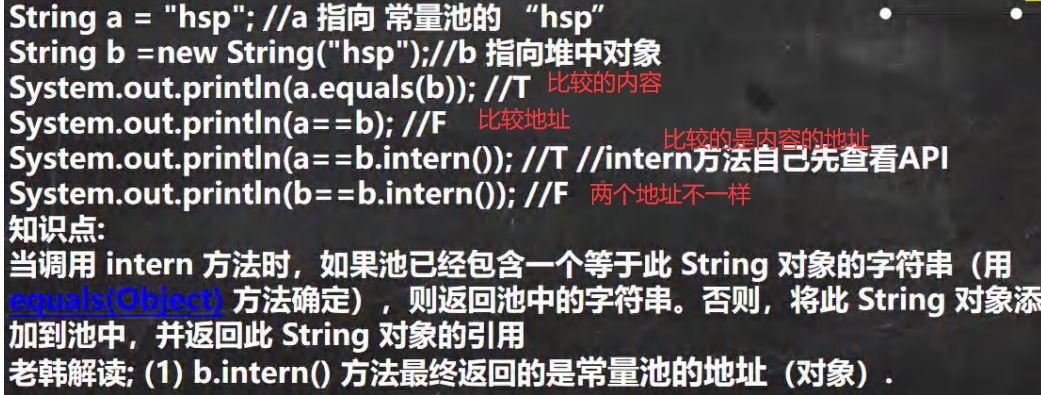
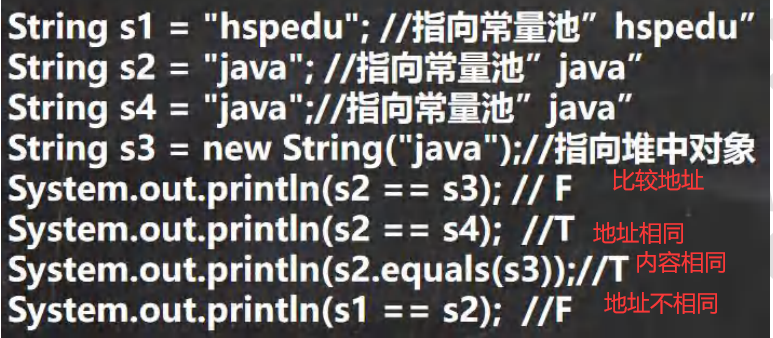
equals ==和 equals 的对比
1 2 3 4 5 6 7 8 9 10 11 12 13 14 15 16 17 18 19 20 21 22 23 24 25 26 27 28 29 30 31 32 33 34 35 36 37 38 39 40 41 42 43 44 45 46 47 48 49 50 51 52 53 54 55 56 57 58 59 60 61 62 63 64 65 66 67 68 69 70 71 72 73 74 75 76 77 78 79 80 81 package com.ep.object;public class Equals {public static void main (String[] args) {A a = new A ();A b = a;A c = a;int num1 = 10 ;int num2 = 10 ;"hello" .equals("abc" );new Integer (5 ).equals(5 );" ==============================" );Integer integer1 = new Integer (1000 );Integer integer2 = new Integer (1000 );String str1 = new String ("abc" );String str2 = new String ("abc" );class A {
重写equals方法 1 2 3 4 5 6 7 8 9 10 11 12 13 14 15 16 17 18 19 20 21 22 23 24 25 26 27 28 29 30 31 32 33 34 35 36 37 38 39 40 41 42 43 44 45 46 47 48 49 50 51 52 53 54 55 56 57 58 59 60 61 62 63 64 65 package com.ep.object;public class OverrideEquals {public static void main (String[] args) {Person person = new Person ("jack" , 10 , "男" );Person person2 = new Person ("jack" , 10 , "男" );class Person {private String name;private Integer age;private String sex;@Override public boolean equals (Object obj) {if ( this == obj) {return true ;if (obj instanceof Person) { Person p = (Person) obj;return this .name.equals(p.name) && this .age == p.age && this .sex == p.sex;else {return false ;public Person (String name, Integer age, String sex) {this .name = name;this .age = age;this .sex = sex;public String getName () {return name;public void setName (String name) {this .name = name;public Integer getAge () {return age;public void setAge (Integer age) {this .age = age;public String getSex () {return sex;public void setSex (String sex) {this .sex = sex;
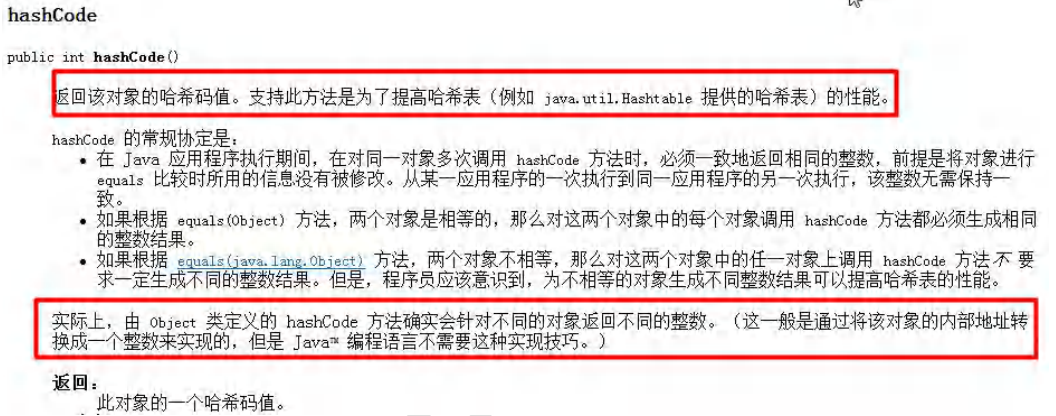
hashCode
提高具有哈希结构的容器的效率!
两个引用,如果指向的是同一个对象,则哈希值肯定是一样的!
两个引用,如果指向的是不同对象,则哈希值是不一样的
哈希值主要根据地址号来的!, 不能完全将哈希值等价于地址。
1 2 3 4 5 6 7 8 9 10 11 12 13 14 public class HashCodeTest {public static void main (String[] args) {AA aa1 = new AA ();AA aa2 = new AA ();AA aa3 = aa1;class AA {
toString
基本介绍
默认返回:全类名+@+哈希值的十六进制,【查看 Object 的 toString 方法】
子类往往重写 toString 方法,用于返回对象的属性信息
重写 toString 方法,打印对象或拼接对象时,都会自动调用该对象的 toString 形式.
当直接输出一个对象时,toString 方法会被默认的调用, 比如 System.out.println(monster); 就会默认调用 monster.toString()
1 2 3 4 5 6 7 8 9 10 11 12 13 14 15 16 17 18 19 20 21 22 23 24 25 26 27 28 29 30 31 32 33 34 35 36 37 38 39 package com.ep.object;public class ToStringTest {public static void main (String[] args) {Stu stu = new Stu ("张三" , 18 , 98 );" hashCode = " + stu.hashCode());class Stu {private String name;private Integer age;private double score;@Override public String toString () {return "Stu{" +"name='" + name + '\'' +", age=" + age +", score=" + score +'}' ;public Stu (String name, Integer age, double score) {this .name = name;this .age = age;this .score = score;
finalize
当对象被回收时,系统自动调用该对象的 finalize 方法。子类可以重写该方法,做一些释放资源的操作.
什么时候被回收:当某个对象没有任何引用时,则 jvm 就认为这个对象是一个垃圾对象,就会使用垃圾回收机制来 销毁该对象,在销毁该对象前,会先调用 finalize 方法。
垃圾回收机制的调用,是由系统来决定(即有自己的 GC 算法), 也可以通过 System.gc() 主动触发垃圾回收机制.
1 2 3 4 5 6 7 8 9 10 11 12 13 14 15 16 17 18 19 20 21 22 23 24 25 26 27 package com.ep.object;public class FinalizeTest {public static void main (String[] args) {Car car = new Car ("宝马" );null ;"程序退出了" );class Car {private String name;@Override protected void finalize () throws Throwable {this .name + "被销毁" );"资源被回收" );public Car (String name) {this .name = name;
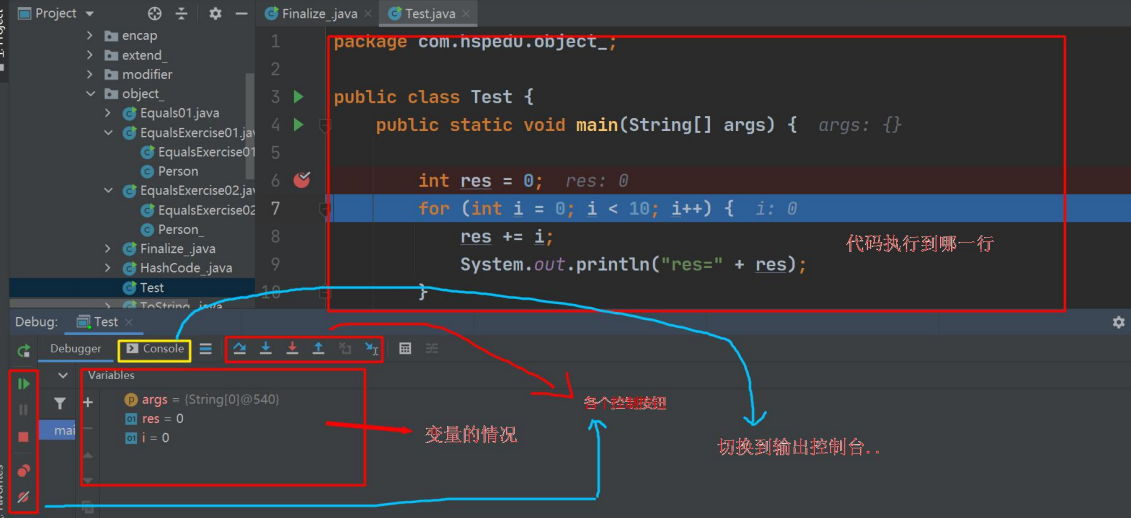
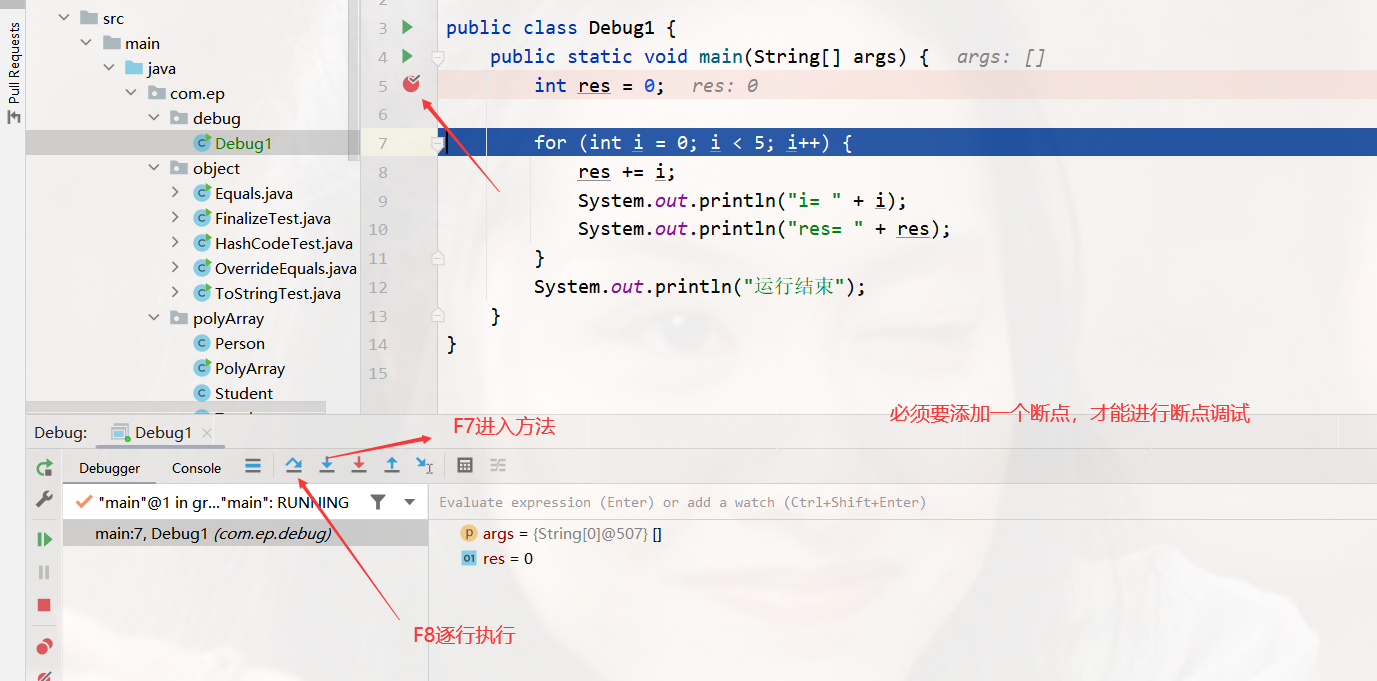
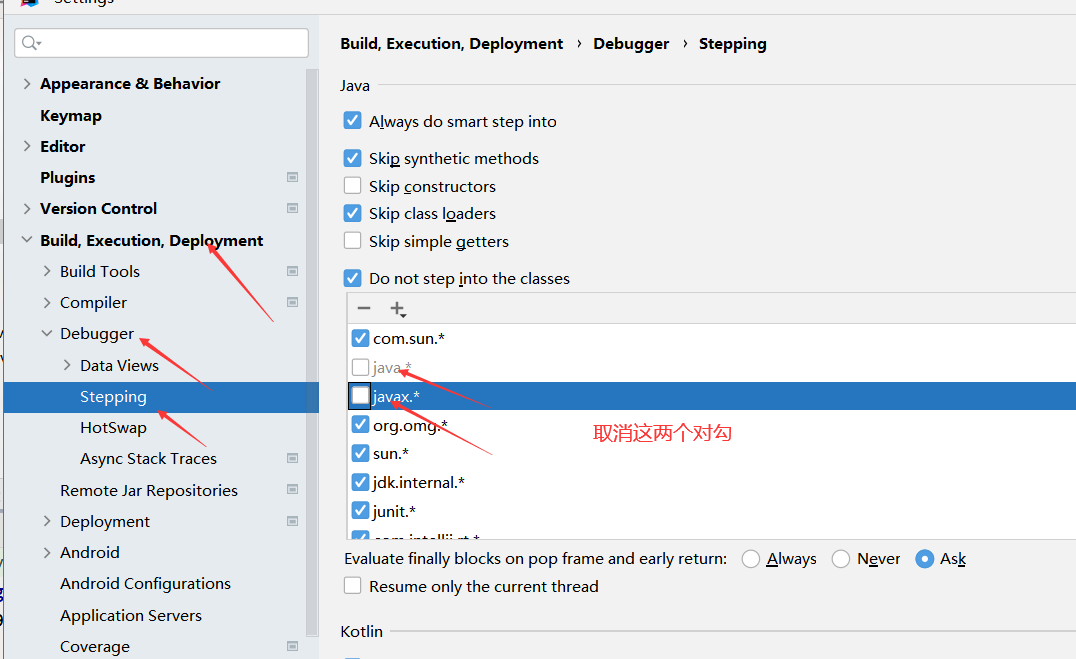
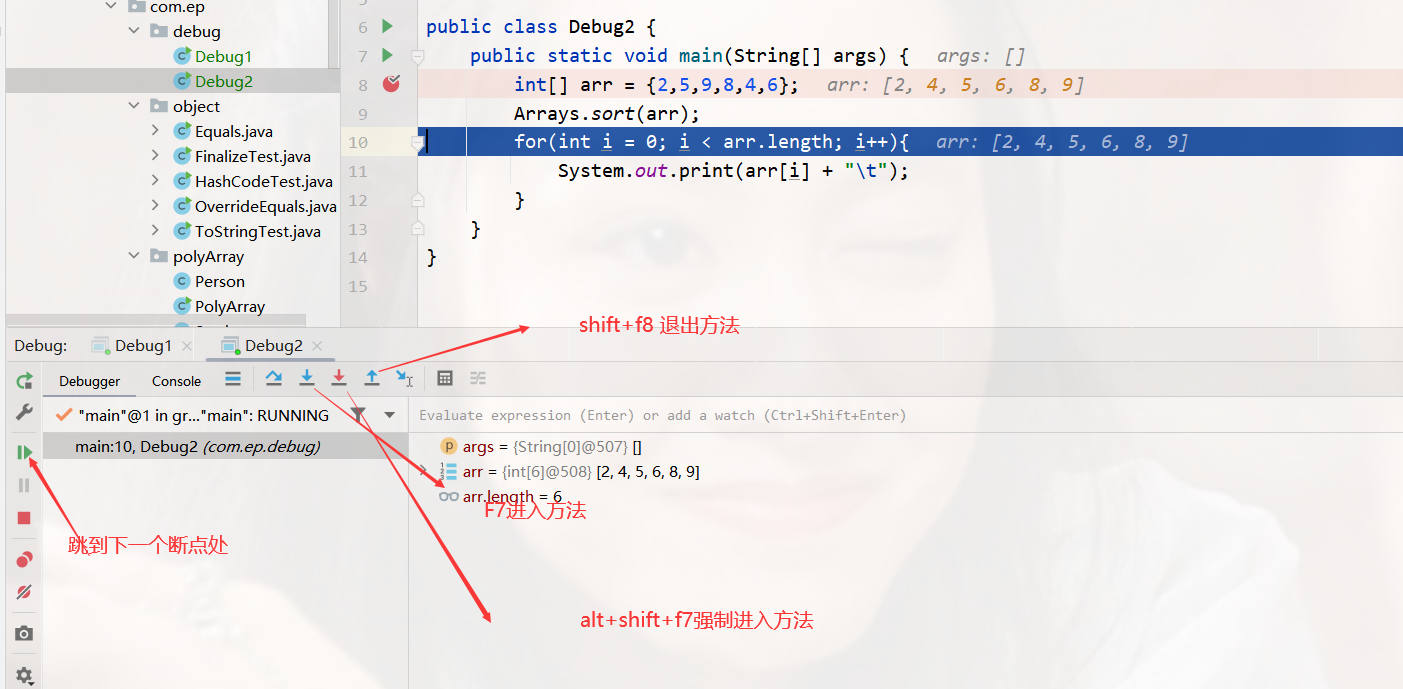
断点调试(debug)
快捷键 F7(跳入) F8(跳过) shift+F8(跳出) F9(resume,执行到下一个断点)
F7:跳入方法内
F8: 逐行执行代码.
shift+F8: 跳出方法
进入不到方法,强制进入 alt+shift+f7或者
断点可以在 debug 过程中,动态的下断点
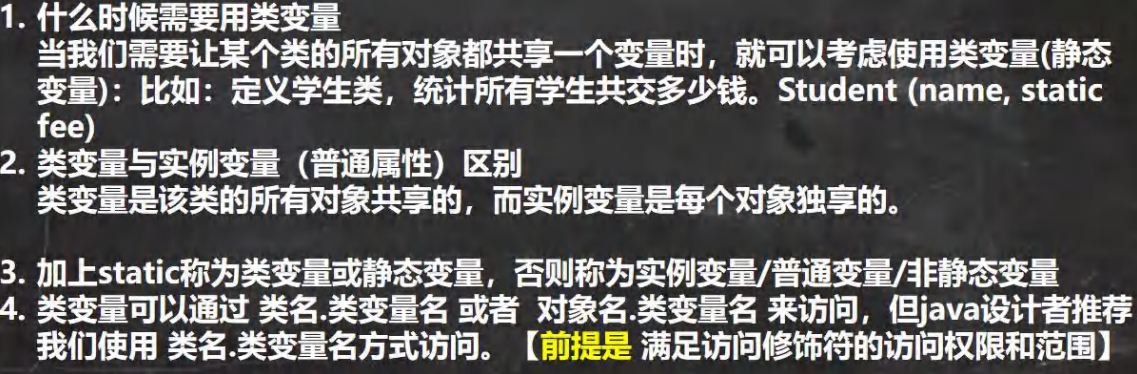
(面向对象)高级部分 类变量
1 2 3 4 5 6 7 8 9 10 11 12 13 14 15 16 17 18 19 20 21 22 23 24 25 26 27 28 package com.ep.class1;public class ClassParameter {public static void main (String[] args) {Stu stu1 = new Stu ("zhangsan" , 15 );Stu stu2 = new Stu ("lisi" , 15 );Stu stu3 = new Stu ("wangwu" , 15 );class Stu {public static Integer count = 0 ;private String name;private Integer age;public Stu (String name, Integer age) {this .name = name;this .age = age;
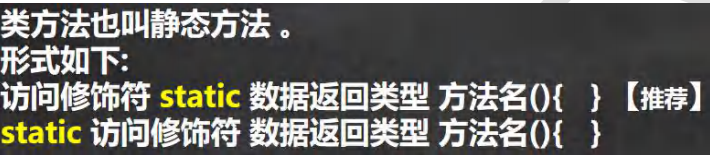
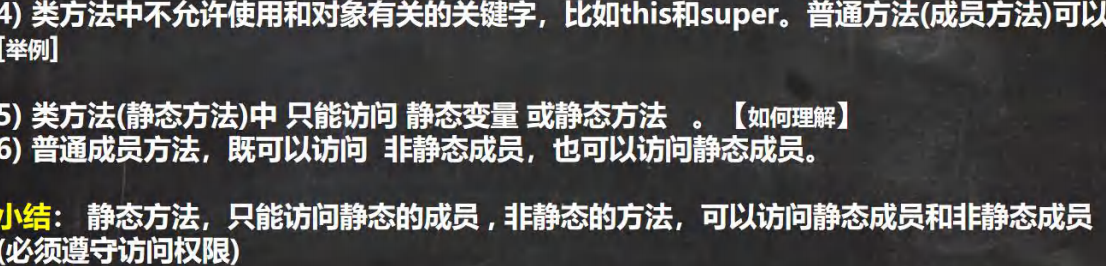
类方法
1 2 3 4 5 6 7 8 9 10 11 12 13 14 15 16 17 18 19 20 21 22 23 24 25 26 27 package com.ep.class1;public class staticTest {public static int n1;public int n2;public void test () {public static void hello () {
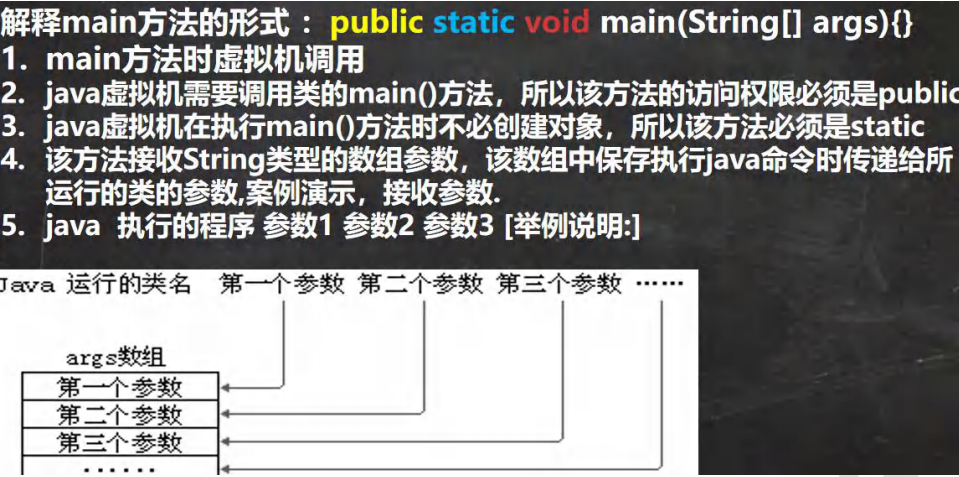
main 方法
1 2 3 4 5 6 7 8 9 10 11 12 13 14 15 16 17 18 19 20 21 22 23 24 25 26 27 28 29 30 31 32 33 package com.ep.Main;public class Main01 {public static String name = "静态变量,都可以访问" ;public int n1 = 1 ;public static void hi () {}public void hello () {}public static void main (String[] args) {new Main01 ().n1);new Main01 ().hello();
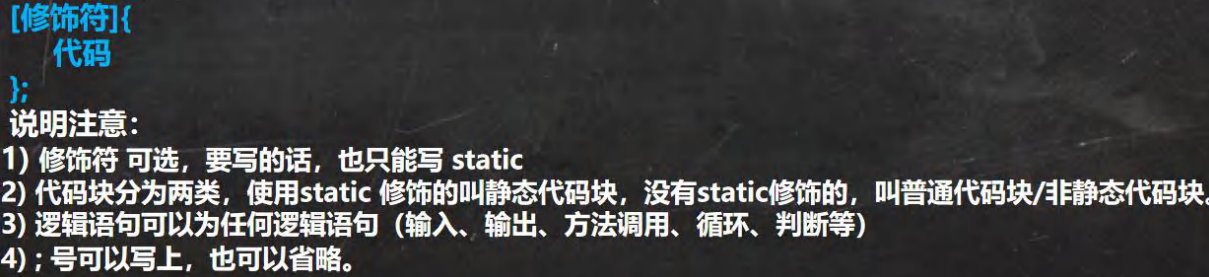
代码块
1 2 3 4 5 6 7 8 9 10 11 12 13 14 15 16 17 18 19 20 21 22 23 24 25 26 27 28 29 30 31 32 33 34 35 36 37 38 39 40 41 42 43 44 45 public class CodeBlock1 {public static void main (String[] args) {Movie movie = new Movie ("你好李焕英" );new Movie ("大闹天宫" ,19.9 ,"lisi" );class Movie {private String name;private double price;private String author;"电影屏幕打开....." );"电影广告开始播放....." );"电影开始播放....." );public Movie (String name) {this .name = name;"开始播放..." );public Movie (String name, double price) {this .name = name;this .price = price;"开始播放..." );public Movie (String name, double price, String author) {this .name = name;this .price = price;this .author = author;"开始播放..." );
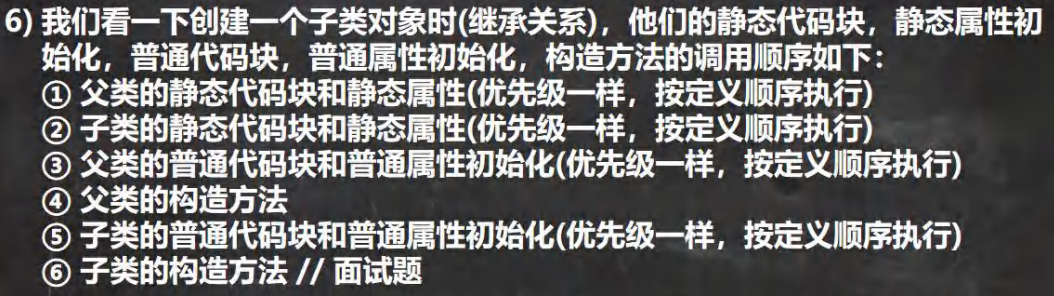
1 2 3 4 5 6 7 8 9 10 11 12 13 14 15 16 17 18 19 20 21 22 23 24 25 26 27 28 29 30 31 32 33 34 35 36 37 38 39 40 41 42 43 44 45 package com.ep.codeBlock;public class CodeBlock2 {public static void main (String[] args) {class DD {public static int m = 3 ;static {"DD的静态代码块,只会执行一次" );"DD的非静态代码块,创建实例就会执行" );class AA extends BB {public static int n1 = 1 ;static {"AA的静态代码块执行了" );class BB {static {"父类的静态代码块被执行了.." );
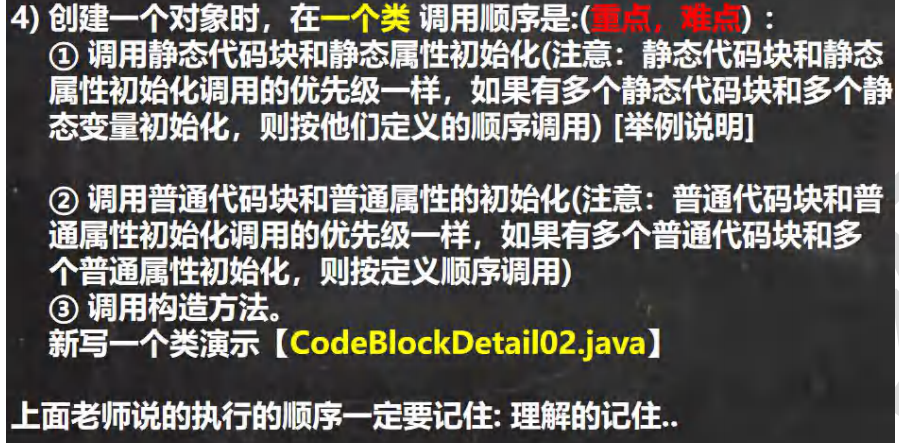
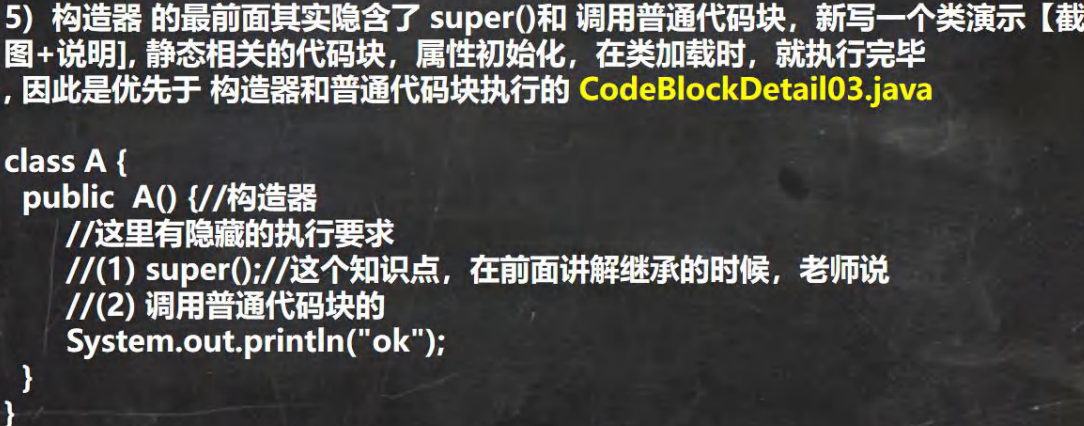
[静态代码块,静态属性](按顺序) > [代码块,普通变量] (按顺序) > 构造器
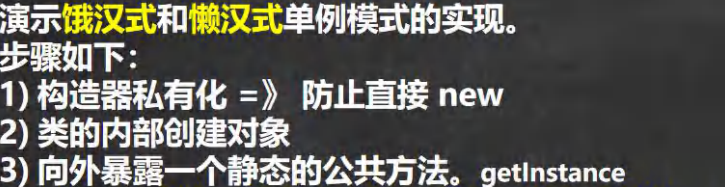
单例设计模式
饿汉式:
1 2 3 4 5 6 7 8 9 10 11 12 13 14 15 16 17 18 19 20 21 22 23 24 25 26 27 28 29 30 31 32 33 34 35 36 37 38 39 40 package com.ep.single_;public class Single1 {public static void main (String[] args) {GrildFriend instance = GrildFriend.getInstance();GrildFriend instance2 = GrildFriend.getInstance();class GrildFriend {private String name;private GrildFriend (String name) {this .name = name;private static GrildFriend gf = new GrildFriend ("小红" );public static GrildFriend getInstance () {return gf;@Override public String toString () {return "GrildFriend{" +"name='" + name + '\'' +'}' ;
懒汉式:
1 2 3 4 5 6 7 8 9 10 11 12 13 14 15 16 17 18 19 20 21 22 23 24 25 26 27 28 29 30 31 public class single2 {public static void main (String[] args) {Cat instance = Cat.getInstance();Cat instance2 = Cat.getInstance();class Cat {private String name;private static Cat cat; private Cat (String name) {this .name = name;public static Cat getInstance () {if (cat == null ) { new Cat ("小猫" );return cat;
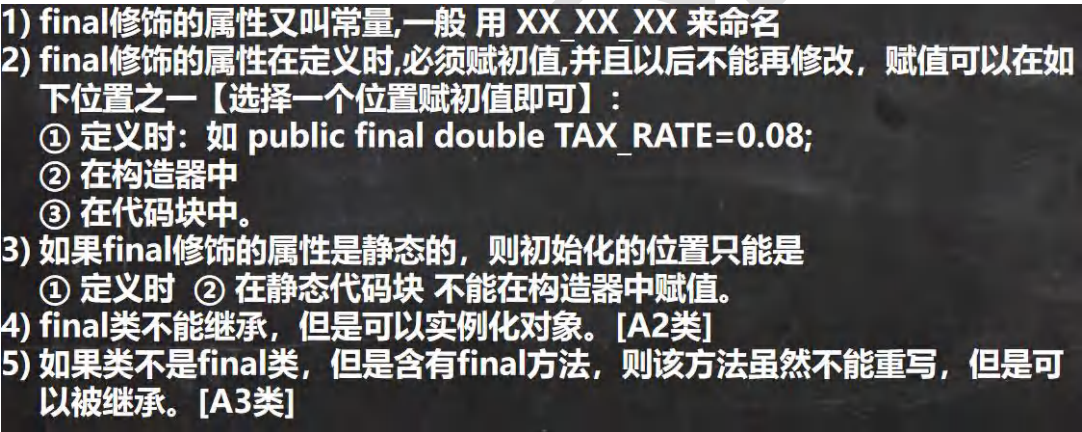
final
1 2 3 4 5 6 7 8 9 10 11 12 13 14 15 16 17 18 19 20 21 22 23 24 25 26 27 28 29 30 31 32 33 34 35 36 37 38 39 40 41 42 43 package com.ep.final_;public class final01 {public static void main (String[] args) {final class A {class C {public final void hi () {class D extends C {class E {public final static int MAX = 1000 ; class F {public void cry () {final double NUM = 0.01 ;"NUM=" + NUM); }
比如将一个变量,定义为 public final static int n1 = 100, 那么在使用n1的时候不会导致类加载,也就不会导致类的静态代码块执行
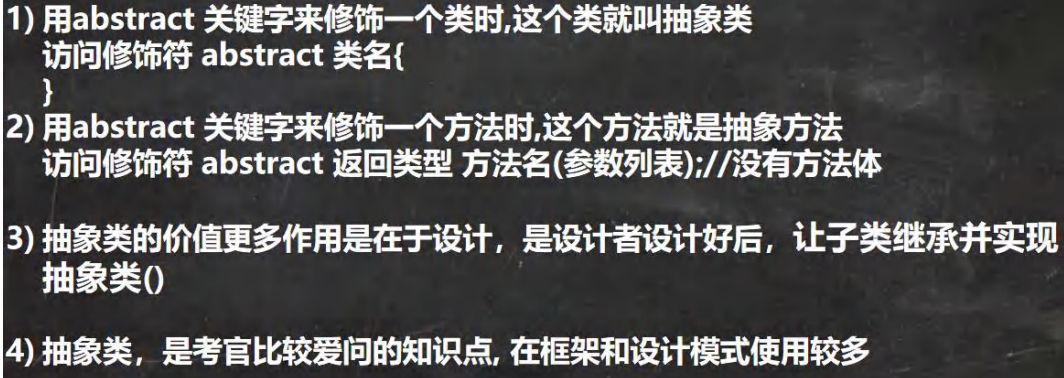
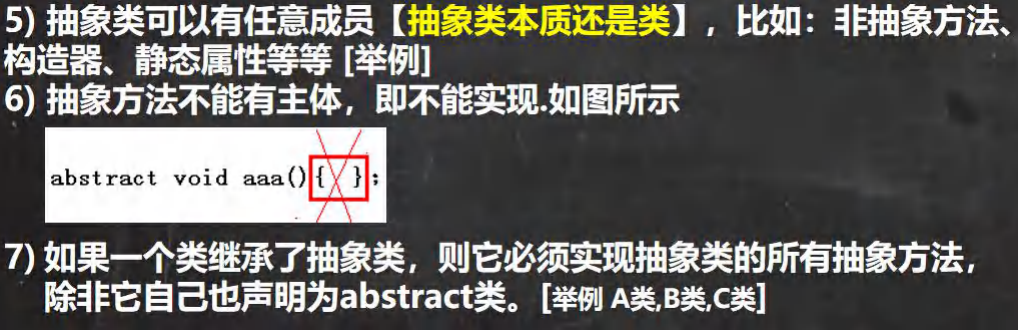
抽象类 //===> 所谓抽象方法就是没有实现的方法
//===> 所谓没有实现就是指,没有方法体
//===> 当一个类中存在抽象方法时,需要将该类声明为 abstract 类
//===> 一般来说,抽象类会被继承,有其子类来实现抽象方法.
1 2 3 4 5 6 7 8 9 10 11 12 13 14 15 16 17 18 19 20 21 22 23 24 public class Abstract01 {public static void main (String[] args) {abstract class A {public void hi () {"hi" );abstract class B {public abstract void hi () ;class C {
模板设计模式
1 2 3 4 5 6 7 8 9 10 11 12 public abstract class Template { public abstract void job (String name) ; public void calculateTime (String name) {long start = System.currentTimeMillis();long end = System.currentTimeMillis();"工作时间:" + (end - start));
接口
//1.接口不能被实例化
//2.接口中所有的方法是 public 方法, 接口中抽象方法,可以不用 abstract 修饰
//3.一个普通类实现接口,就必须将该接口的所有方法都实现,可以使用 alt+enter 来解决
//4.抽象类去实现接口时,可以不实现接口的抽象方法
1 2 3 4 5 6 7 8 9 10 11 12 13 14 15 16 17 18 19 20 21 22 23 24 25 26 27 28 29 30 public class Interface01 {public static void main (String[] args) {interface IB {int n1 = 10 ; void hi () ;interface IC {void say () ;interface ID extends IB , IC {}interface IE {}class Pig implements IB ,IC {public void hi () {}public void say () {}
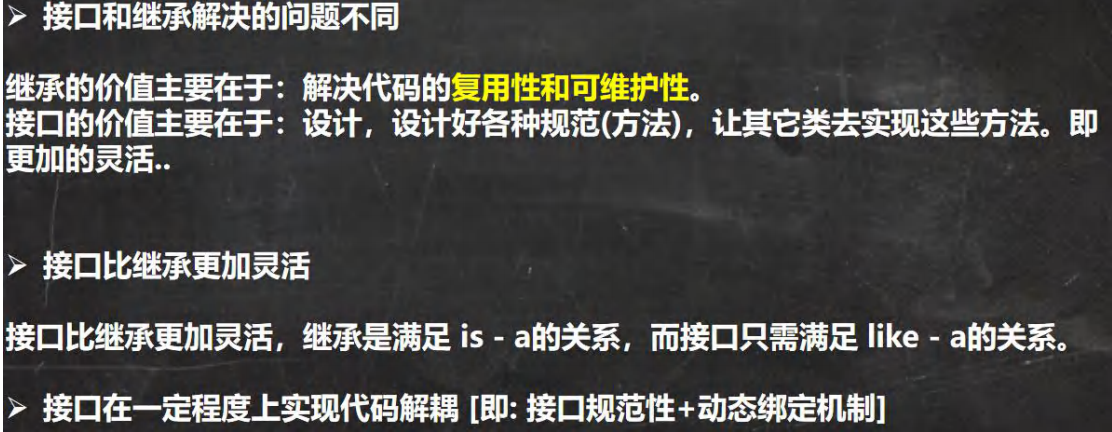
小结: 当子类继承了父类,就自动的拥有父类的功能
如果子类需要扩展功能,可以通过实现接口的方式扩展.
可以理解 实现接口 是 对 java 单继承机制的一种补充
接口多态 1 2 3 4 5 6 7 8 9 10 11 12 13 14 15 16 17 18 19 20 21 22 23 24 25 public class InterfacePolyParameter {public static void main (String[] args) {IF if01 = new Monster ();new Car ();AAA a = new BBB ();new CCC ();interface IF {}class Monster implements IF { }class Car implements IF { }class AAA { }class BBB extends AAA { }class CCC extends AAA { }
1 2 3 4 5 6 7 8 9 10 11 12 13 14 15 16 17 18 19 20 21 22 23 24 25 26 27 28 29 30 31 32 33 34 35 36 37 38 39 public class InterfacePolyArr {public static void main (String[] args) {new Usb [2 ];0 ] = new Phone_ ();1 ] = new Camera_ ();for (int i = 0 ; i < usbs.length; i++) {if (usbs[i] instanceof Phone_) {interface Usb {void work () ;class Phone_ implements Usb {public void call () {"手机可以打电话..." );public void work () {"手机工作中..." );class Camera_ implements Usb {public void work () {"相机工作中..." );
1 2 3 4 5 6 7 8 9 10 11 12 13 14 15 16 17 18 19 20 21 22 23 public class InterfacePolyPass {public static void main (String[] args) {IG ig = new Teacher ();IH ih = new Teacher ();interface IH {void hi () ;interface IG extends IH { }class Teacher implements IG {public void hi () {}
对于一个类同时继承父类和实现接口,想要访问x
//访问接口A的 x 就使用 A.x
//访问父类的 x 就使用 super.x
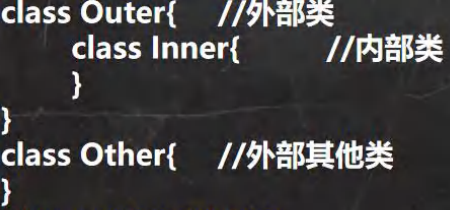
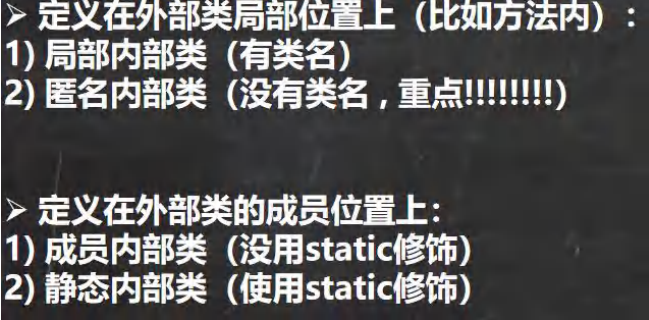
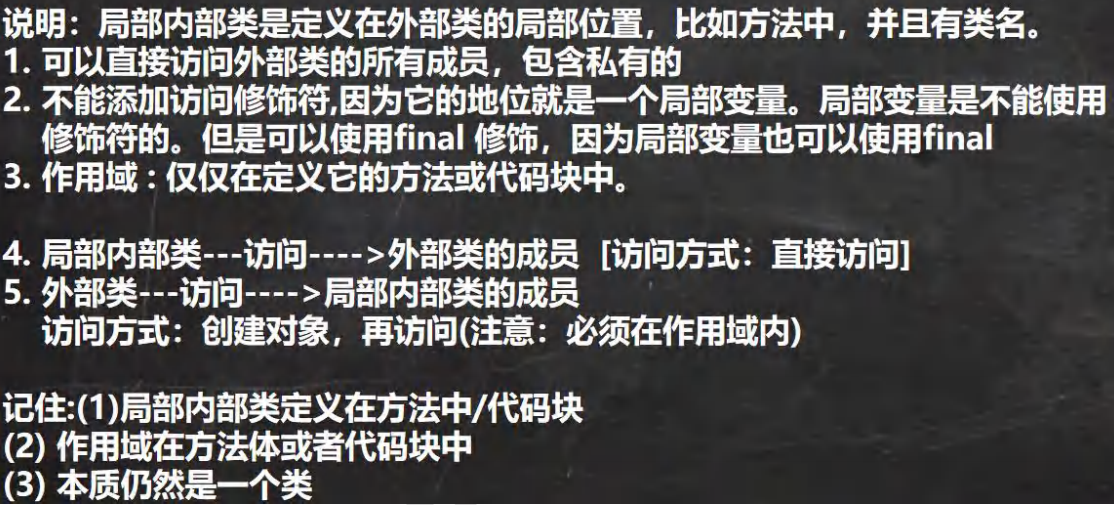
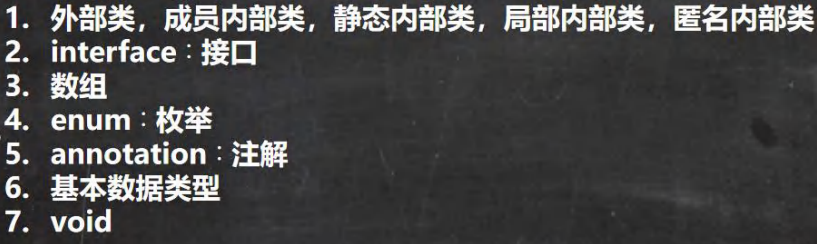
内部类 如果定义类在局部位置(方法中/代码块) :(1) 局部内部类 (2) 匿名内部类
定义在成员位置 (1) 成员内部类 (2) 静态内部类
内部类的分类
局部内部类
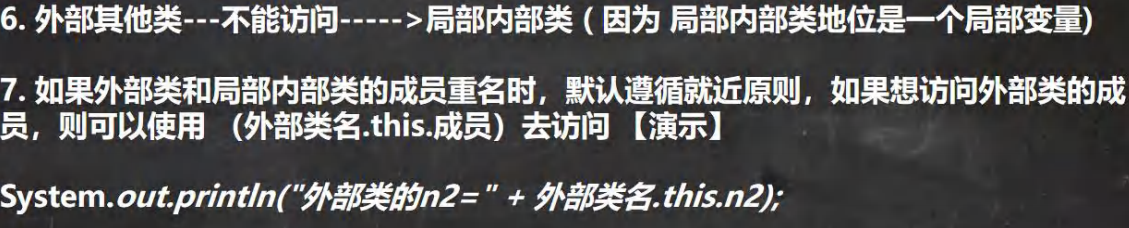
1 2 3 4 5 6 7 8 9 10 11 12 13 14 15 16 17 18 19 20 21 22 23 24 25 26 27 28 29 30 31 32 33 34 35 36 37 38 39 public class LocalInnerClass {public static void main (String[] args) {Outer02 outer02 = new Outer02 ();"outer02 的 hashcode=" + outer02);class Outer02 {private int n1 = 100 ;private void m2 () {"Outer02 m2()" );public void m1 () {final class Inner02 {private int n1 = 800 ;public void f1 () {"n1=" + n1 + " 外部类的 n1=" + Outer02.this .n1);"Outer02.this hashcode=" + Outer02.this );Inner02 inner02 = new Inner02 ();
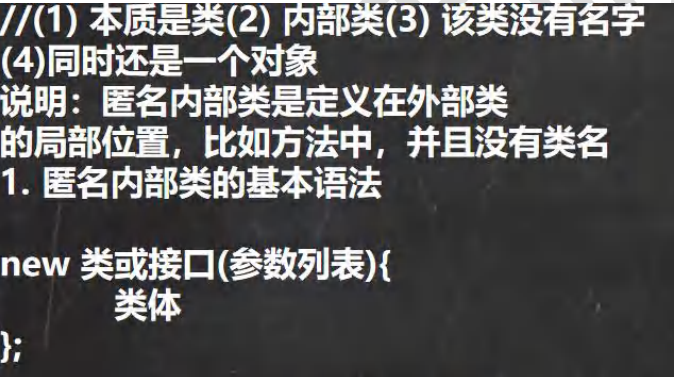
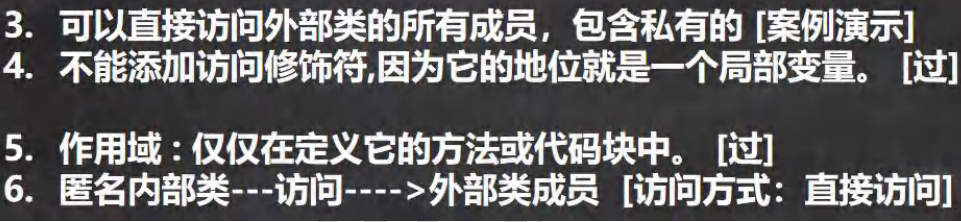
匿名内部类
1 2 3 4 5 6 7 8 9 10 11 12 13 14 15 16 17 18 19 20 21 22 23 24 25 26 27 28 29 30 31 32 33 34 35 36 37 38 39 40 41 42 43 44 45 46 47 48 49 50 51 52 53 54 55 56 57 58 59 60 61 62 63 64 65 66 67 68 69 70 71 72 73 74 75 76 77 78 79 80 81 82 83 84 85 86 87 88 89 90 91 92 93 94 95 96 97 98 public class AnonymousInnerClass {public static void main (String[] args) {Outer04 outer04 = new Outer04 ();class Outer04 { private int n1 = 10 ;public void method () {IA tiger = new IA () {public void cry () {"老虎叫唤..." );"tiger 的运行类型=" + tiger.getClass());Father father = new Father ("jack" ){@Override public void test () {"匿名内部类重写了 test 方法" );"father 对象的运行类型=" + father.getClass());Animal animal = new Animal (){@Override void eat () {"小狗吃骨头..." );interface IA {public void cry () ;class Father {public Father (String name) {"接收到 name=" + name);public void test () {abstract class Animal { abstract void eat () ;
1 2 3 4 5 6 7 8 9 10 11 12 13 14 15 16 17 18 19 20 21 22 23 24 25 26 27 28 29 30 31 32 33 34 35 36 37 38 39 40 41 42 43 44 45 46 47 48 49 50 51 52 public class AnonymousInnerClassDetail {public static void main (String[] args) {Outer05 outer05 = new Outer05 ();"main outer05 hashcode=" + outer05);class Outer05 {private int n1 = 99 ;public void f1 () {Person p = new Person (){private int n1 = 88 ;@Override public void hi () {"匿名内部类重写了 hi 方法 n1=" + n1 + " 外部内的 n1=" + Outer05.this .n1 );"Outer05.this hashcode=" + Outer05.this );new Person (){@Override public void hi () {"匿名内部类重写了 hi 方法,哈哈..." );@Override public void ok (String str) {super .ok(str);"jack" );class Person {public void hi () {"Person hi()" );public void ok (String str) {"Person ok() " + str);
1 2 3 4 5 6 7 8 9 10 11 12 13 14 15 16 17 18 19 20 21 22 23 24 25 26 27 28 29 30 31 32 33 34 35 36 37 38 39 40 41 42 public class InnerClassExercise {public static void main (String[] args) {CellPhone cellPhone = new CellPhone ();new Bell () { public void ring () {"懒猪起床了" );new Bell () {public void ring () {"小伙伴上课了" );interface Bell { void ring () ;class CellPhone {public void alarmClock (Bell bell) {
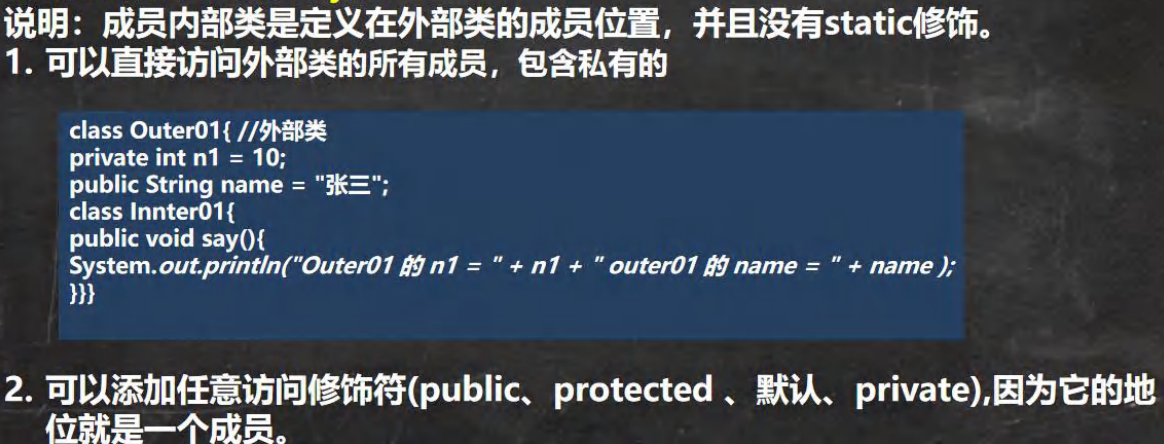
成员内部类
1 2 3 4 5 6 7 8 9 10 11 12 13 14 15 16 17 18 19 20 21 22 23 24 25 26 27 28 29 30 31 32 33 34 35 36 37 38 39 40 41 42 43 44 45 46 47 48 49 50 51 52 public class MemberInnerClass {public static void main (String[] args) {Outer08 outer08 = new Outer08 ();Inner08 inner08 = outer08.new Inner08 ();Inner08 inner08Instance = outer08.getInner08Instance();new Outer08 ().new Inner08 ();class Outer08 { private int n1 = 10 ;public String name = "张三" ;private void hi () {"hi()方法..." );public class Inner08 {private double sal = 99.8 ;private int n1 = 66 ;public void say () {"n1 = " + n1 + " name = " + name + " 外部类的 n1=" + Outer08.this .n1);public Inner08 getInner08Instance () {return new Inner08 ();public void t1 () {Inner08 inner08 = new Inner08 ();
静态内部类
1 2 3 4 5 6 7 8 9 10 11 12 13 14 15 16 17 18 19 20 21 22 23 24 25 26 27 28 29 30 31 32 33 34 35 36 37 38 39 40 41 42 43 44 45 46 47 48 49 50 51 52 public class StaticInnerClass {public static void main (String[] args) {Outer10 outer10 = new Outer10 ();Inner10 inner10 = new Outer10 .Inner10();Inner10 inner101 = outer10.getInner10();"============" );Inner10 inner10_ = Outer10.getInner10_();"************" );class Outer10 { private int n1 = 10 ;private static String name = "张三" ;private static void cry () {}static class Inner10 {private static String name = "张三" ;public void say () {" 外部类 name= " + Outer10.name);public void m1 () { Inner10 inner10 = new Inner10 ();public Inner10 getInner10 () {return new Inner10 ();public static Inner10 getInner10_ () {return new Inner10 ();
枚举和注解 枚举 自定义类实现枚举
1 2 3 4 5 6 7 8 9 10 11 12 13 14 15 16 17 18 19 20 21 22 23 24 25 26 27 28 29 30 31 32 33 34 35 36 37 38 39 40 41 public class Enumeration {public static void main (String[] args) {Season spring = Season.SPRING;class Season {private String name;private String desc;public static final Season SPRING = new Season ("春天" , "温暖" );public static final Season WINTER = new Season ("冬天" , "寒冷" );public static final Season AUTUMN = new Season ("秋天" , "凉爽" );public static final Season SUMMER = new Season ("夏天" , "炎热" );private Season (String name, String desc) {this .name = name;this .desc = desc;public String getName () {return name;public String getDesc () {return desc;@Override public String toString () {return "Season{" +"name='" + name + '\'' +", desc='" + desc + '\'' +'}' ;
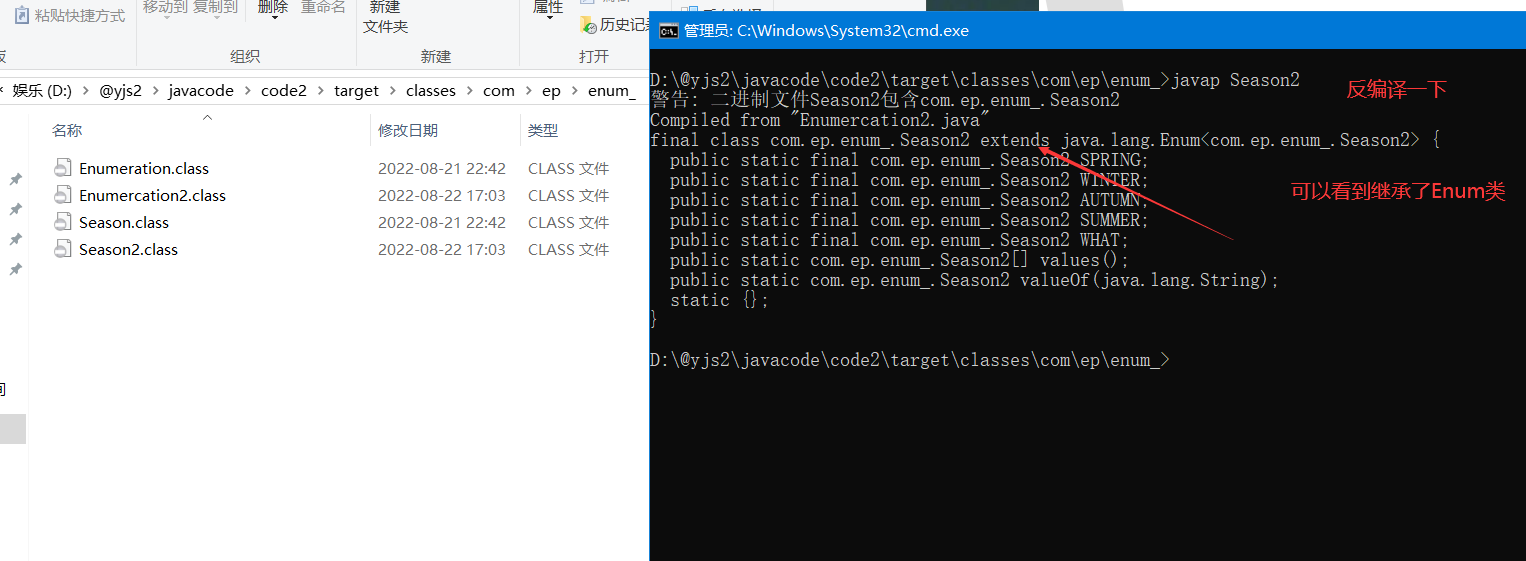
enum实现 1 2 3 4 5 6 7 8 9 10 11 12 13 14 15 16 17 18 19 20 21 22 23 24 25 26 27 28 29 30 31 32 33 34 35 36 37 public class Enumercation2 {public static void main (String[] args) {enum Season2 {"春天" ,"凉爽" ), "冬天" , "寒冷" ),"秋天" , "凉爽" ),"夏天" , "炎热" ),private String name;private String Desc;private Season2 (String name, String desc) {this .name = name;private Season2 () {}
注意事项
当我们使用 enum 关键字开发一个枚举类时,默认会继承 Enum 类, 而且是一个 final 类[如何证明],使用 javap 工 具来演示
传统的 public static final Season2 SPRING = new Season2(“春天”, “温暖”); 简化成 SPRING(“春天”, “温暖”), 这里必 须知道,它调用的是哪个构造器.
如果使用无参构造器 创建 枚举对象,则实参列表和小括号都可以省略
当有多个枚举对象时,使用,间隔,最后有一个分号结尾
枚举对象必须放在枚举类的行首
1 2 3 4 5 6 7 8 9 10 11 12 13 14 15 16 17 18 public class Enumeration3 {public static void main (String[] args) {Gender boy = Gender.BOY;Gender boy2 = Gender.BOY;enum Gender {
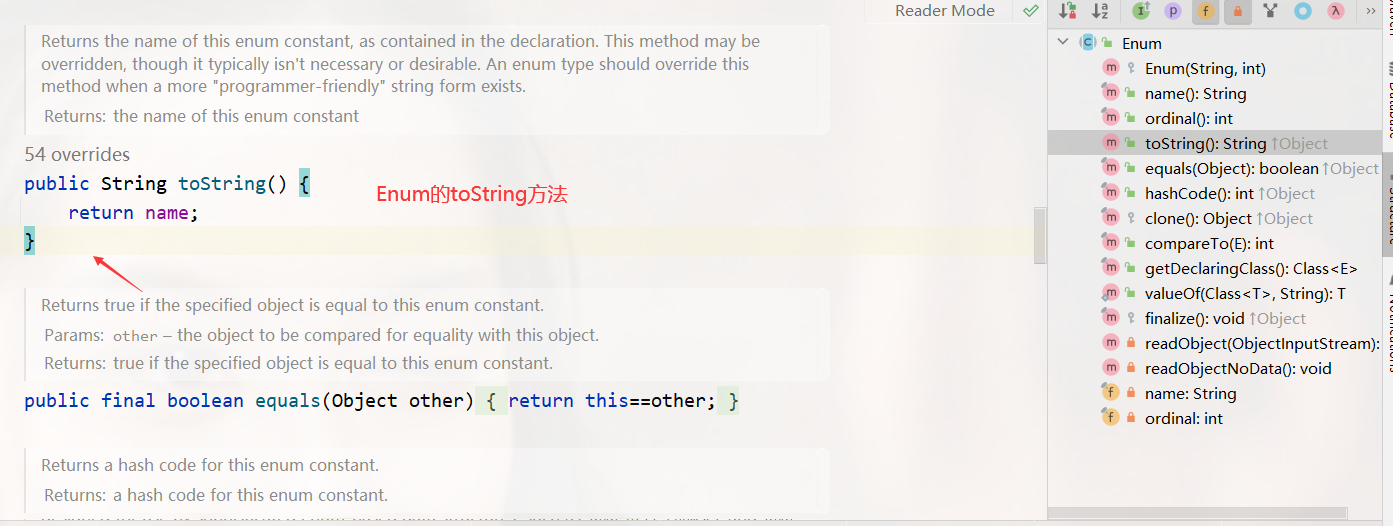
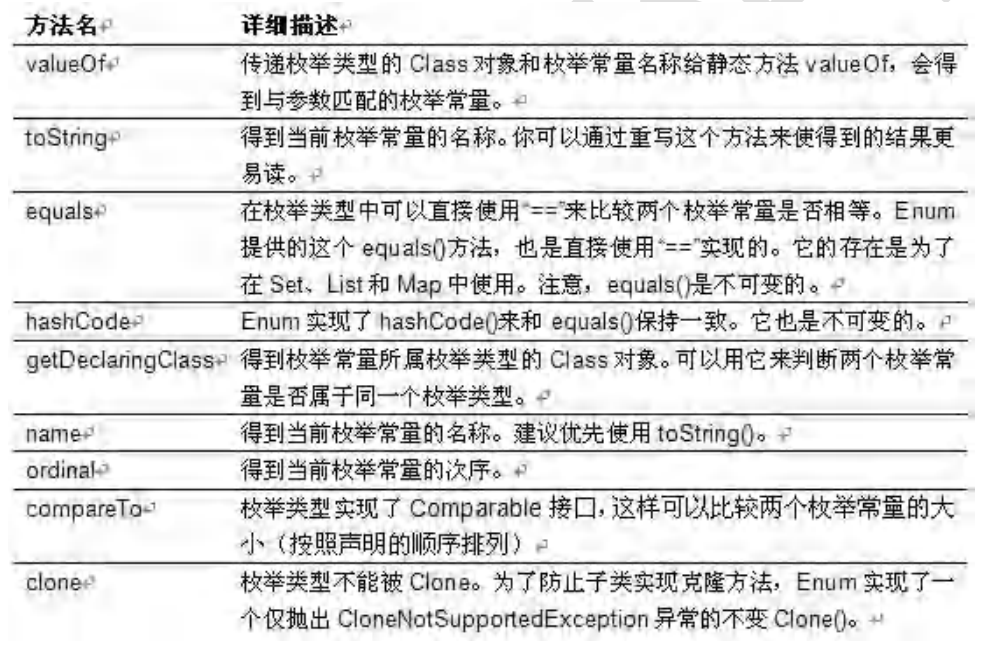
enum常用方法 使用关键字 enum 时,会隐式继承 Enum 类, 这样我们就可以使用 Enum 类相关的方法
1 2 3 public abstract class Enum <E extends Enum <E>> implements Comparable <E>, Serializable {
toString:Enum 类已经重写过了,返回的是当前对象 名,子类可以重写该方法,用于返回对象的属性信息
name:返回当前对象名(常量名),子类中不能重写
ordinal:返回当前对象的位置号,默认从 0 开始
values:返回当前枚举类中所有的常量
valueOf:将字符串转换成枚举对象,要求字符串必须 为已有的常量名,否则报异常!
compareTo:比较两个枚举常量,比较的就是编号!
1 2 3 4 5 6 7 8 9 10 11 12 13 14 15 16 17 18 19 20 21 22 23 24 25 public class EnumMethod {public static void main (String[] args) {Season2 autumn = Season2.AUTUMN;for (Season2 value : Season2.values()) {Season2 autumn1 = Season2.valueOf("AUTUMN" );
1 2 3 4 5 6 7 8 9 10 11 12 13 14 15 16 17 18 19 20 21 22 23 24 25 26 27 28 29 30 31 32 33 public class EnumExercise {public static void main (String[] args) {for (Week value : Week.values()) {enum Week {"星期一" ),"星期二" ),"星期三" ),"星期四" ),"星期五" ),"星期六" ),"星期天" );private String name;private Week (String name) {this .name = name;@Override public String toString () {return name;
使用 enum 关键字后,就不能再继承其它类了,因为 enum 会隐式继承 Enum,而 Java 是单继承机制。
枚举类和普通类一样,可以实现接口,如下形式。
enum 类名 implements 接口 1,接口 2{}
注解
注解(Annotation)也被称为元数据(Metadata),用于修饰解释 包、类、方法、属性、构造器、局部变量等数据信息。
和注释一样,注解不影响程序逻辑,但注解可以被编译或运行,相当于嵌入在代码中的补充信息。
在 JavaSE 中,注解的使用目的比较简单,例如标记过时的功能,忽略警告等。在 JavaEE 中注解占据了更重要的角色,例如用来配置应用程序的任何切面,代替 java EE 旧版中所遗留的繁冗代码和 XML 配置等。
使用 Annotation 时要在其前面增加 @ 符号, 并把该 Annotation 当成一个修饰符使用。用于修饰它支持的程序元 素
三个基本的 Annotation:
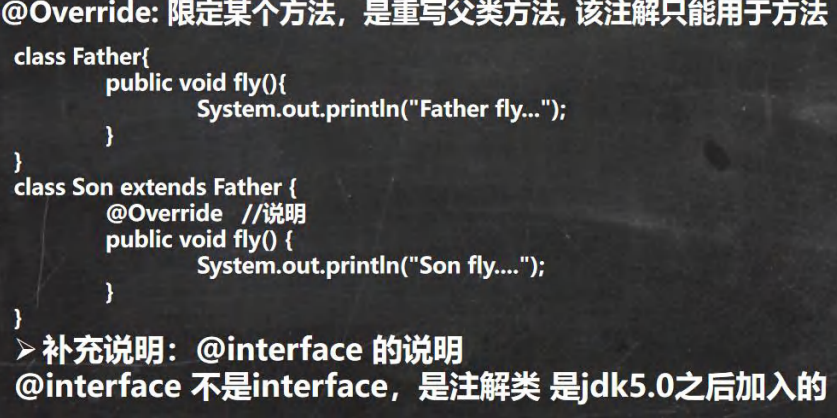
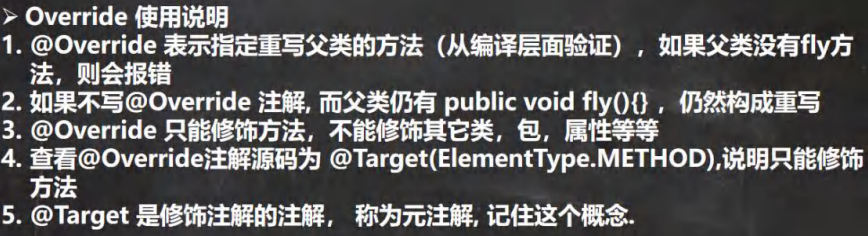
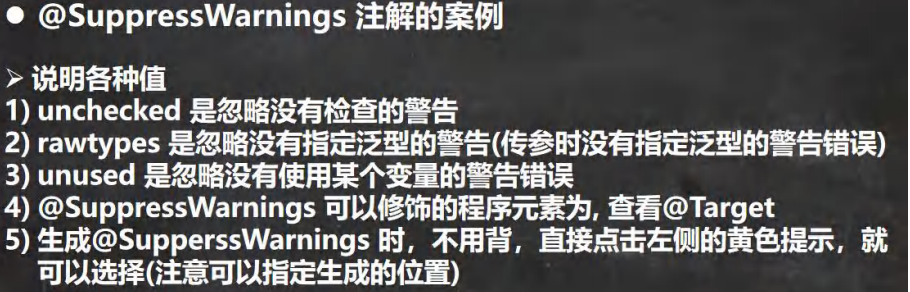
@Override: 限定某个方法,是重写父类方法, 该注解只能用于方法
@Deprecated: 用于表示某个程序元素(类, 方法等)已过时
@SuppressWarnings: 抑制编译器警告
@Override
1 2 3 4 5 6 7 8 9 10 11 12 13 14 15 16 17 18 19 20 21 22 23 24 25 26 27 28 29 class Father {public void fly () {"Father fly..." );public void say () {}class Son extends Father {@Override public void fly () {"Son fly...." );@Override public void say () {}
@Deprecated
@Deprecated: 用于表示某个程序元素(类, 方法等)已过时
1 2 3 4 5 6 7 8 9 10 11 12 13 14 15 16 17 18 19 20 21 22 23 24 25 26 public class Deprecated_ {public static void main (String[] args) {A a = new A ();@Deprecated class A {@Deprecated public int n1 = 10 ;@Deprecated public void hi () {}
@SuppressWarnings
@SuppressWarnings: 抑制编译器警告
1 2 3 4 5 6 7 8 9 10 11 12 13 14 15 16 17 18 19 20 21 22 23 24 25 26 27 28 29 30 31 32 33 34 35 36 37 38 39 40 41 42 43 44 45 46 47 48 49 50 51 52 53 54 55 56 57 58 59 60 61 62 @SuppressWarnings({"rawtypes", "unchecked", "unused"}) public class SuppressWarnings_ {public static void main (String[] args) {List list = new ArrayList ();"jack" );"tom" );"mary" );int i;1 ));public void f1 () {@SuppressWarnings({"rawtypes"}) List list = new ArrayList ();"jack" );"tom" );"mary" );@SuppressWarnings({"unused"}) int i;1 ));
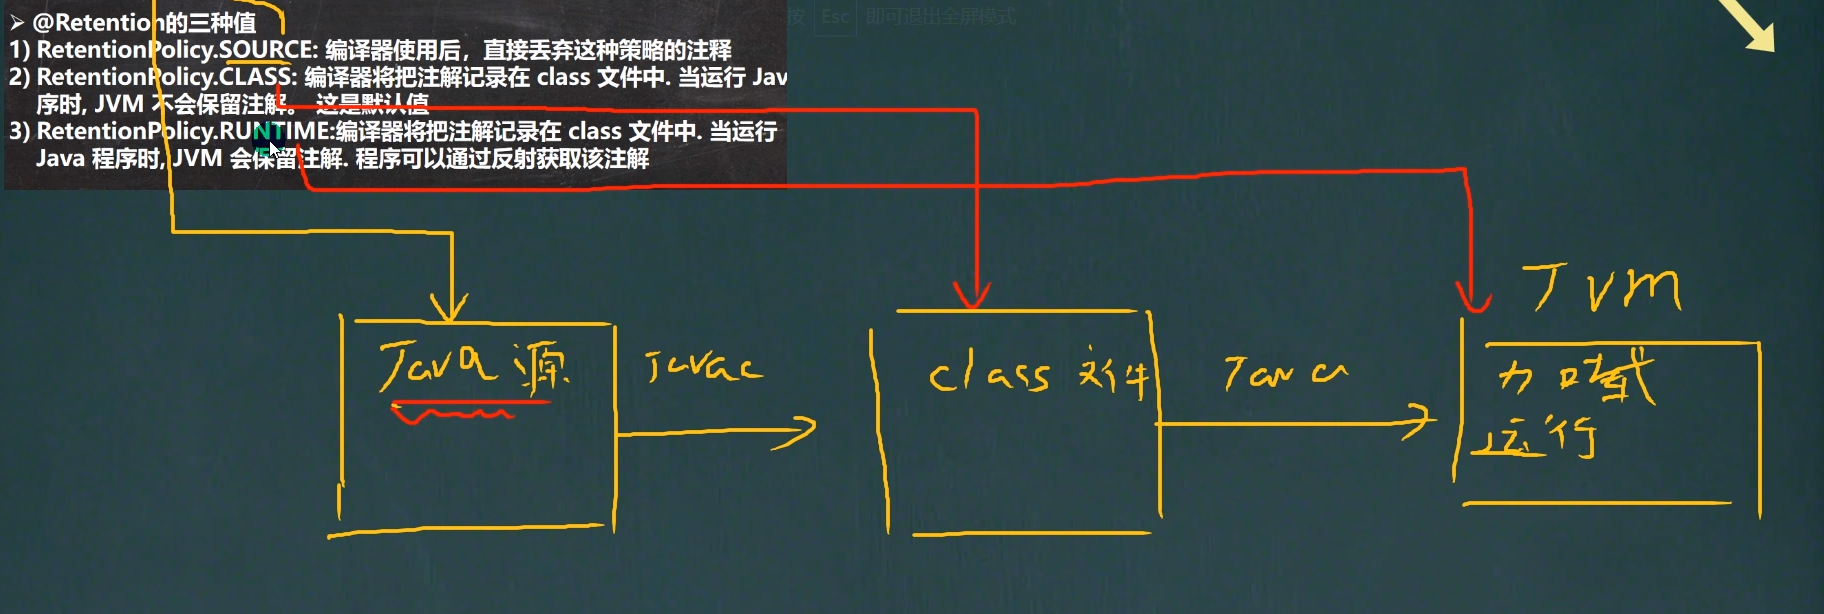
元注解 JDK 的元 Annotation 用于修饰其他 Annotation
Retention //指定注解的作用范围,三种 SOURCE,CLASS,RUNTIME
Target // 指定注解可以在哪些地方使用
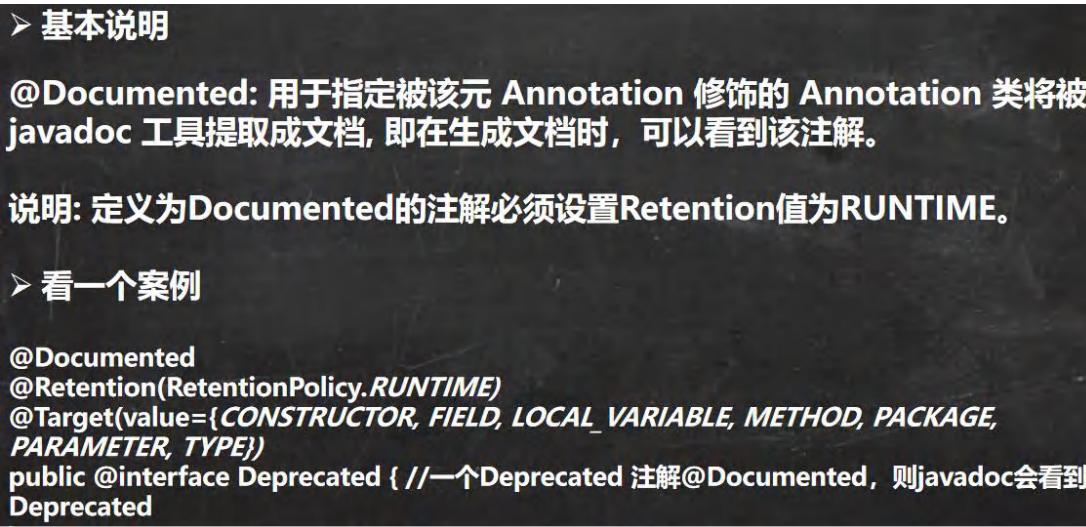
Documented //指定该注解是否会在 javadoc 体现
Inherited //子类会继承父类注解
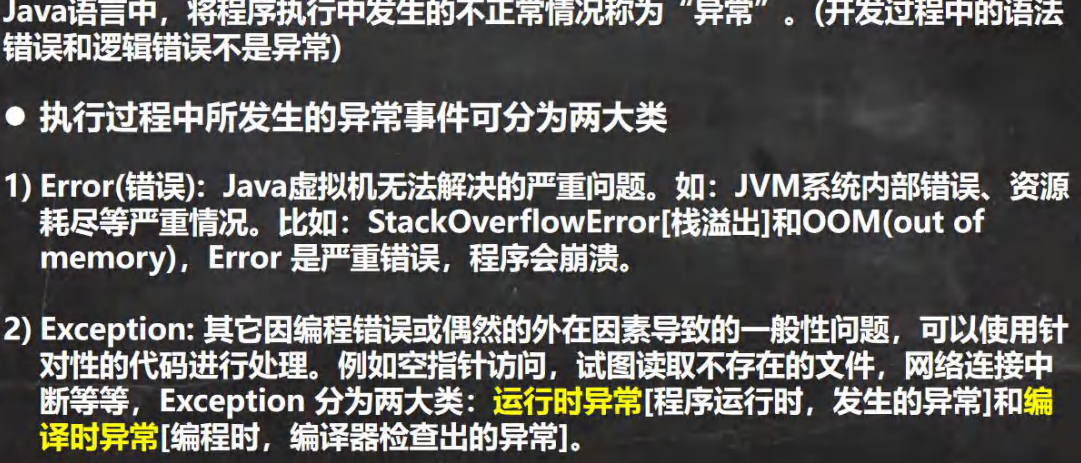
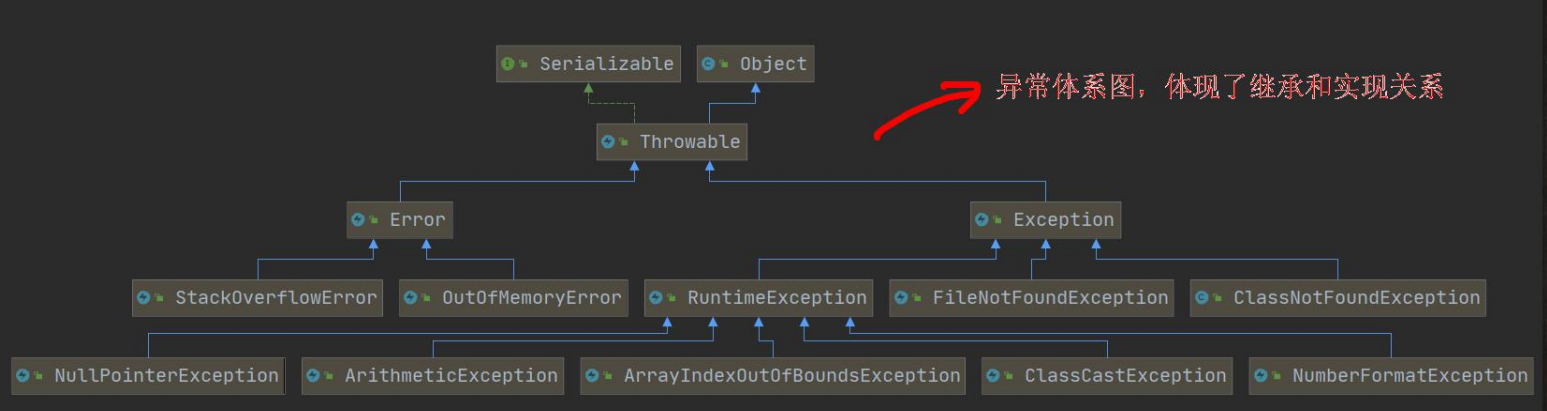
异常-Exception
运行时异常
NullPointerException 空指针异常
ArithmeticException 数学运算异常
ArrayIndexOutOfBoundsException 数组下标越界异常
ClassCastException 类型转换异常
NumberFormatException 数字格式不正确异常[]
编译时异常
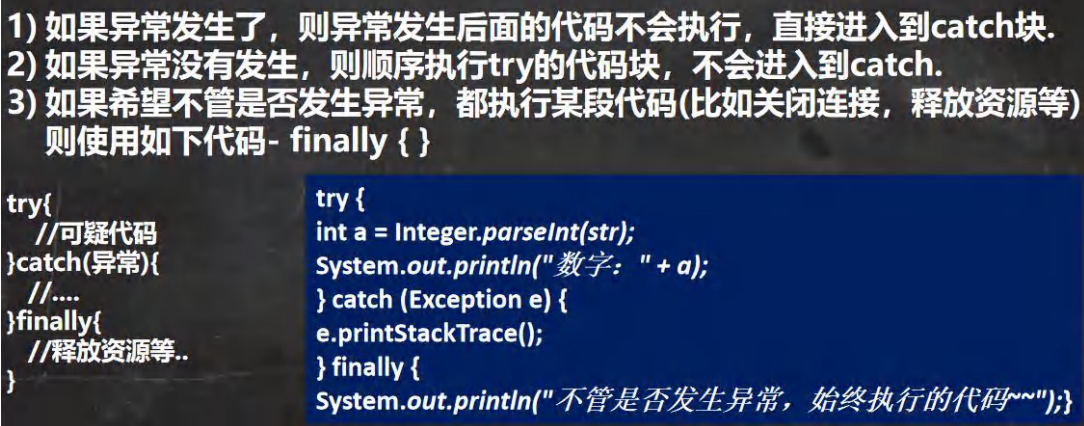
异常处理
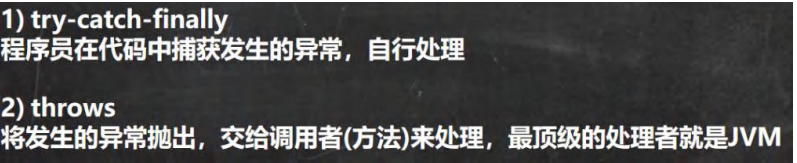
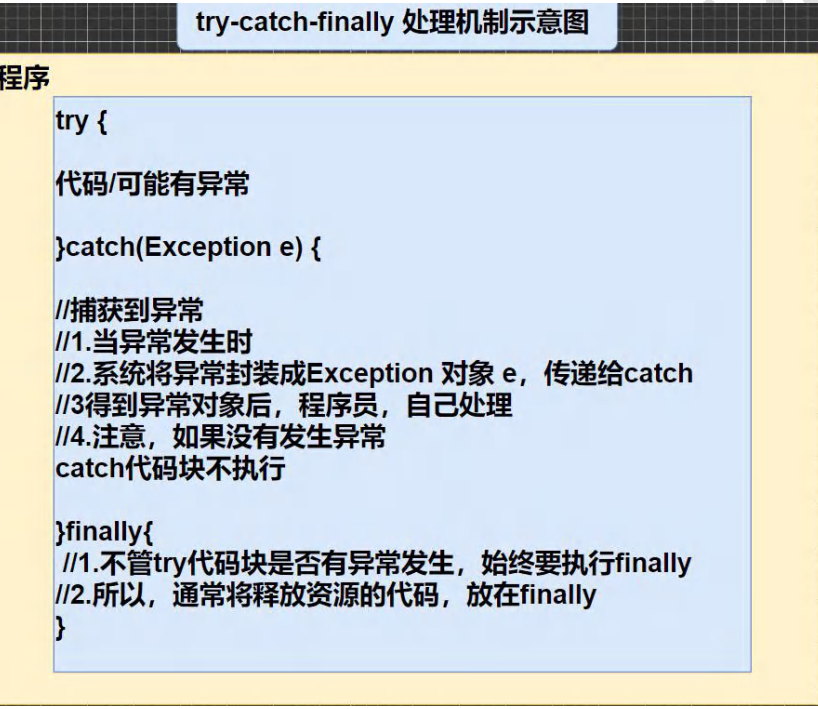
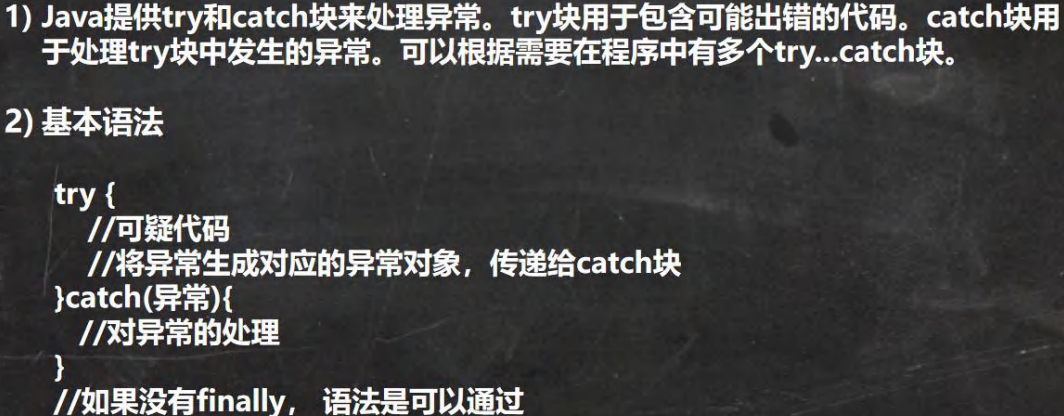
try-catch-finally
快捷键:选中代码,ctrl+alt+t,然后选择6.try-catch
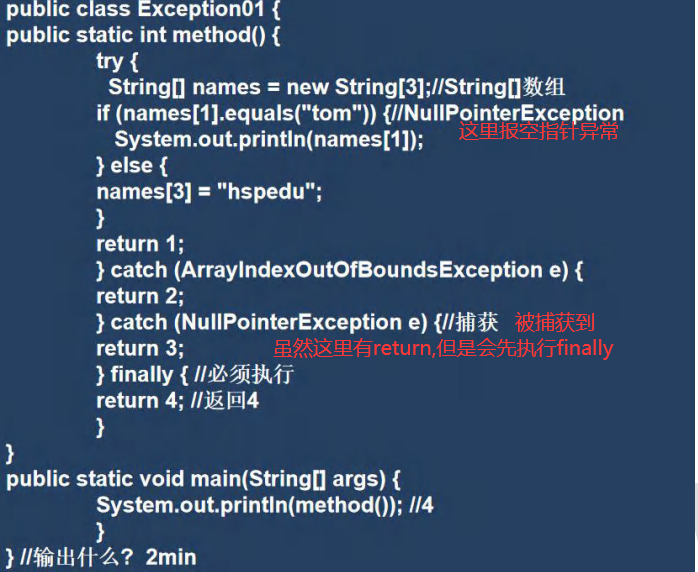
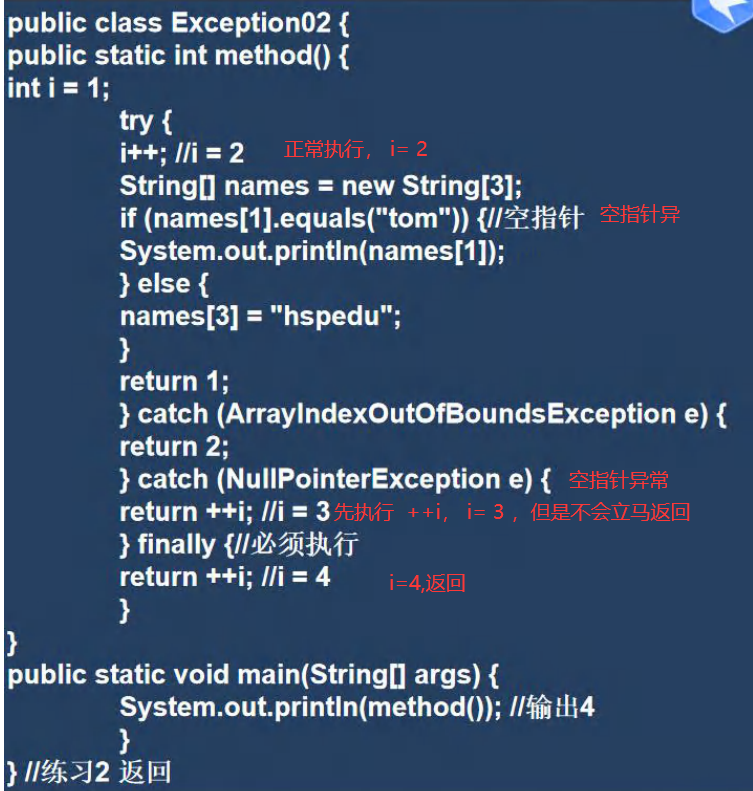
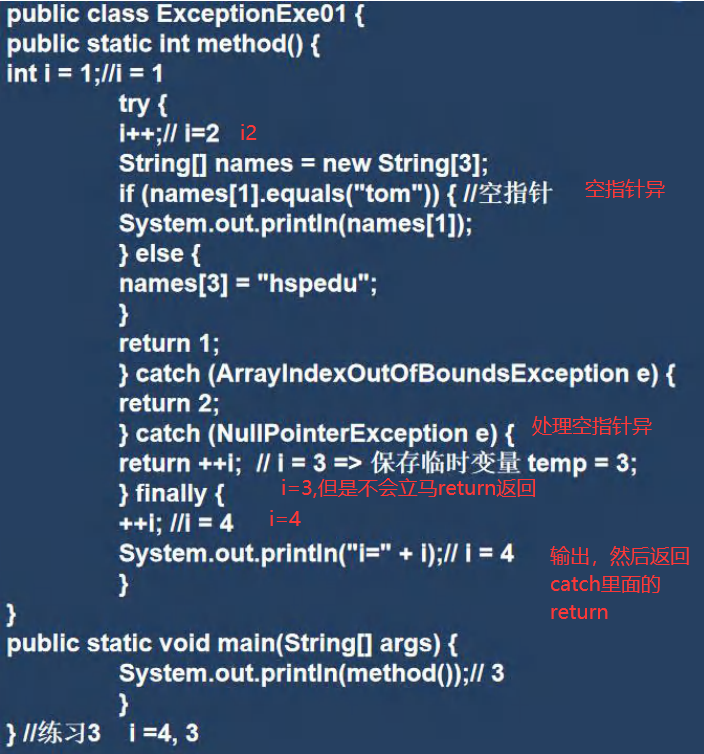
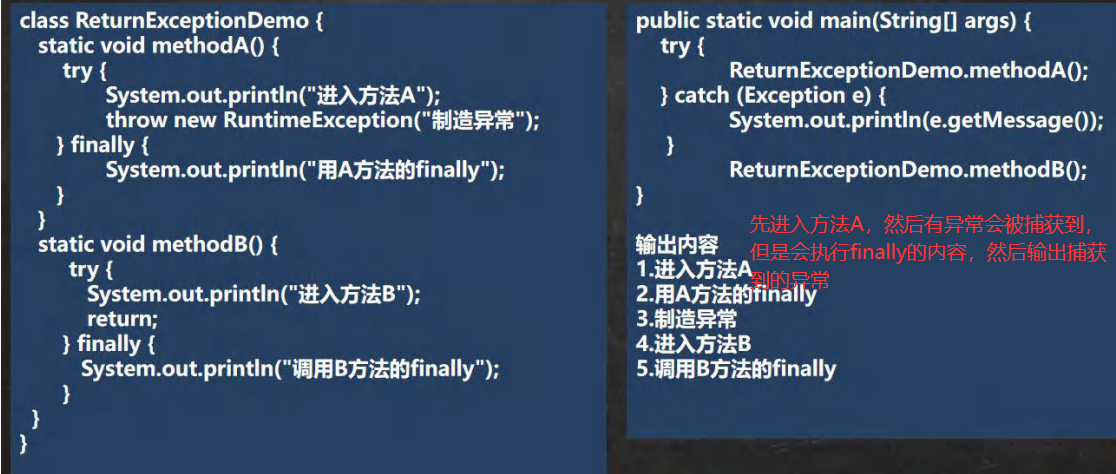
1 2 3 4 5 6 7 8 9 10 11 12 13 14 15 16 17 18 19 20 21 22 23 24 25 26 27 28 29 30 31 32 33 public class tryCatch {public static void main (String[] args) {try {Person person = new Person ();null ;int n1 = 10 ;int n2 = 0 ;int res = n1 / n2;"前面有异常,我就不会输出" );catch (NullPointerException e) { "空指针异常=" + e.getMessage());catch (ArithmeticException e) {"算术异常=" + e.getMessage());catch (Exception e) {finally {"不管有没有异常,我都会执行" );class Person {private String name = "jack" ;public String getName () {return name;
1 2 3 4 5 6 7 8 9 10 11 public class tryFinally {public static void main (String[] args) {try {int res = 1 /0 ;"发生异常,我不会执行" );finally {"这段代码要执行" );"try-finally,如果有异常,这里不会执行,直接结束程序" );
1 2 3 4 5 6 7 8 9 10 11 12 13 14 15 16 17 18 19 20 public class TryCatchExcrise {public static void main (String[] args) {Scanner scanner = new Scanner (System.in);int num = 0 ;String inputStr = "" ;while (true ) {"请输入一个数字" );try {break ;catch (NumberFormatException e) {"输入有误,请重新输入" );"你输入的是:" + num);
面试题
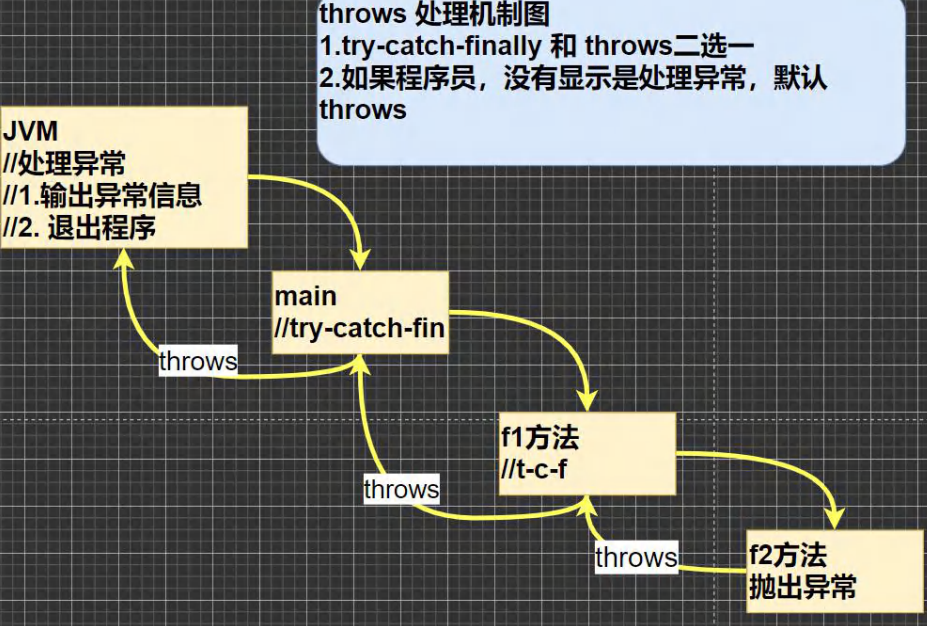
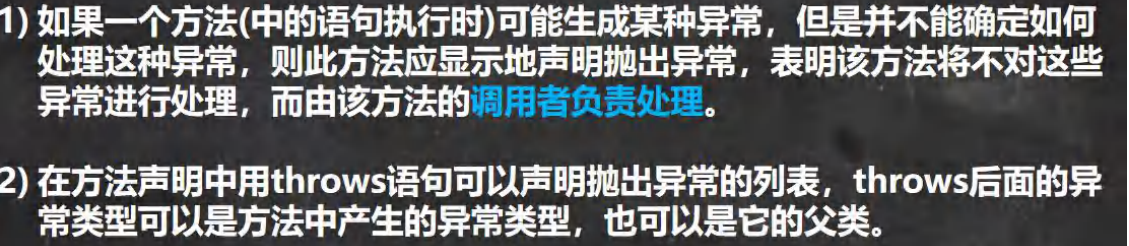
throws
1 2 3 4 5 6 7 8 9 10 11 12 13 14 15 16 17 18 19 20 21 22 23 24 25 26 27 28 29 30 31 32 33 34 35 36 37 38 39 40 41 42 43 44 45 46 47 48 public class ThrowsDetail {public static void main (String[] args) {public static void f2 () {int n1 = 10 ;int n2 = 0 ;double res = n1 / n2;public static void f1 () throws FileNotFoundException {public static void f3 () throws FileNotFoundException { FileInputStream fis = new FileInputStream ("d://aa.txt" );public static void f4 () {public static void f5 () throws ArithmeticException {class Father { public void method () throws RuntimeException {class Son extends Father {@Override public void method () throws ArithmeticException {
自定义异常
1 2 3 4 5 6 7 8 9 10 11 12 13 14 15 16 17 18 19 20 21 22 23 public class MyException {public static void main (String[] args) {int age = 250 ;if (age > 0 && age <= 150 ) {"年龄合法" );else {throw new AgeException ("年龄不合法" );class AgeException extends RuntimeException {public AgeException (String message) { super (message);
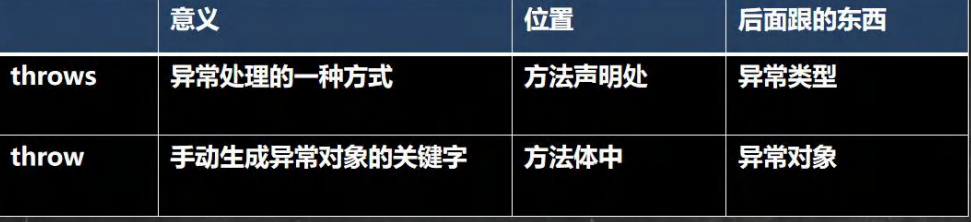
throw 和 throws
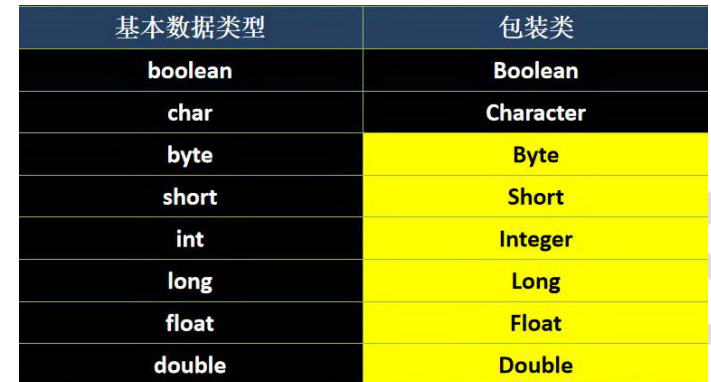
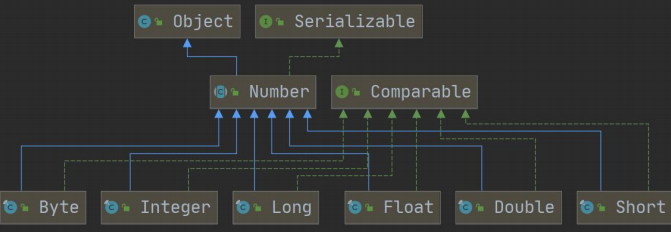
常用类 包装类
包装类和基本数据的转换
1 2 3 4 5 6 7 8 9 10 11 12 13 14 15 16 17 18 19 20 21 22 public class Interge01 {public static void main (String[] args) {int n1 = 5 ;Integer integer = new Integer (n1);Integer integer1 = Integer.valueOf(n1);int n2 = 100 ;Integer integer2 = n2;
包装类型和 String 类型的相互转换 1 2 3 4 5 6 7 8 9 10 11 12 13 14 15 16 17 public class WrapperVSString {public static void main (String[] args) {Integer n = 1 ; String i = n + "" ;String i2 = n.toString();String i3 = String.valueOf(n);String s = "123" ;Integer n1 = Integer.parseInt(s); ;Integer n2 = new Integer (s);
Integer 类和 Character 类的常用方法 1 2 3 4 5 6 7 8 9 10 11 12 13 14 15 public class WrapperMethod { public static void main (String[] args) { 'a' ));'a' ));'a' ));'a' ));'a' ));'a' ));'A' ));
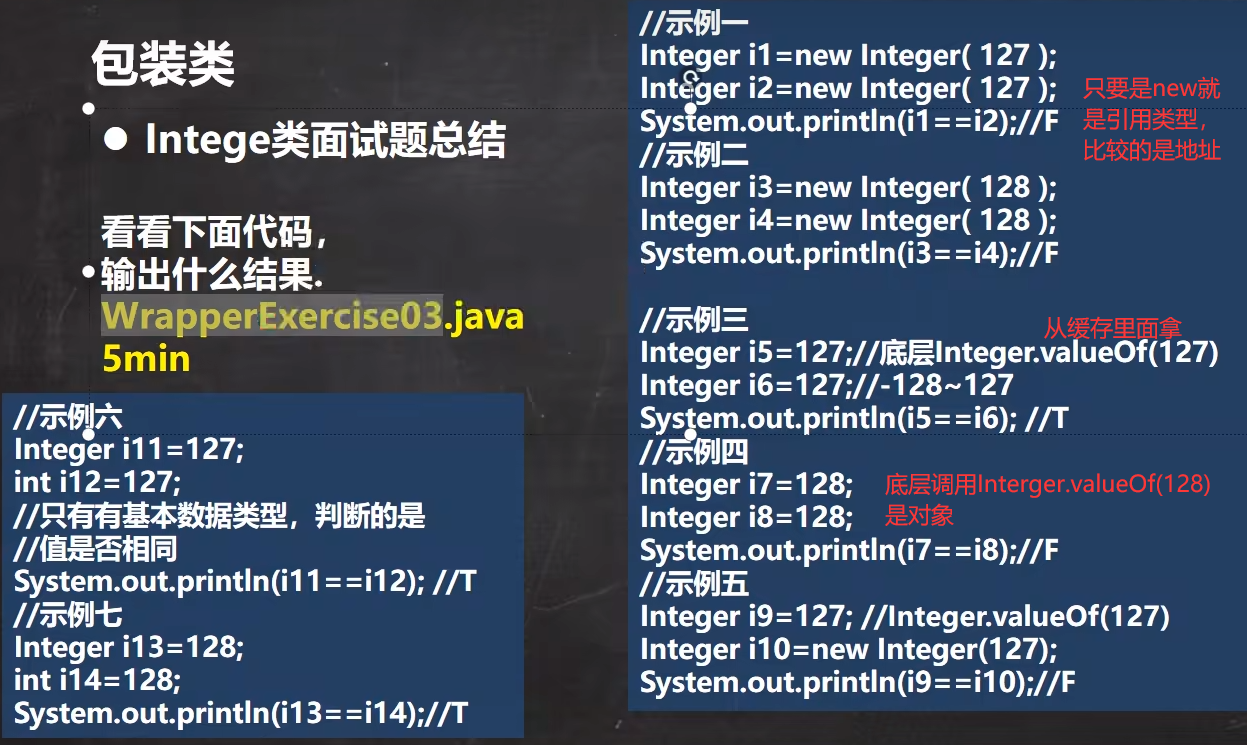
源码解读:
1 2 3 4 5 6 7 8 9 10 11 12 13 14 15 16 public static Integer valueOf (int i) {if (i >= IntegerCache.low && i <= IntegerCache.high)return IntegerCache.cache[i + (-IntegerCache.low)];return new Integer (i);Integer m = 1 ; Integer n = 1 ;Integer x = 128 ;Integer y = 128 ;
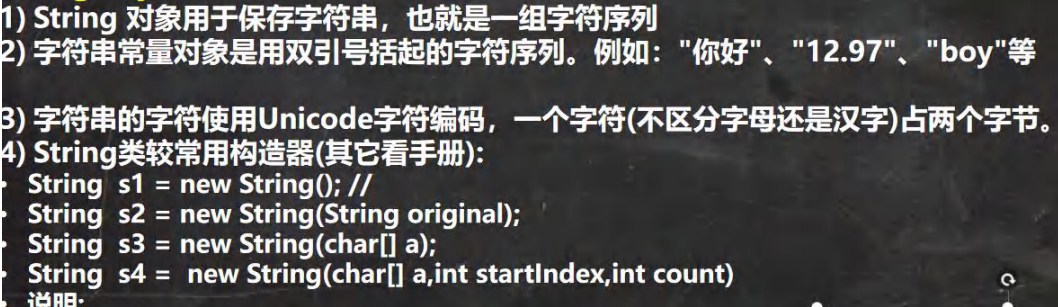
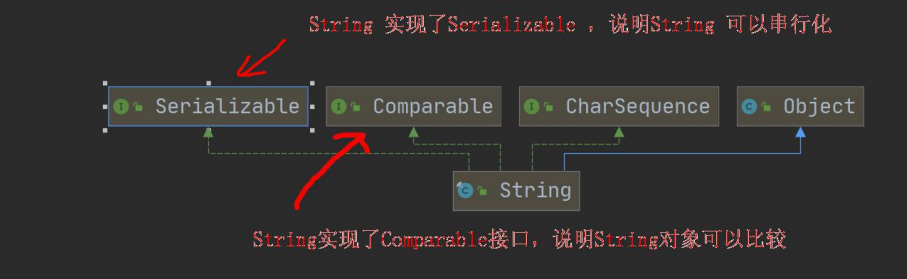
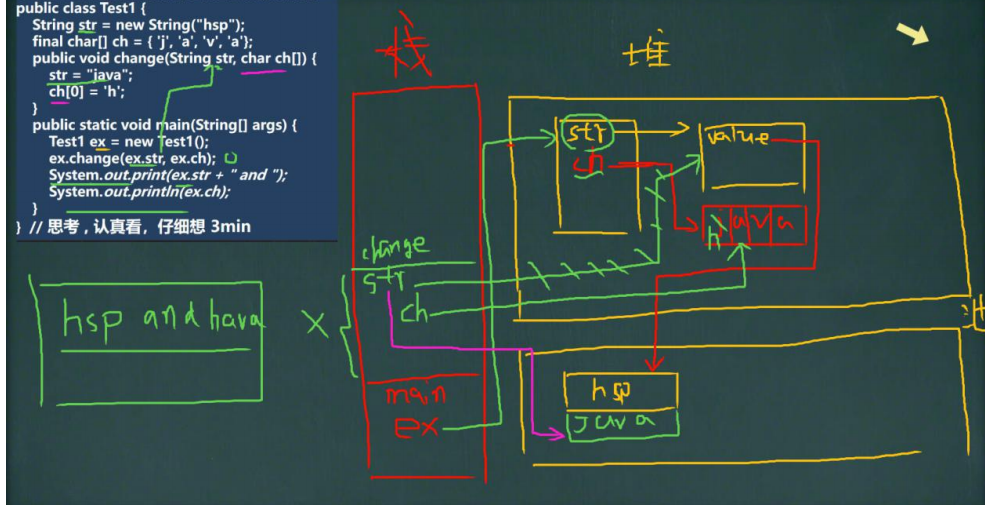
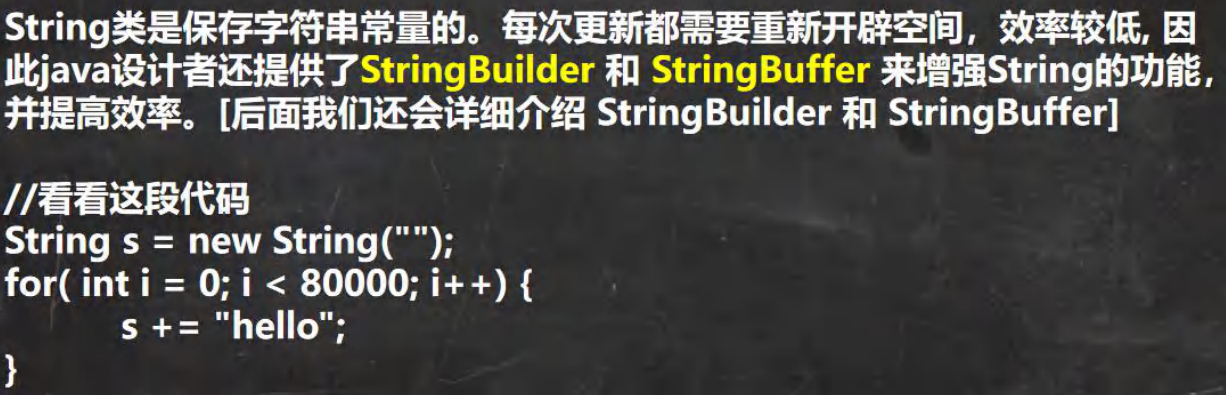
String 类 String 类的理解和创建对象
1 2 3 4 5 6 7 8 9 10 11 12 13 14 15 16 17 18 19 20 21 22 23 24 25 26 27 public class String01 {public static void main (String[] args) {String name = "jack" ;"tom" ;final char values[] = {'a' ,'b' };0 ] = 'c' ;char [] v2 = {'t' ,'o' ,'m' };
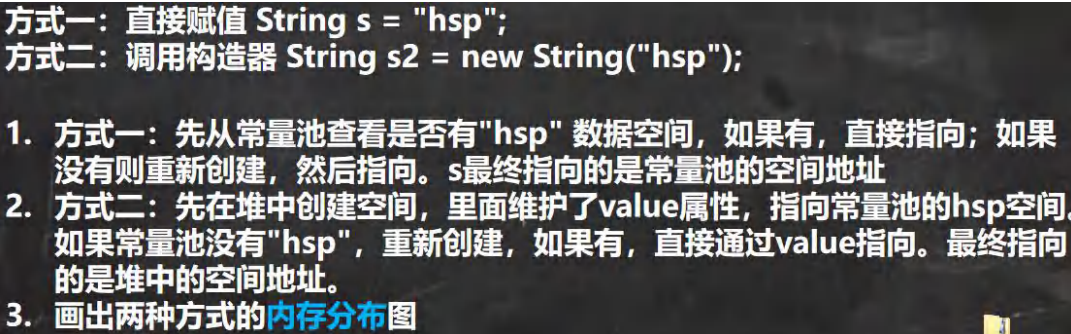
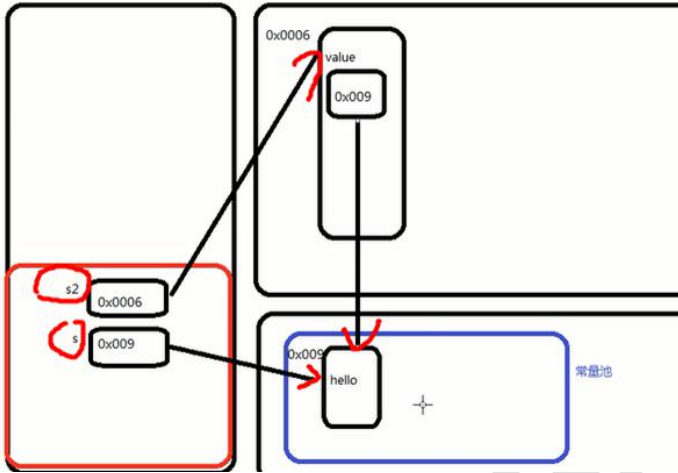
创建 String 对象的两种方式 1 2 String name = "abc" String name = new String ("abc" )
测试题
字符串的特性
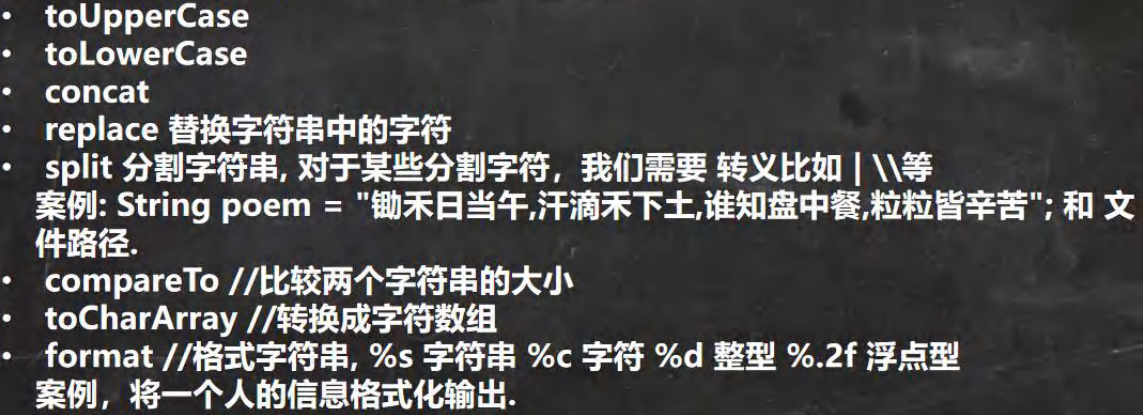
String 类的常见方法
1 2 3 4 5 6 7 8 9 10 11 12 13 14 15 16 17 18 19 20 21 22 23 24 25 26 27 28 29 30 31 32 33 34 35 36 37 38 public class StringMethod {public static void main (String[] args) {String str1 = "hello" ;String str2 = "Hello" ;String username = "johN" ;if ("john" .equalsIgnoreCase(username)) {"Success!" );else {"Failure!" );"abc" .length());String s1 = "wer@terwe@g" ;int index = s1.indexOf('@' );"weIndex=" + s1.indexOf("we" ));"wer@terwe@g@" ;'@' );"ter 的位置=" + s1.lastIndexOf("ter" ));String name = "hello,张三" ;6 ));2 ,5 ));
1 2 3 4 5 6 7 8 9 10 11 12 13 14 15 16 17 18 19 20 21 22 23 24 25 26 27 28 29 30 31 32 33 34 35 36 37 38 39 40 41 42 43 44 45 46 47 48 49 50 51 52 53 54 55 56 57 58 59 60 61 62 63 64 65 66 67 68 69 70 71 72 73 74 75 76 77 78 public class StringMethod2 {public static void main (String[] args) {String s = "heLLo" ;String s1 = "宝玉" ;"林黛玉" ).concat("薛宝钗" ).concat("together" );"宝玉 and 林黛玉 林黛玉 林黛玉" ;String s11 = s1.replace("宝玉" , "jack" );String poem = "锄禾日当午,汗滴禾下土,谁知盘中餐,粒粒皆辛苦" ;"," );"E:\\aaa\\bbb" ;"\\\\" );"==分割后内容===" );for (int i = 0 ; i < split.length; i++) {"happy" ;char [] chs = s.toCharArray();for (int i = 0 ; i < chs.length; i++) {String a = "jcck" ;String b = "jack" ;String name = "john" ;int age = 10 ;double score = 56.857 ;char gender = '男' ;String info = "我的姓名是" + name + "年龄是" + age + ",成绩是" + score + "性别是" + gender + "。希望大家喜欢我! " ;String formatStr = "我的姓名是%s 年龄是%d,成绩是%.2f 性别是%c.希望大家喜欢我!" ;String info2 = String.format(formatStr, name, age, score, gender);"info2=" + info2);
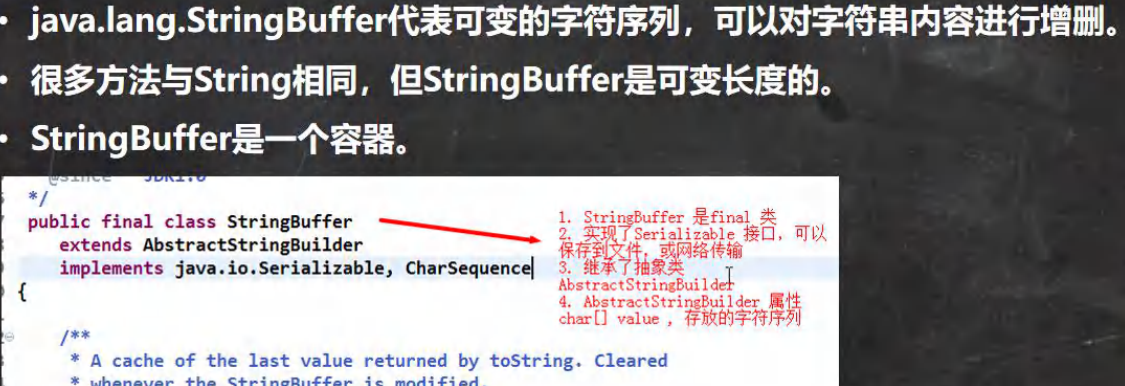
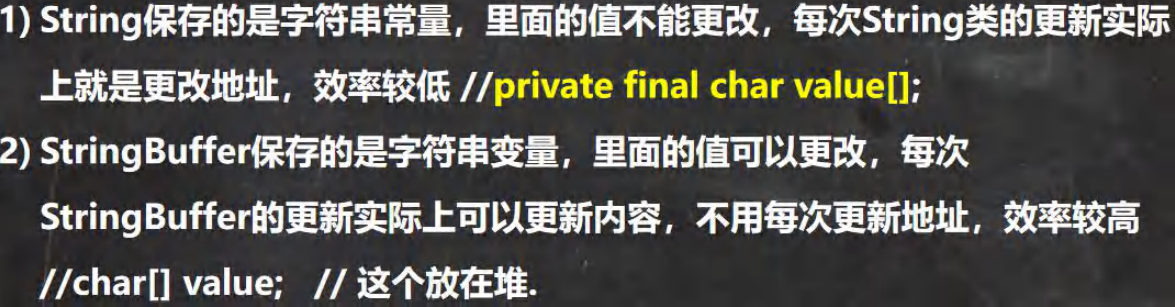
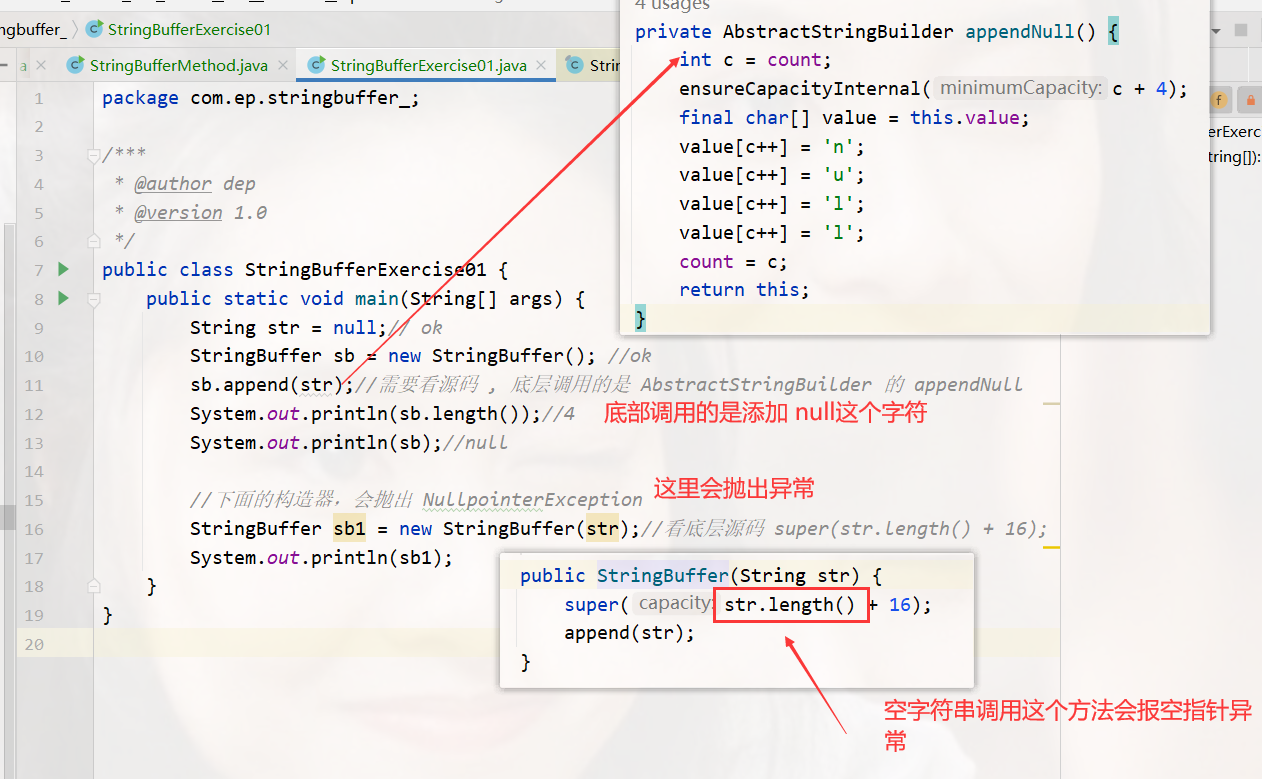
StringBuffer类
1 2 3 4 5 6 7 8 9 10 11 12 public class StringBuffer01 {public static void main (String[] args) {StringBuffer stringBuffer = new StringBuffer ();
String VS StringBuffer
String 和 StringBuffer 相互转换 1 2 3 4 5 6 7 8 9 10 11 12 13 14 15 16 17 18 19 20 21 public class StringAndStringBuffer {public static void main (String[] args) {String str = "abc" ;StringBuffer stringBuffer = new StringBuffer (str);StringBuffer stringBuffer1 = new StringBuffer ();StringBuffer sbuf = new StringBuffer ("abc" );String str1 = sbuf.toString();String s = new String (sbuf);
StringBuffer 类常见方法 1 2 3 4 5 6 7 8 9 10 11 12 13 14 15 16 17 18 19 20 21 22 23 24 25 26 27 28 29 30 31 32 33 34 35 36 37 public class StringBufferMethod {public static void main (String[] args) {StringBuffer s = new StringBuffer ("hello" );',' );"张三丰" );"赵敏" ).append(100 ).append(true ).append(10.5 );11 , 14 );9 , 11 , "周芷若" );int indexOf = s.indexOf("张三丰" );9 , "赵敏" );
1 2 3 4 5 6 7 8 9 10 11 12 public class StringBufferExercise02 {public static void main (String[] args) {String price = "123456875.988" ;StringBuffer stringBuffer = new StringBuffer (price);for (int i = stringBuffer.indexOf("." ) -3 ; i > 0 ; i -= 3 ) {"," );
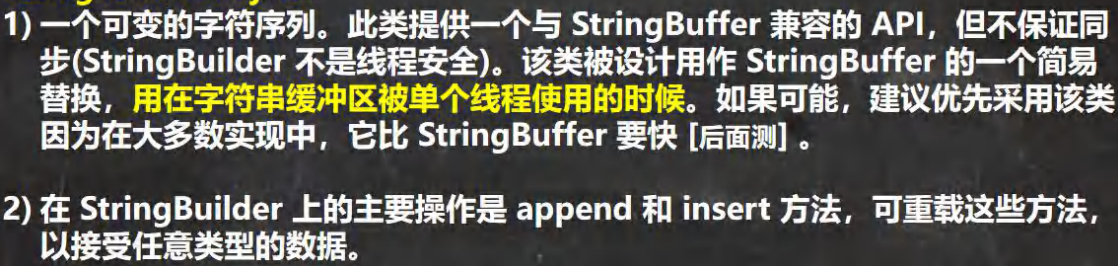
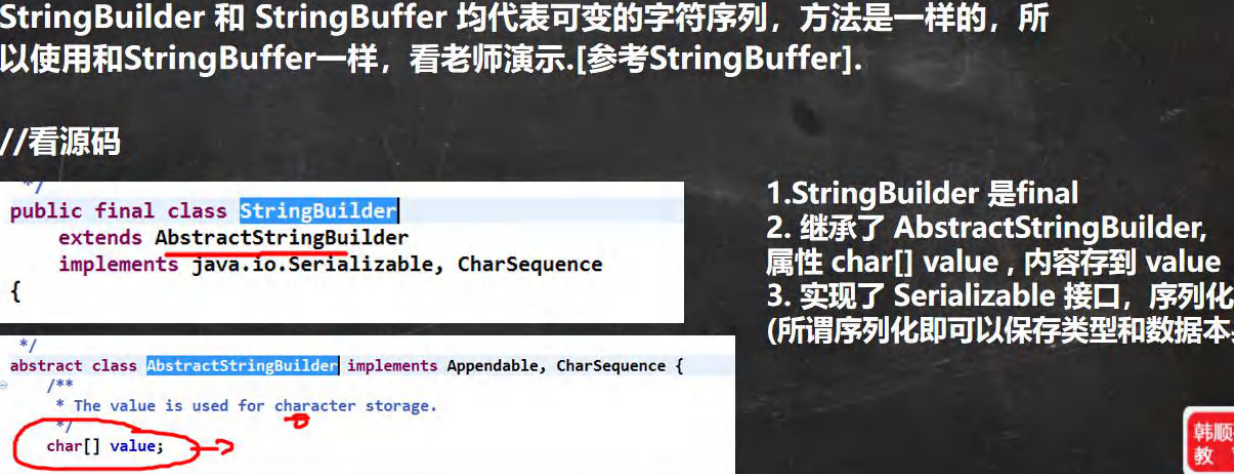
StringBuilder 类
1 2 3 4 5 6 7 8 9 10 11 public class StringBuilder01 {public static void main (String[] args) {StringBuilder abc = new StringBuilder ("abc" );
StringBuilder 常用方法
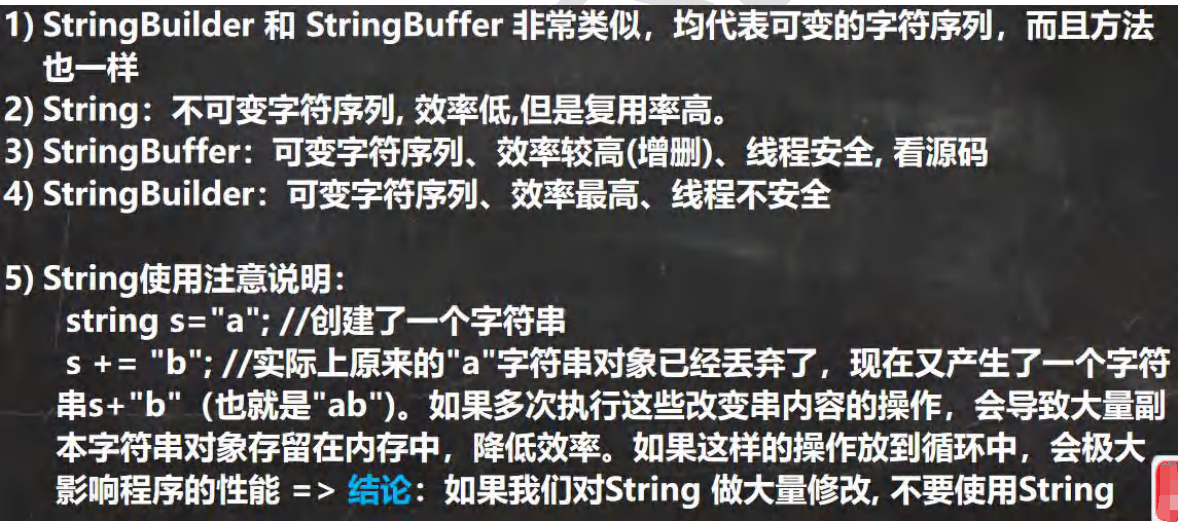
String、StringBuffer 和 StringBuilder 的比较
Math类 1 2 3 4 5 6 7 8 9 10 11 12 13 14 15 16 17 18 19 20 21 22 23 24 25 26 27 28 29 30 31 32 33 34 35 36 37 38 39 40 41 42 43 44 45 46 47 48 49 50 public class MathMethod {public static void main (String[] args) {int abs = Math.abs(-9 );double pow = Math.pow(2 , 4 );double ceil = Math.ceil(3.9 );double floor = Math.floor(4.001 );long round = Math.round(5.51 );double sqrt = Math.sqrt(9.0 );for (int i = 0 ; i < 100 ; i++) {int )(2 + Math.random() * (7 - 2 + 1 )));int min = Math.min(1 , 9 );int max = Math.max(45 , 90 );"min=" + min);"max=" + max);
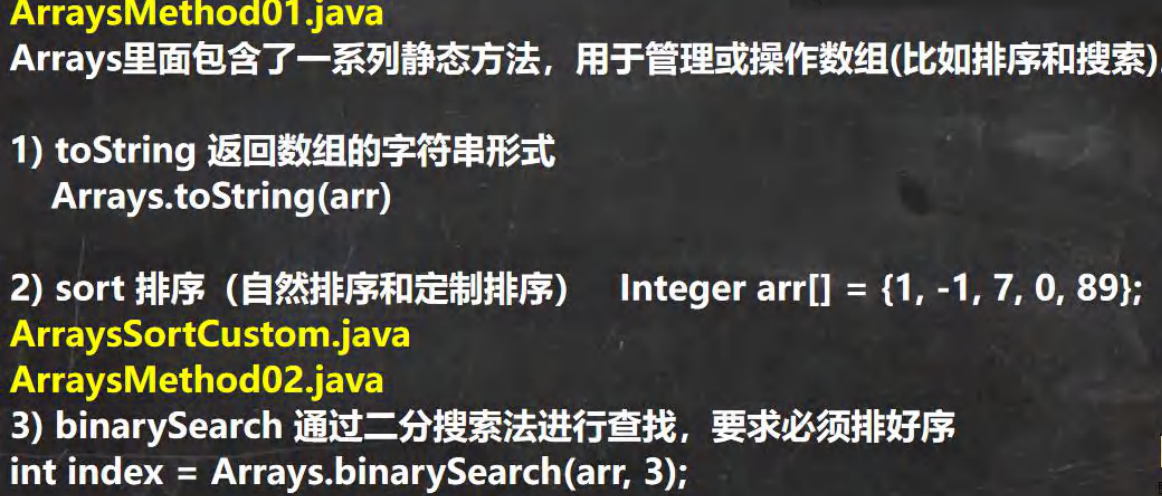
Arrays类 常用方法
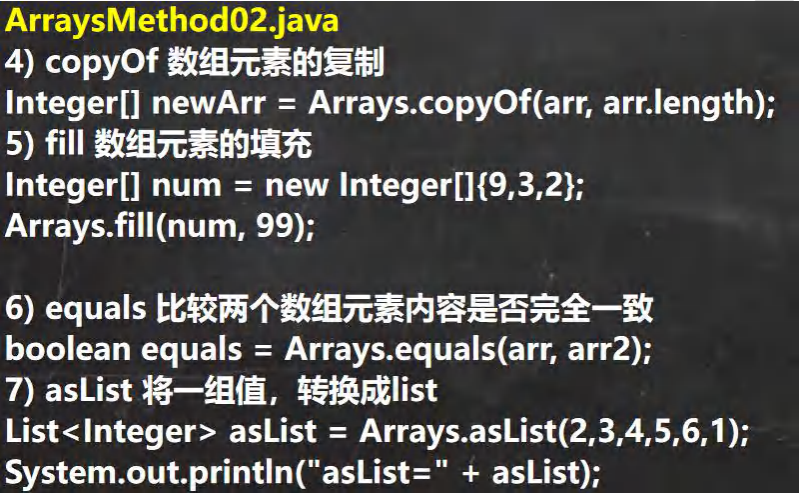
1 2 3 4 5 6 7 8 9 10 11 12 13 14 15 16 17 18 19 20 21 22 23 24 25 26 27 28 29 30 31 32 33 34 35 36 37 38 39 40 41 42 43 44 45 46 47 48 49 50 51 52 53 54 55 56 57 58 59 60 61 62 63 64 65 66 67 68 69 70 71 72 73 74 75 76 77 78 79 80 81 82 83 84 85 86 87 88 89 90 91 92 public class ArraysMethod01 {public static void main (String[] args) {1 ,2 ,3 ,4 ,5 };1 , -1 , 7 , 0 , 89 };new Comparator () {public int compare (Object o1, Object o2) {Integer i1 = (Integer) o1;Integer i2 = (Integer) o2;return i2 - i1; 1 , 2 , 90 , 123 , 567 };92 ));new Integer []{9 ,3 ,2 };99 );1 , 2 , 90 , 123 };List asList = Arrays.asList(2 , 3 , 4 , 5 , 6 , 1 );
自定义冒泡 1 2 3 4 5 6 7 8 9 10 11 12 13 14 15 16 17 18 19 20 21 22 23 24 25 26 27 28 29 30 31 32 33 34 35 36 37 38 39 40 41 42 43 44 45 46 47 48 49 50 51 52 53 package com.ep.arrays_;import java.util.Arrays;import java.util.Comparator;public class ArraysBubbleCustom {public static void main (String[] args) {1 ,5 ,6 ,8 ,3 ,10 ,4 };new Comparator () {public int compare (Object o1, Object o2) {Integer i1 = (Integer) o1;Integer i2 = (Integer) o2;return i2-i1;public static void bubble (Integer[] arr) {Integer tmp = 0 ;for (int i = 0 ; i < arr.length - 1 ; i++) {for (int j = 0 ; j < arr.length -1 -i; j++) {if (arr[j] > arr[j+1 ]) {1 ];1 ] = tmp;public static void bubble (Integer[] arr, Comparator c) {Integer tmp = 0 ;for (int i = 0 ; i < arr.length - 1 ; i++) {for (int j = 0 ; j < arr.length -1 -i; j++) {if (c.compare(arr[j],arr[j+1 ]) > 0 ) {1 ];1 ] = tmp;
练习 1 2 3 4 5 6 7 8 9 10 11 12 13 14 15 16 17 18 19 20 21 22 23 24 25 26 27 28 29 30 31 32 33 34 35 36 37 38 39 40 41 42 43 44 45 46 47 48 49 50 51 52 53 54 55 56 57 58 59 60 61 62 63 64 65 66 public class ArraysExercise {public static void main (String[] args) {new Books [4 ];0 ] = new Books ("红楼梦" , 100 );1 ] = new Books ("金瓶梅新" , 90 );2 ] = new Books ("青年文摘 20 年" , 5 );3 ] = new Books ("java 从入门到放弃~" , 300 );new Comparator <Books>() {@Override public int compare (Books o1, Books o2) {double differ = o1.price - o2.price;if (differ > 0 ){return 1 ;else if (differ < 0 ) {return -1 ;else {return 0 ;new Comparator <Books>() {@Override public int compare (Books o1, Books o2) {return o1.name.length() - o2.name.length();class Books {public String name;public double price;public Books (String name, double price) {this .name = name;this .price = price;public String getName () {return name;public void setName (String name) {this .name = name;public double getPrice () {return price;public void setPrice (double price) {this .price = price;@Override public String toString () {return "Books{" +"name='" + name + '\'' +", price=" + price +'}' ;
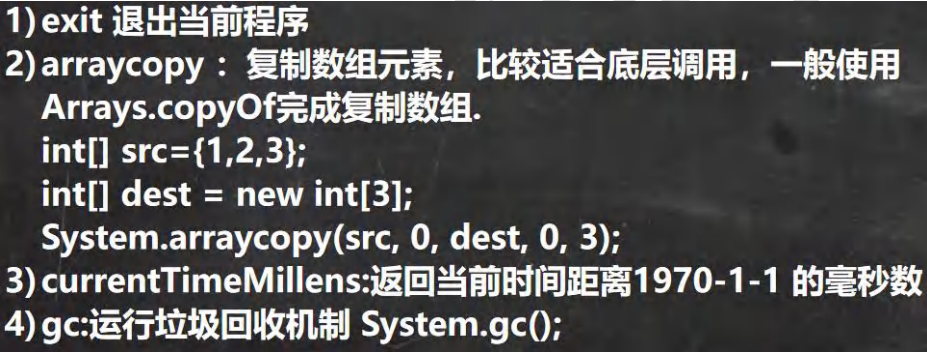
System类
1 2 3 4 5 6 7 8 9 10 11 12 13 14 15 16 17 18 19 20 21 22 23 24 25 26 public class System01 {public static void main (String[] args) {1 ,2 ,3 };new Integer [3 ]; 0 ,dest,0 ,dest.length);
BigInteger 和 BigDecimal 类
1 2 3 4 5 6 7 8 9 10 11 12 13 14 15 16 17 public class BigTnterge1 {public static void main (String[] args) {BigInteger bigInteger = new BigInteger ("12323232323232323232323232333333333" );BigInteger i = new BigInteger ("100" );BigInteger add = bigInteger.add(i); BigInteger subtract = bigInteger.subtract(i); BigInteger multiply = bigInteger.multiply(i); BigInteger divide = bigInteger.divide(i);
1 2 3 4 5 6 7 8 9 10 11 12 13 14 15 16 17 18 19 20 21 22 23 public class BigDecimal1 {public static void main (String[] args) {double d = 199.999999999999999999999999999999999999 ;BigDecimal bigDecimal = new BigDecimal ("199.999999999999999999999999999999" );BigDecimal i = new BigDecimal ("1.1" );BigDecimal add = bigDecimal.add(i);BigDecimal subtract = bigDecimal.subtract(i);BigDecimal multiply = bigDecimal.multiply(i);BigDecimal divide = bigDecimal.divide(i, BigDecimal.ROUND_UP);
日期类 第一代日期类Date
1 2 3 4 5 6 7 8 9 10 11 12 13 14 15 16 17 18 19 20 21 22 23 24 25 public class Date0 {public static void main (String[] args) throws ParseException {Date d1 = new Date (); "当前日期=" + d1); Date d2 = new Date (9234567 );"d2=" + d2); SimpleDateFormat sdf = new SimpleDateFormat ("yyyy年MM月dd日 hh:mm:ss E" );String format = sdf.format(d1); String s = "1996年01月01日 10:20:30 星期一" ;Date date = sdf.parse(s);
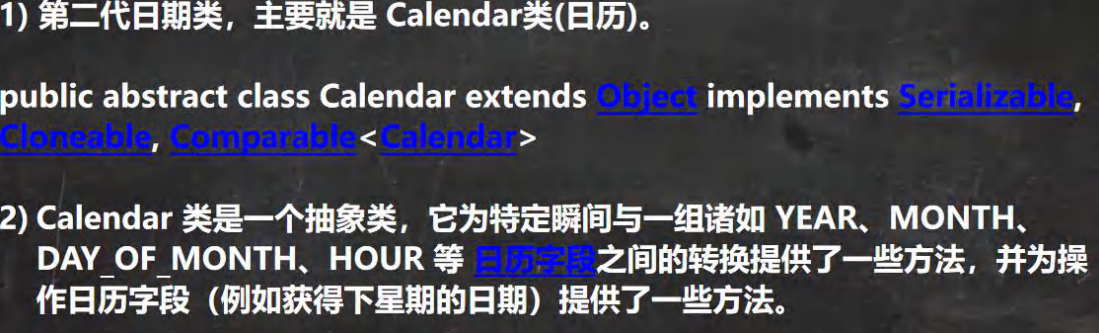
第二代日期类Calendar
1 2 3 4 5 6 7 8 9 10 11 12 13 14 15 16 17 18 19 20 21 22 23 24 25 public class Calender0 {public static void main (String[] args) {Calendar c = Calendar.getInstance(); "c=" + c);"年:" + c.get(Calendar.YEAR));"月:" + (c.get(Calendar.MONTH) + 1 ));"日:" + c.get(Calendar.DAY_OF_MONTH));"小时:" + c.get(Calendar.HOUR));"分钟:" + c.get(Calendar.MINUTE));"秒:" + c.get(Calendar.SECOND));"年" + (c.get(Calendar.MONTH)+ 1 ) + "月" + c.get(Calendar.DAY_OF_MONTH)"日" + c.get(Calendar.HOUR_OF_DAY) + ":" + c.get(Calendar.MINUTE) +":" + c.get(Calendar.SECOND)
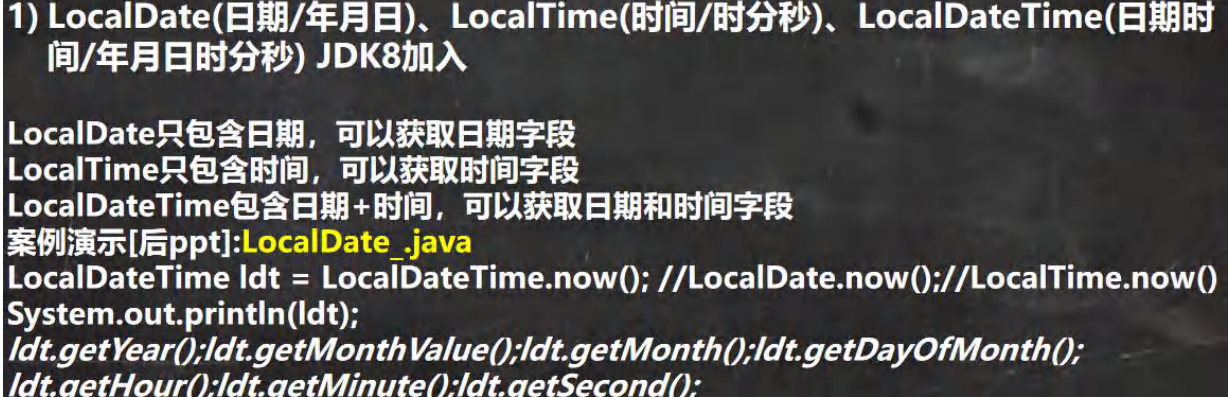
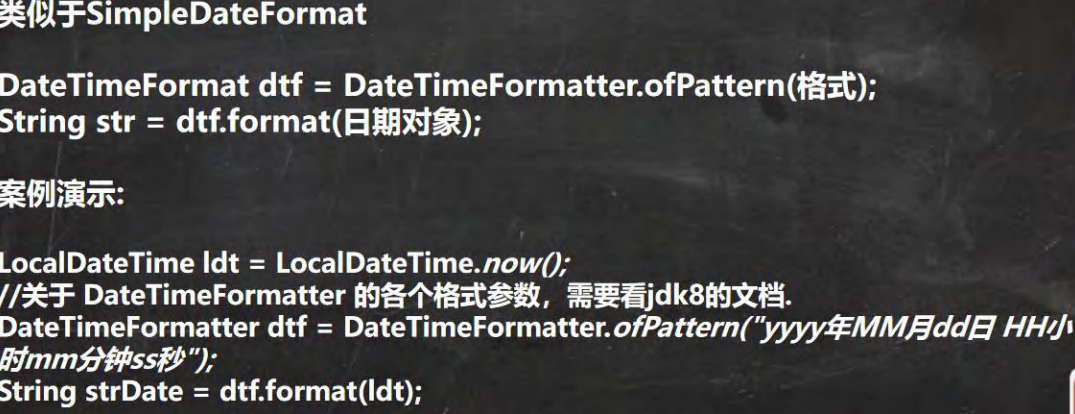
第三代日期类LocalDate
1 2 3 4 5 6 7 8 9 10 11 12 13 14 15 16 17 18 19 20 21 22 23 24 25 26 27 28 29 30 31 32 33 34 35 36 public class LocalDate0 {public static void main (String[] args) {LocalDateTime now = LocalDateTime.now(); DateTimeFormatter dateTimeFormatter = DateTimeFormatter.ofPattern("yyyy-MM-dd HH:mm:ss" );String format = dateTimeFormatter.format(now);LocalDateTime ldt = LocalDateTime.now();"年=" + ldt.getYear());"月=" + ldt.getMonth()); "月=" + ldt.getMonthValue());"日=" + ldt.getDayOfMonth());"时=" + ldt.getHour());"分=" + ldt.getMinute());"秒=" + ldt.getSecond());LocalDate now1 = LocalDate.now(); LocalTime now2 = LocalTime.now();LocalDateTime localDateTime = ldt.plusDays(890 );"890 天后=" + dateTimeFormatter.format(localDateTime));LocalDateTime localDateTime2 = ldt.minusMinutes(3456 );"3456 分钟前 日期=" + dateTimeFormatter.format(localDateTime2));
Instant 时间戳
1 2 3 4 5 6 7 8 9 10 11 12 13 14 public class Instant0 {public static void main (String[] args) {Instant now = Instant.now();Date date = Date.from(now);Instant instant = date.toInstant();
集合 数组的不足
集合的优点
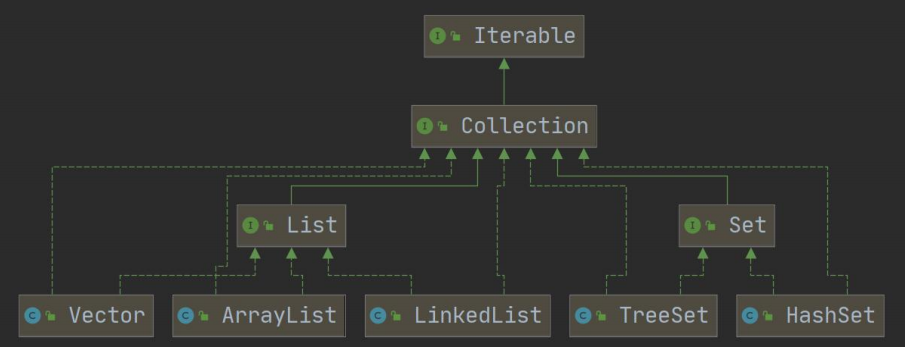
集合的框架体系
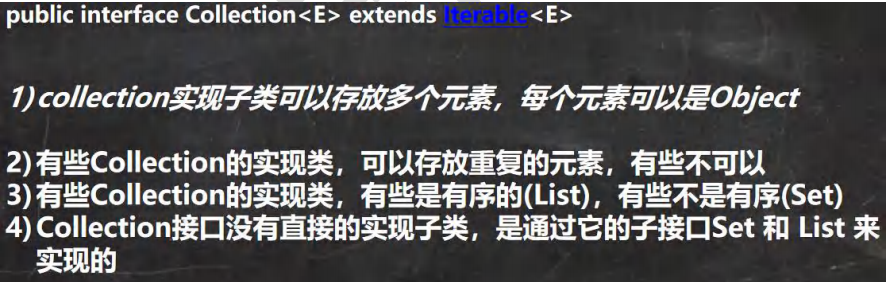
集合主要是两组(单列集合 , 双列集合)
Collection 接口有两个重要的子接口 List Set , 他们的实现子类都是单列集合
Map 接口的实现子类 是双列集合,存放的 K-V
Collection 接口和常用方法
由于接口不能直接实例化,采用ArrayList实现类来展示Collection接口的方法
1 2 3 4 5 6 7 8 9 10 11 12 13 14 15 16 17 18 19 20 21 22 23 24 25 26 27 28 29 30 31 32 33 34 35 36 37 38 39 40 41 42 public class CollectionMethod {public static void main (String[] args) {List list = new ArrayList ();"abc" );100 );true );"abc" ); true ));ArrayList arrayList = new ArrayList ();"李四" );"张三" );
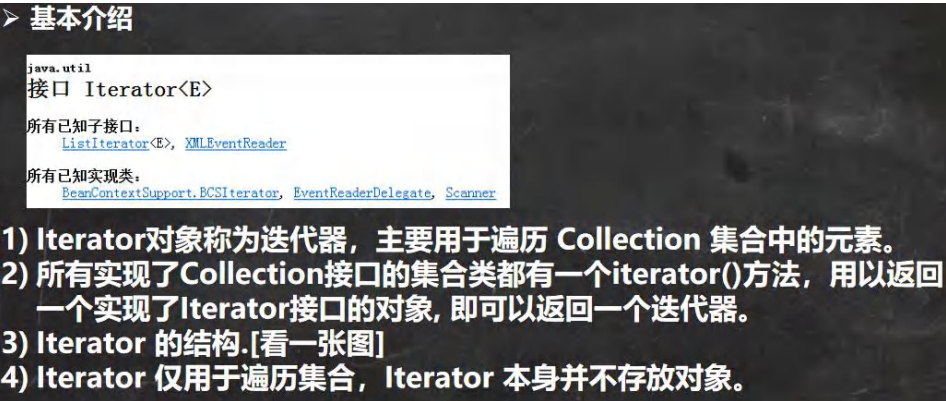
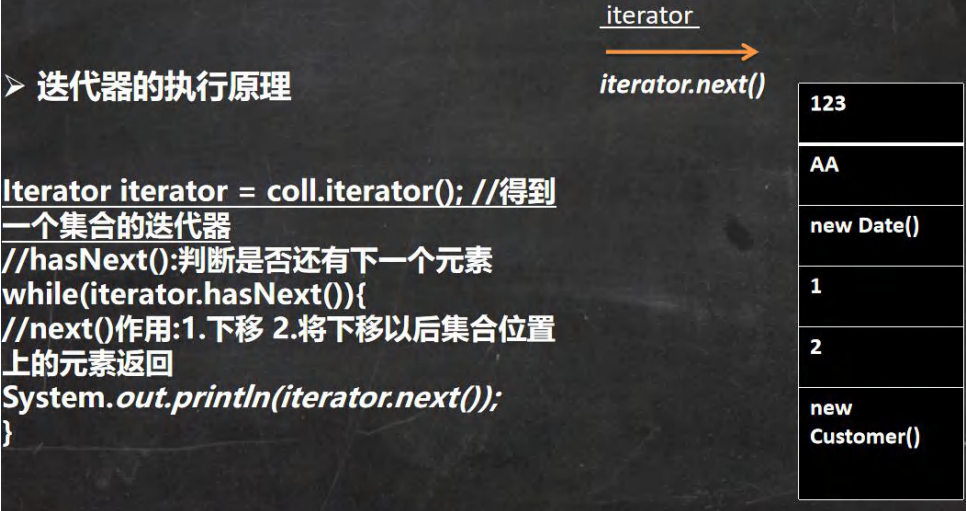
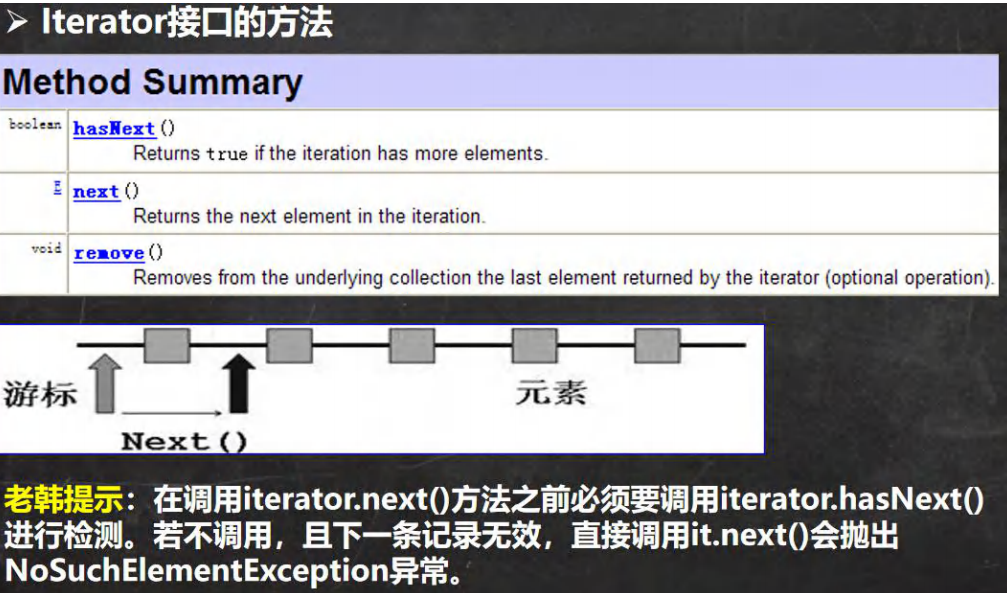
Iterator(迭代器)
1 2 3 4 5 6 7 8 9 10 11 12 13 14 15 16 17 18 19 20 21 22 23 24 25 26 27 28 29 30 31 public class CollectionIterator {public static void main (String[] args) {Book book = new Book ("三国演义" , "罗贯中" );Book book2 = new Book ("水浒传" ,"施耐庵" );Book book3 = new Book ("红楼梦" ,"曹雪芹" );Book book4 = new Book ("水浒传" ,"吴承恩" );Collection col = new ArrayList ();Iterator iterator = col.iterator();while (iterator.hasNext()) { Object next = iterator.next(); "=========================" );while (iterator.hasNext()) {Object next = iterator.next();
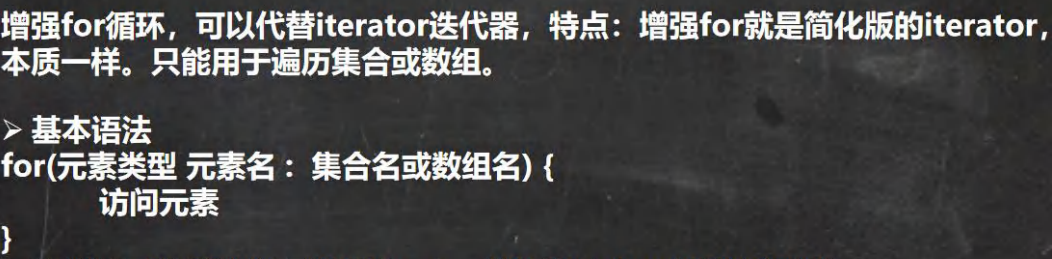
增强for循环
1 2 3 4 5 6 7 8 9 10 11 12 13 14 15 16 17 18 19 20 21 public class CollectionFor {public static void main (String[] args) {Book book = new Book ("三国演义" , "罗贯中" );Book book2 = new Book ("水浒传" ,"施耐庵" );Book book3 = new Book ("红楼梦" ,"曹雪芹" );Book book4 = new Book ("水浒传" ,"吴承恩" );Collection col = new ArrayList ();for (Object o : col) {
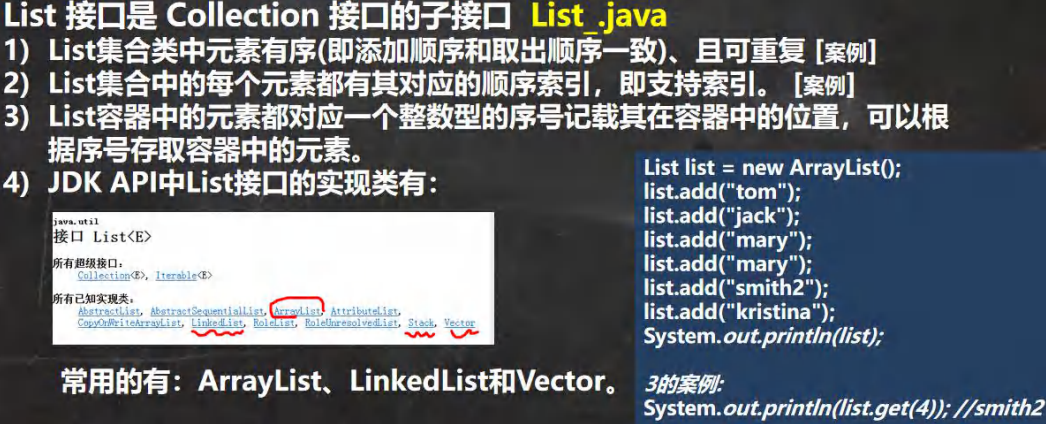
List 接口
常用方法 1 2 3 4 5 6 7 8 9 10 11 12 13 14 15 16 17 18 19 20 21 22 23 24 25 26 27 28 29 30 31 32 33 34 35 36 37 38 39 public class ListMethod {public static void main (String[] args) {List list = new ArrayList ();"张三" );"李四" );1 ,"王五" ); ArrayList arrayList = new ArrayList ();"java" );"c++" );1 ,arrayList);0 )); "java" ));"java" );"java" ));Object remove = list.remove(0 );2 ,"python" );List list1 = list.subList(0 , 3 );
三种遍历方式
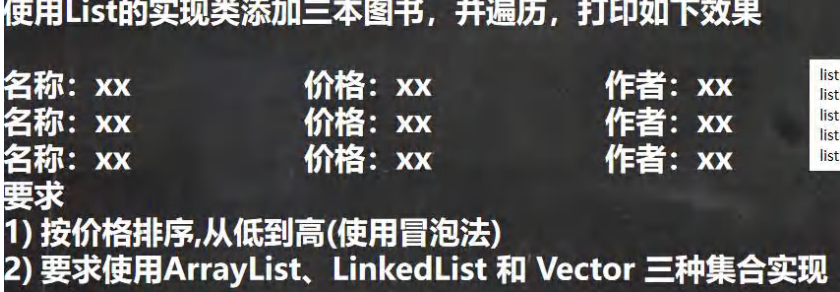
练习
1 2 3 4 5 6 7 8 9 10 11 12 13 14 15 16 17 18 19 20 21 22 23 24 25 26 27 28 29 30 31 public class ListExercise {public static void main (String[] args) {List list = new ArrayList ();new Book ("红楼梦" , "曹雪芹" , 100 ));new Book ("西游记" , "吴承恩" , 10 ));new Book ("水浒传" , "施耐庵" , 19 ));new Book ("三国" , "罗贯中" , 80 ));for (Object o : list) {public static void bubbleSort (List list) {int length = list.size();for (int i = 0 ; i < length-1 ; i++) {for (int j = 0 ; j < length-1 -i; j++) {Book book1 = (Book) list.get(j);Book book2 = (Book) list.get(j+1 );if (book1.getPrice() > book2.getPrice()) { 1 ,book1);
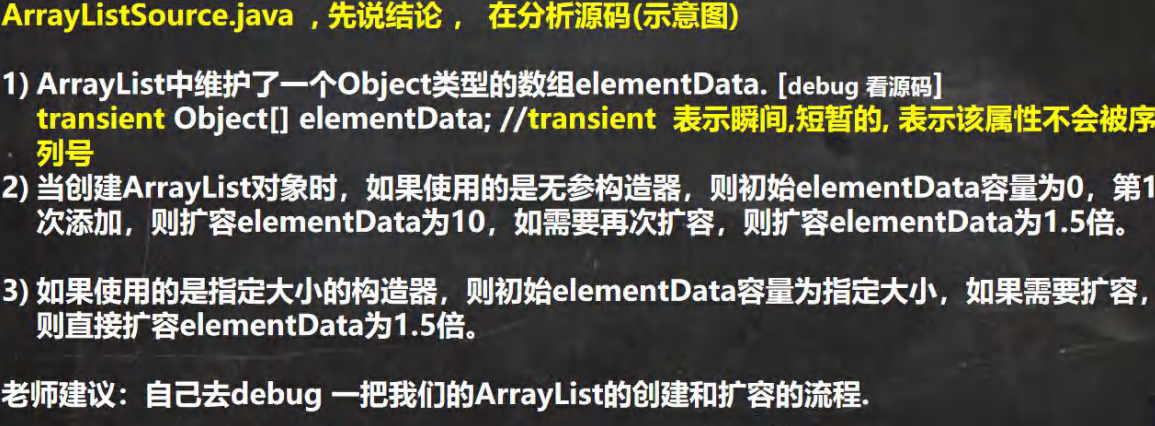
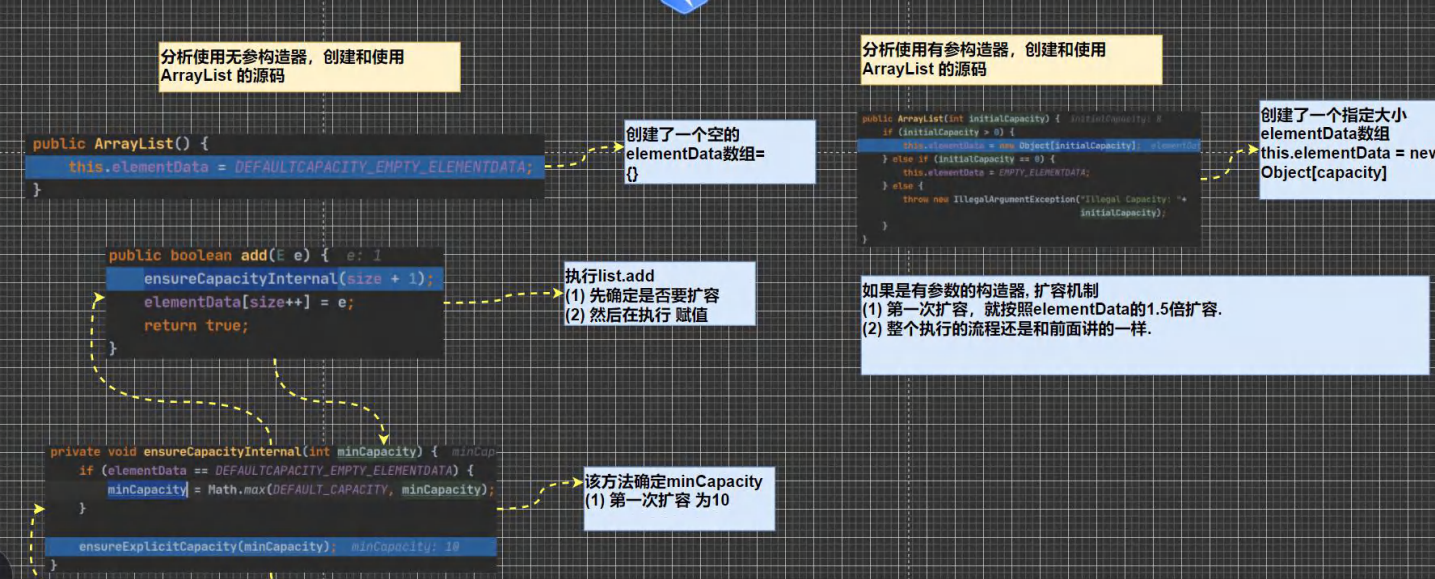
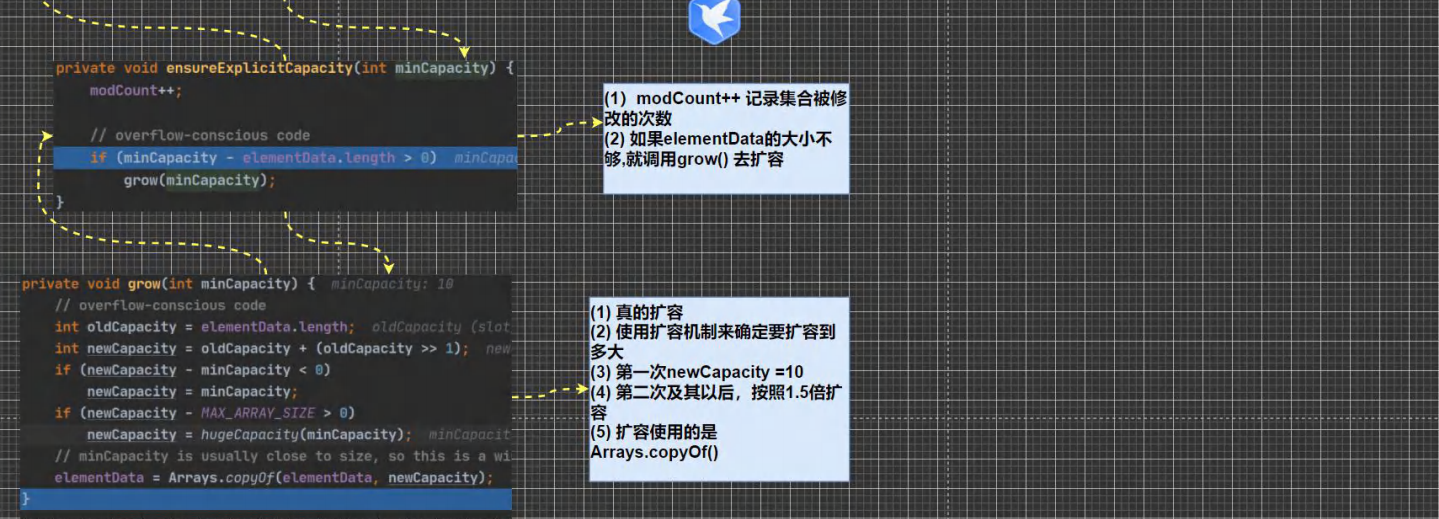
ArrayList
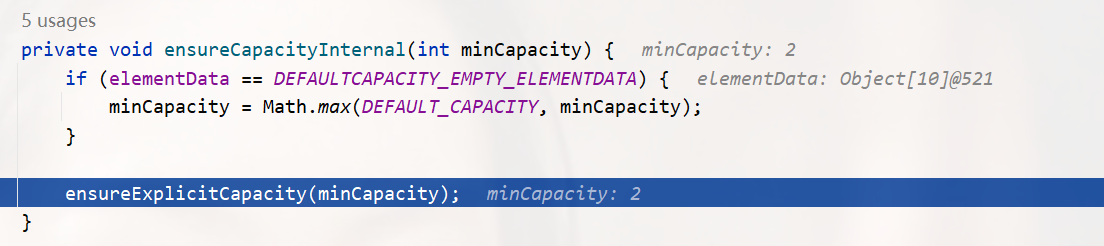
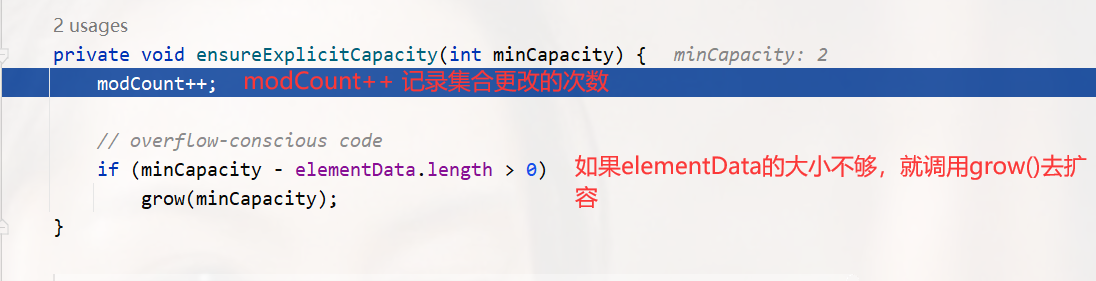
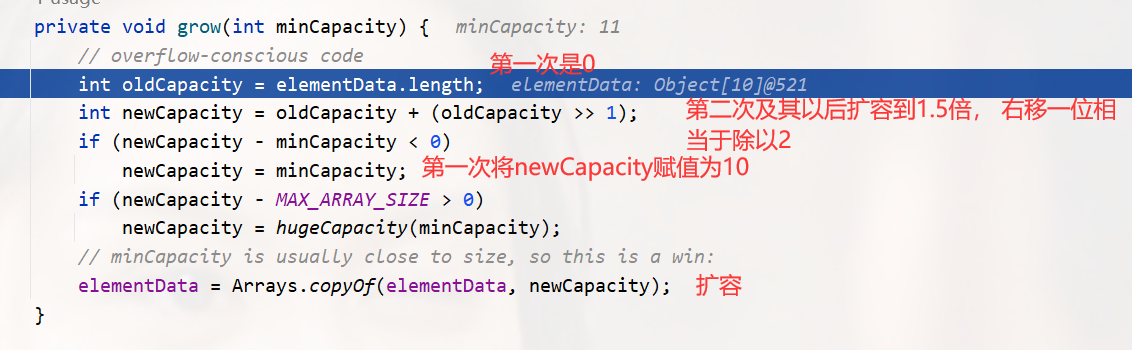
底层源码分析 调试的时候按F7进入方法内部
1 2 3 4 5 6 7 8 9 10 11 12 13 14 15 16 17 18 19 20 21 22 23 24 @SuppressWarnings({"all"}) public class ArrayListSource {public static void main (String[] args) {ArrayList list = new ArrayList ();for (int i = 1 ; i <= 10 ; i++) {for (int i = 11 ; i <= 15 ; i++) {100 );200 );null );
默认大小是10 (DEFAULT_CAPACITY)
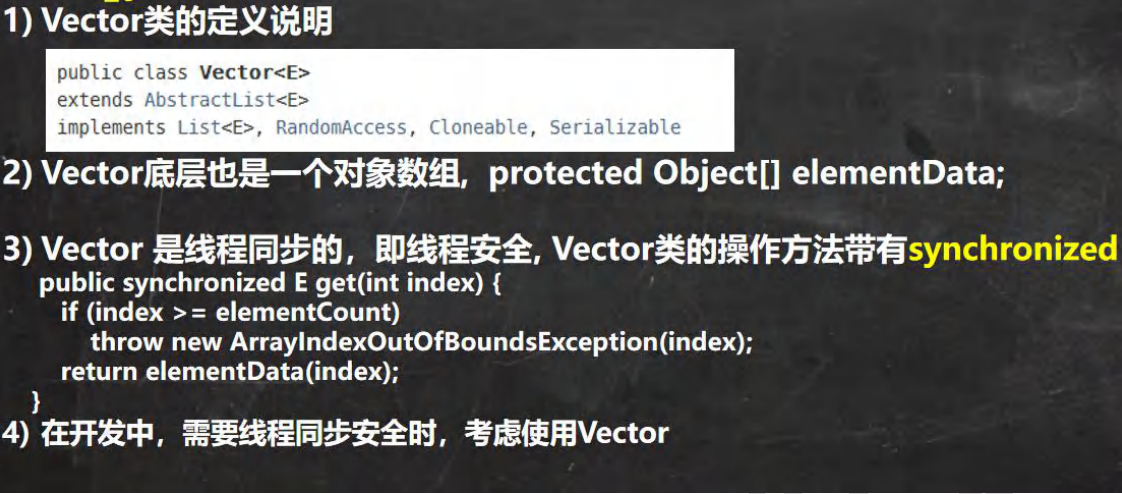
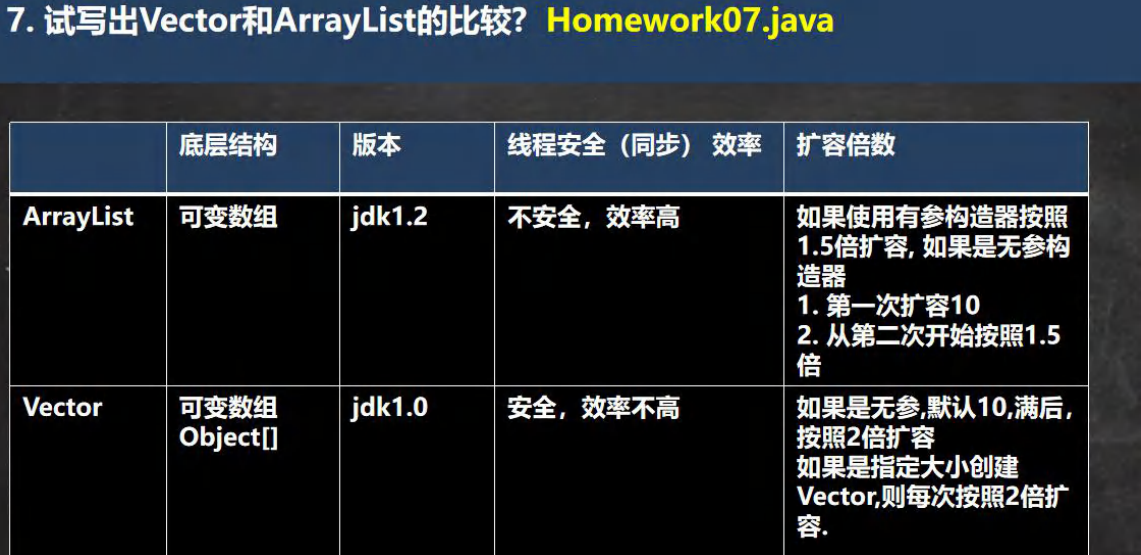
Vector
1 2 3 4 5 6 7 8 9 10 11 12 13 14 15 16 17 18 19 20 21 22 23 24 25 26 27 28 29 30 31 32 33 34 35 36 37 38 39 40 41 42 43 44 45 46 47 48 49 50 51 52 53 54 55 56 57 58 59 60 61 62 63 64 package com.ep.list_;import java.util.Vector;@SuppressWarnings({"all"}) public class vector_ {public static void main (String[] args) {Vector vector = new Vector (8 );for (int i = 0 ; i < 10 ; i++) {100 );"vector=" + vector);
Vector 和 ArrayList 的比较
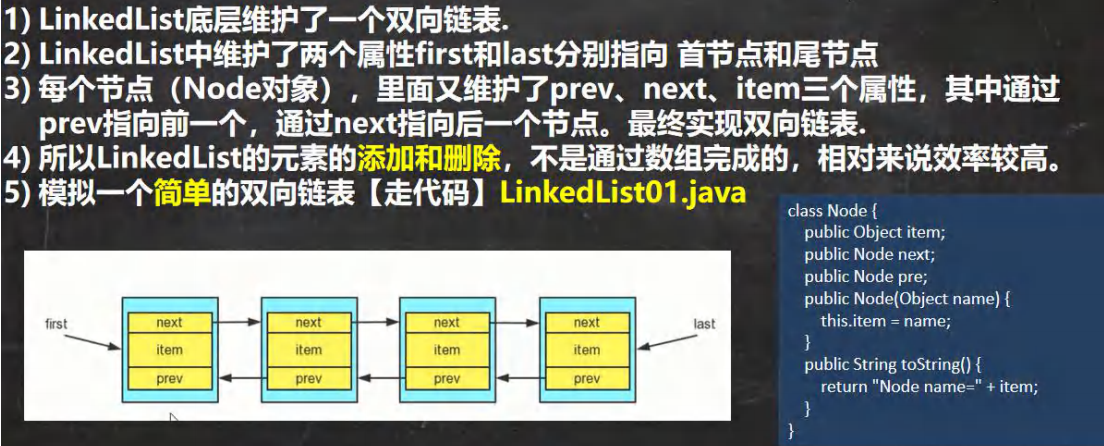
LinkedList
模拟双向链表 1 2 3 4 5 6 7 8 9 10 11 12 13 14 15 16 17 18 19 20 21 22 23 24 25 26 27 28 29 30 31 32 33 34 35 36 37 38 39 40 41 42 43 44 45 46 47 48 49 50 51 52 53 54 55 56 57 58 59 60 61 62 63 64 65 66 67 68 69 70 71 72 73 74 75 76 77 78 79 package com.ep.list_;public class LinkedList01 {public static void main (String[] args) {Node aaa = new Node ("aaa" );Node bbb = new Node ("bbb" );Node ccc = new Node ("ccc" );Node first = aaa; Node last = ccc; Node p = first;while (p!=null ) {"=========" );Node p1 = last;while (p1 != null ) {Node newNode = new Node ("111" );"=======" );Node p2 = first;while (p2!=null ) {class Node {public Object item; public Node next; public Node pre; public Node (Object item) {this .item = item;@Override public String toString () {return "Node{" +"item=" + item +'}' ;
1 2 3 4 5 6 7 8 9 10 11 12 13 14 15 16 17 18 19 20 21 22 23 24 25 26 27 28 29 30 31 32 33 34 35 36 37 38 39 40 41 42 43 44 45 46 47 48 49 50 51 52 53 54 55 56 57 58 59 60 61 62 63 64 65 66 67 68 69 70 71 72 73 74 75 76 77 78 79 80 81 82 83 84 85 86 87 88 89 90 91 92 93 94 95 96 97 98 99 100 101 102 103 104 105 106 package com.ep.list_;import java.util.Iterator;import java.util.LinkedList;@SuppressWarnings({"all"}) public class LinkedListCRUD {public static void main (String[] args) {LinkedList linkedList = new LinkedList ();1 );2 );3 );"linkedList=" + linkedList);"linkedList=" + linkedList);1 , 999 );"linkedList=" + linkedList);Object o = linkedList.get(1 );"===LinkeList 遍历迭代器====" );Iterator iterator = linkedList.iterator();while (iterator.hasNext()) {Object next = iterator.next();"next=" + next);"===LinkeList 遍历增强 for====" );for (Object o1 : linkedList) {"o1=" + o1);"===LinkeList 遍历普通 for====" );for (int i = 0 ; i < linkedList.size(); i++) {
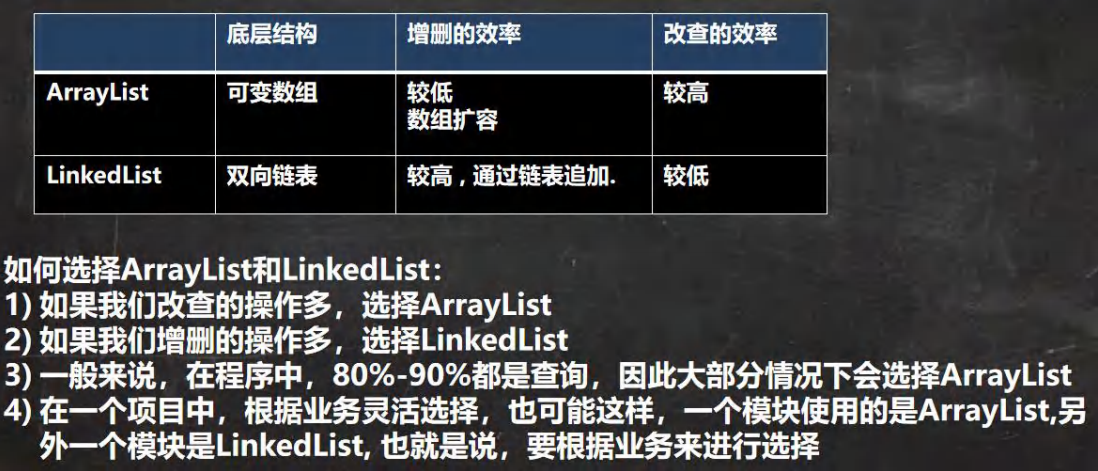
ArrayList 和 LinkedList 比较
Set接口
和 List 接口一样, Set 接口也是 Collection 的子接口,因此,常用方法和 Collection 接口一样
Set 接口的遍历方式
1 2 3 4 5 6 7 8 9 10 11 12 13 14 15 16 17 18 19 20 21 22 23 24 25 26 27 28 29 30 31 32 33 34 35 36 37 38 39 40 41 42 43 44 45 46 47 48 package com.ep.set_;import java.util.HashSet;import java.util.Iterator;import java.util.Set;@SuppressWarnings({"all"}) public class SetMethod {public static void main (String[] args) {Set set = new HashSet ();"tom" );"jack" );"jack" ); "zhangsan" );true );null );null );Iterator iterator = set.iterator();while (iterator.hasNext()) {null );"=====增强 for====" );for (Object o : set) {
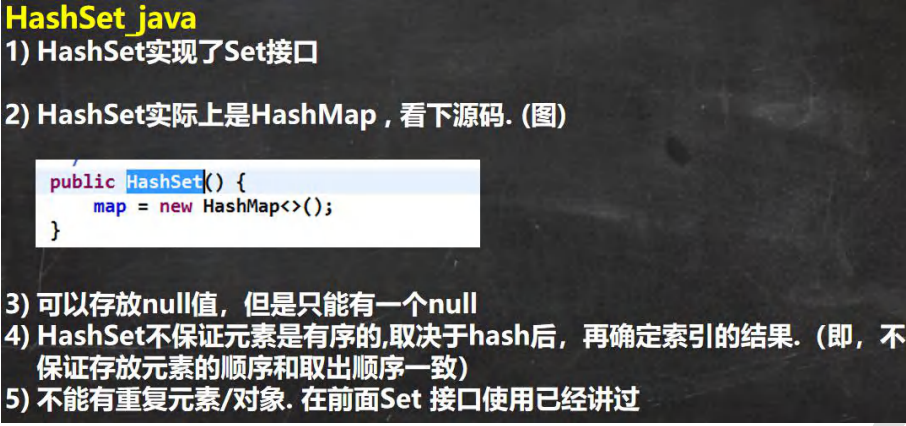
HashSet
1 2 3 4 5 6 7 8 9 10 11 12 13 public class HashSet_ {public static void main (String[] args) {HashSet hashSet = new HashSet ();
1 2 3 4 5 6 7 8 9 10 11 12 13 14 15 16 17 18 19 20 21 22 23 24 25 26 27 28 29 30 31 32 33 34 35 36 37 38 39 40 41 42 43 44 45 46 47 48 49 package com.ep.set_;import java.util.HashSet;public class HashSet01 {public static void main (String[] args) {HashSet hashSet = new HashSet ();"tom" )); "tom" )); "jack" )); "tom" )); "lisi" )); "lisi" )); new Dog ("lisi" ))); new Dog ("lisi" ))); new String ("abc" ))); new String ("abc" ))); class Dog {private String name;public Dog (String name) {this .name = name;@Override public String toString () {return "Dog{" +"name='" + name + '\'' +'}' ;
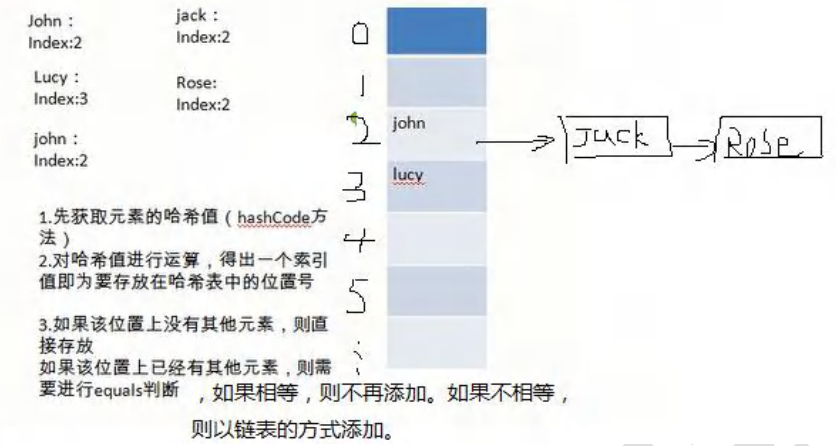
HashSet 底层机制
1 2 3 4 5 6 7 8 9 10 11 12 13 14 15 16 17 18 19 20 21 22 23 24 25 26 27 28 29 30 31 32 33 34 35 36 37 38 39 40 41 42 43 44 45 46 47 48 49 50 51 52 53 54 55 56 57 58 59 60 61 62 63 64 65 66 67 68 69 70 71 72 73 74 75 76 77 78 79 80 81 82 83 84 85 86 87 88 89 90 91 92 93 94 95 96 97 98 99 100 101 102 103 104 105 106 107 package com.ep.set_;import java.util.HashSet;@SuppressWarnings({"all"}) public class HashSetSource {public static void main (String[] args) {HashSet hashSet = new HashSet ();"java" );"php" );"java" );"set=" + hashSet);
练习
使用alt+enter生成equals和hashCode方法
1 2 3 4 5 6 7 8 9 10 11 12 13 14 15 16 17 18 19 20 21 22 23 24 25 26 27 28 29 30 31 32 33 34 35 36 37 38 39 40 41 42 43 44 45 46 47 48 49 50 51 52 53 54 55 56 57 58 package com.ep.set_;import java.util.HashSet;import java.util.Objects;@SuppressWarnings({"all"}) public class HashSetExercise {public static void main (String[] args) {HashSet hashSet = new HashSet ();new Employee ("zhangsan" , 18 ))); new Employee ("lisi" , 18 ))); new Employee ("zhangsan" , 18 ))); class Employee {private String name;private Integer age;public Employee (String name, Integer age) {this .name = name;this .age = age;public String getName () {return name;public void setName (String name) {this .name = name;public Integer getAge () {return age;public void setAge (Integer age) {this .age = age;@Override public boolean equals (Object o) {if (this == o) return true ;if (o == null || getClass() != o.getClass()) return false ;Employee employee = (Employee) o;return Objects.equals(name, employee.name) && Objects.equals(age, employee.age);@Override public int hashCode () {return Objects.hash(name, age);
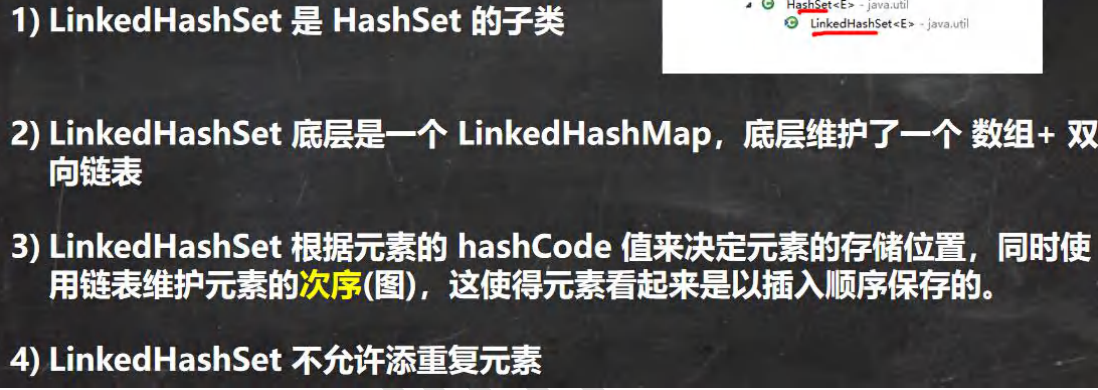
LinkedHashSet
插入顺序和输出顺序相同
练习
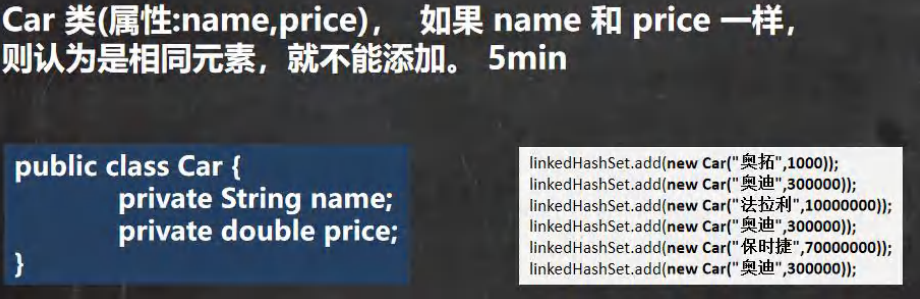
1 2 3 4 5 6 7 8 9 10 11 12 13 14 15 16 17 18 19 20 21 22 23 24 25 26 27 28 29 30 31 32 33 34 35 36 37 38 39 40 41 42 43 44 45 46 47 48 49 50 51 52 53 54 55 56 57 58 59 60 61 62 63 64 65 66 67 68 69 70 71 package com.ep.set_;import java.util.LinkedHashSet;import java.util.Objects;public class LinkedHashSet0 {public static void main (String[] args) {LinkedHashSet linkedHashSet = new LinkedHashSet ();new Car ("奥拓" , 1000 ));new Car ("奥迪" , 300000 ));new Car ("法拉利" , 10000000 ));new Car ("奥迪" , 300000 ));new Car ("保时捷" , 70000000 ));new Car ("奥迪" , 300000 ));"linkedHashSet=" + linkedHashSet);class Car {private String name;private double price;public Car (String name, double price) {this .name = name;this .price = price;public String getName () {return name;public void setName (String name) {this .name = name;public double getPrice () {return price;public void setPrice (double price) {this .price = price;@Override public String toString () {return "Car{" +"name='" + name + '\'' +", price=" + price +'}' ;@Override public boolean equals (Object o) {if (this == o) return true ;if (o == null || getClass() != o.getClass()) return false ;Car car = (Car) o;return Double.compare(car.price, price) == 0 && Objects.equals(name, car.name);@Override public int hashCode () {return Objects.hash(name, price);
TreeSet 1 2 3 4 5 6 7 8 9 10 11 12 13 14 15 16 17 18 19 20 21 22 23 24 25 26 27 28 29 30 31 32 33 34 35 36 37 38 39 40 41 42 43 44 45 46 47 48 49 50 51 52 53 54 55 56 57 58 59 package com.ep.set_;import java.util.Comparator;import java.util.TreeSet;public class TreeSet_ {public static void main (String[] args) {TreeSet treeSet = new TreeSet (new Comparator () {@Override public int compare (Object o1, Object o2) {return ((String)o1).length() - ((String)o2).length(); "a" );"edhhd" );"abc" );"ed" );"ab" );
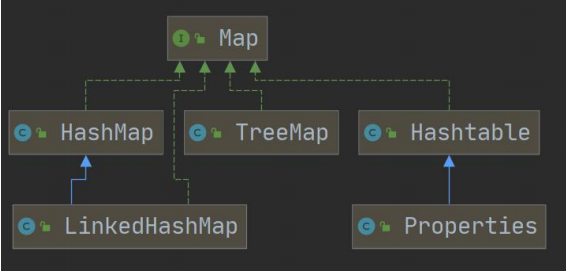
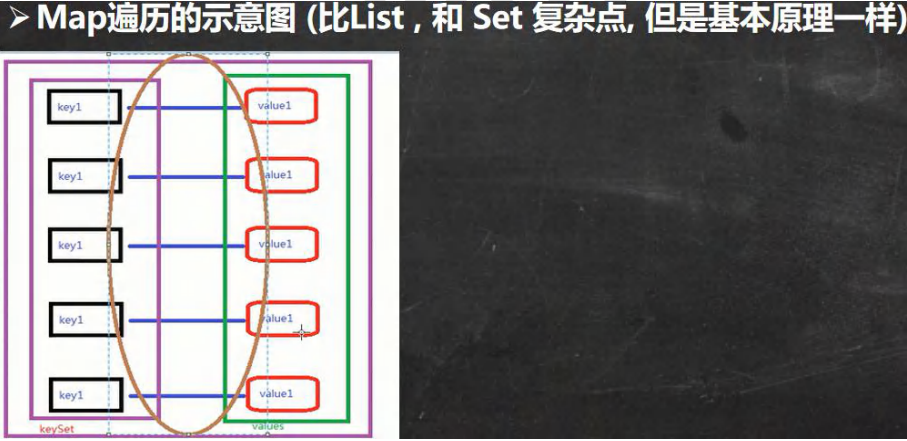
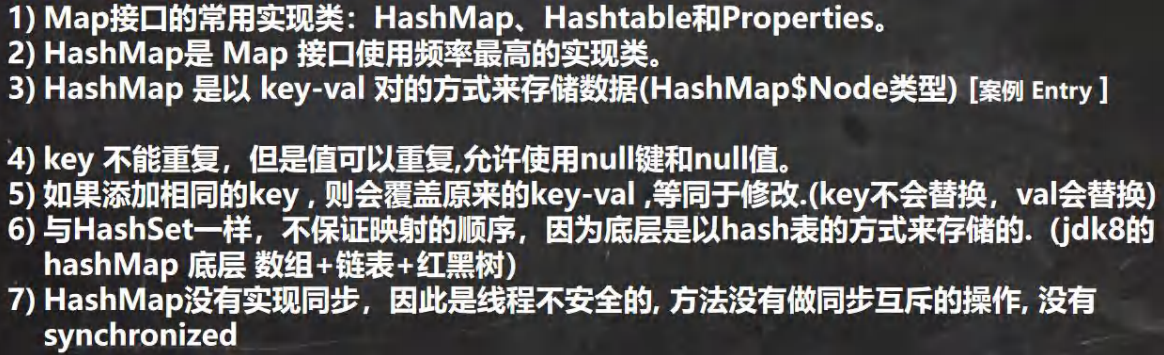
Map接口
和HashSet一样也是无序的
1 2 3 4 5 6 7 8 9 10 11 12 13 14 15 16 17 18 19 20 21 22 23 24 25 26 27 28 29 30 31 32 33 34 35 36 37 package com.ep.map_;import java.util.HashMap;import java.util.Map;@SuppressWarnings({"all"}) public class MapMethod {public static void main (String[] args) {Map map = new HashMap ();"aaa" ,"aaa" );"bbb" ,"bbb" );"aaa" ,111 ); null ,null );null ,"abc" );new Object (),"object" );1 ,"111" );"aaa" ));"as" ));
常用方法 1 2 3 4 5 6 7 8 9 10 11 12 13 14 15 16 17 18 19 20 21 22 23 24 25 26 27 28 29 30 31 32 33 34 35 36 37 38 39 40 41 42 43 44 45 46 47 48 49 50 51 52 53 package com.ep.map_;import java.util.HashMap;import java.util.Map;@SuppressWarnings({"all"}) public class MapMethod {public static void main (String[] args) {Map map = new HashMap ();"邓超" , new Book ("" , 100 ));"邓超" , "孙俪" );"王宝强" , "马蓉" );"宋喆" , "马蓉" );"刘令博" , null );null , "刘亦菲" );"鹿晗" , "关晓彤" );"map=" + map);null );"邓超" ));"邓超" ));class Book {private String name;private double price;public Book (String name, double price) {this .name = name;this .price = price;
遍历
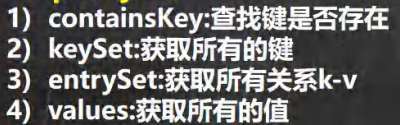
1 2 3 4 5 6 7 8 9 10 11 12 13 14 15 16 17 18 19 20 21 22 23 24 25 26 27 28 29 30 31 32 33 34 35 36 37 38 39 40 41 42 43 44 45 46 47 48 49 50 51 52 53 54 55 56 57 58 59 60 61 62 63 64 65 66 67 68 69 70 71 72 73 package com.ep.map_;import java.util.*;@SuppressWarnings({"all"}) public class MapFor {public static void main (String[] args) {Map map = new HashMap ();"邓超" , "孙俪" );"王宝强" , "马蓉" );"宋喆" , "马蓉" );"刘令博" , null );null , "刘亦菲" );"鹿晗" , "关晓彤" );Set keySet = map.keySet();"-----第一种方式-------" );for (Object key : keySet) {"-" + map.get(key));"----第二种方式--------" );Iterator iterator = keySet.iterator();while (iterator.hasNext()) {Object next = iterator.next();"-" + map.get(next));Collection values = map.values();"---取出所有的 value 增强 for----" );for (Object value : values) {"---取出所有的 value 迭代器----" );Iterator iterator1 = values.iterator();while (iterator1.hasNext()) {Object next = iterator1.next();Set entrySet = map.entrySet(); "----使用 EntrySet 的 for 增强(第 3 种)----" );for (Object entry : entrySet) {Entry mapEntry = (Map.Entry) entry;"-" + mapEntry.getValue());"----使用 EntrySet 的 迭代器(第 4 种)----" );Iterator iterator2 = entrySet.iterator();while (iterator2.hasNext()) {Object next = iterator2.next();Entry mapEntry = (Map.Entry) next;"-" + mapEntry.getValue());
练习
1 2 3 4 5 6 7 8 9 10 11 12 13 14 15 16 17 18 19 20 21 22 23 24 25 26 27 28 29 30 31 32 33 34 35 36 37 38 39 40 41 42 43 44 45 46 47 48 49 50 51 52 53 54 55 56 57 58 59 60 61 62 63 64 65 66 67 68 69 70 71 72 73 74 75 76 77 78 79 80 81 82 83 84 85 86 87 88 89 90 91 92 93 94 95 96 97 package com.ep.map_;import java.util.HashMap;import java.util.Map;import java.util.Set;public class MapExercise {public static void main (String[] args) {HashMap hashMap = new HashMap ();Employee e1 = new Employee (1 , "张三" , 19000 );Employee e2 = new Employee (2 , "李四" , 1200 );Employee e3 = new Employee (3 , "王五" , 200000 );"------方式一:keySet---------" );Set keySet = hashMap.keySet();for (Object key :keySet) {Employee e = (Employee) hashMap.get(key);if (e.getSalary() > 18000 ){"------方式二:values---------" );for (Object value : hashMap.values()) {Employee e = (Employee) value;if (e.getSalary() > 18000 ){"------方式三:entrySet---------" );for (Object entry : hashMap.entrySet()) {Entry e = (Map.Entry) entry;Employee em = (Employee) e.getValue();if (em.getSalary() > 18000 ){class Employee {private Integer id;private String name;private double salary;public Integer getId () {return id;public void setId (Integer id) {this .id = id;public String getName () {return name;public void setName (String name) {this .name = name;public double getSalary () {return salary;public void setSalary (double salary) {this .salary = salary;public Employee (Integer id, String name, double salary) {this .id = id;this .name = name;this .salary = salary;@Override public String toString () {return "Employee{" +"id='" + id + '\'' +", name='" + name + '\'' +", salary=" + salary +'}' ;
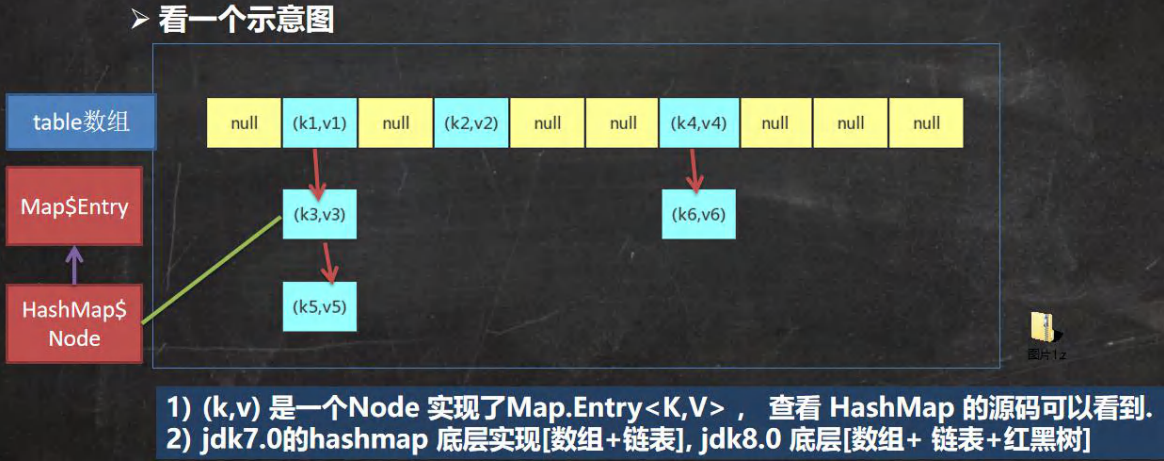
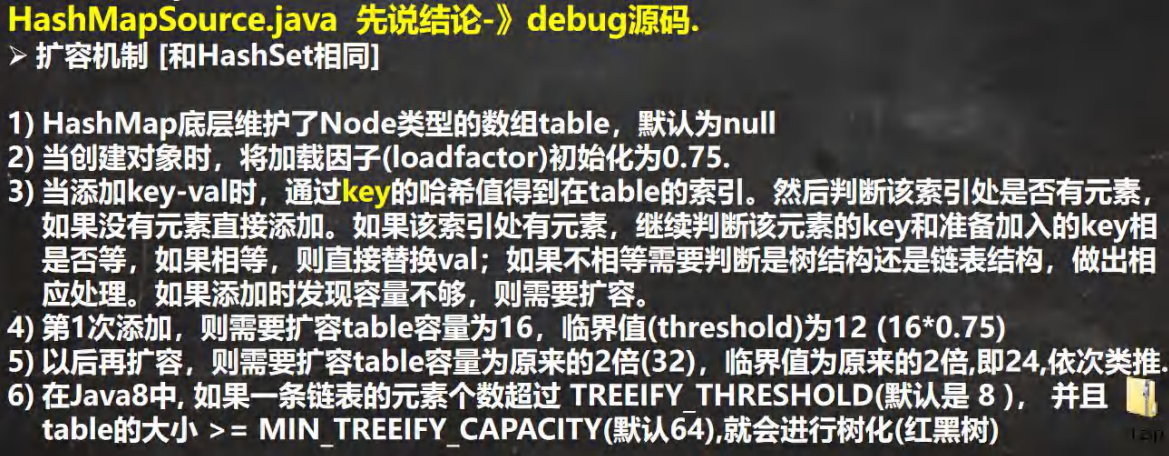
HashMap
底层机制及源码剖析
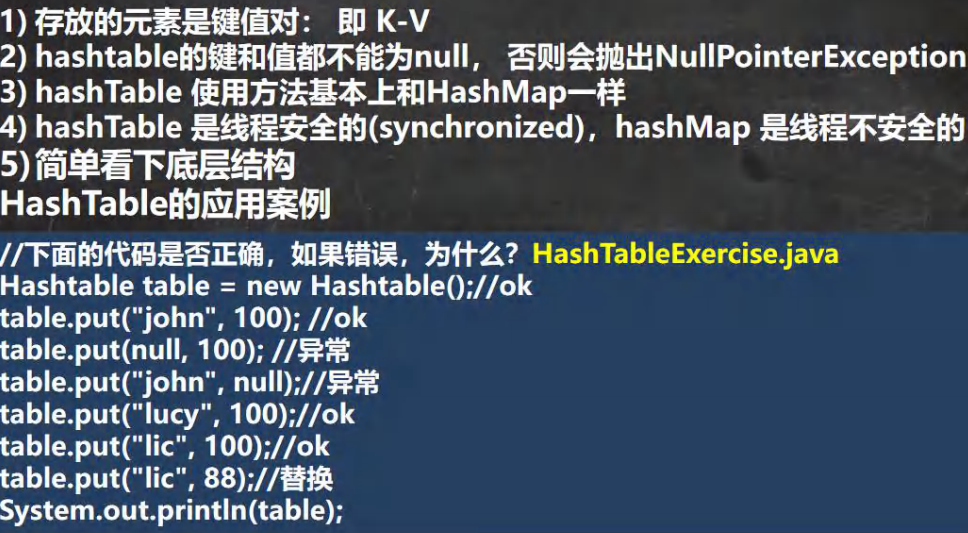
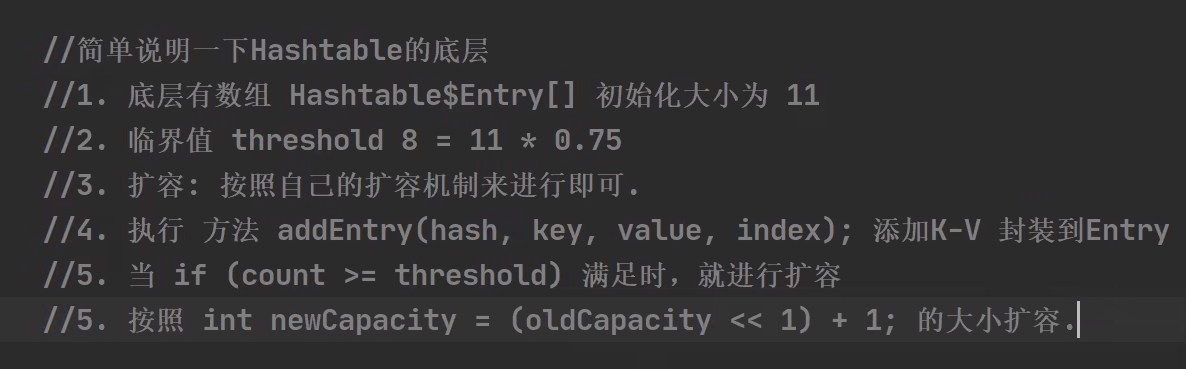
HashTable
1 2 3 4 5 6 7 8 9 10 11 12 13 14 public class HashTableExercise {public static void main (String[] args) {Hashtable hashtable = new Hashtable ();"abc" ,123 );"aaaa" ,111 );"abc" ,"abc" );
Hashtable 和 HashMap 对比
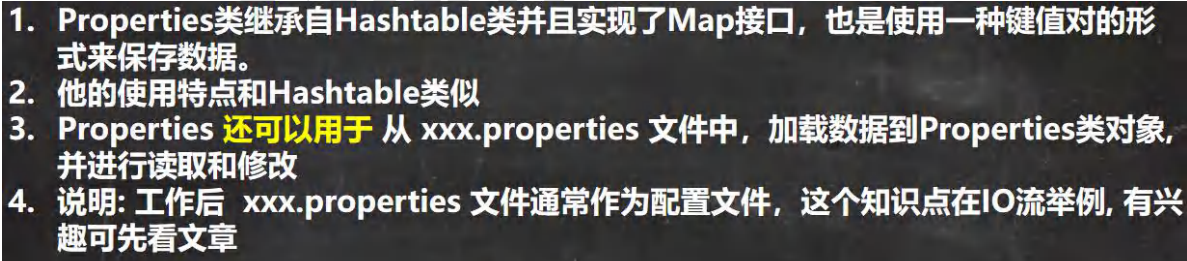
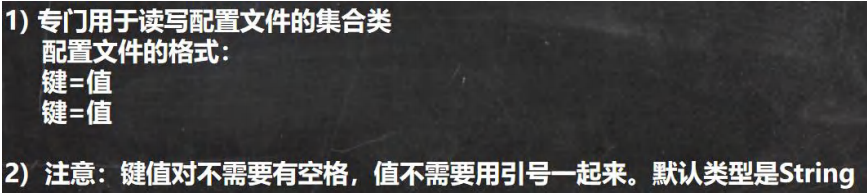
Properties
1 2 3 4 5 6 7 8 9 10 11 12 13 14 15 16 17 18 19 public class Properties_ {public static void main (String[] args) {Properties properties = new Properties ();"abc" ,"abc" );"abc" ,"aaa" ); "abc" ));"abc" ));"abc" );
TreeMap 1 2 3 4 5 6 7 8 9 10 11 12 13 14 15 16 17 18 19 20 21 22 23 24 25 26 27 28 29 30 31 32 33 34 35 36 37 38 39 40 41 42 43 44 45 46 47 48 49 50 51 52 53 54 55 56 57 58 59 60 61 62 63 64 65 66 67 68 69 70 package com.ep.map_;import java.util.Comparator;import java.util.TreeMap;public class TreeMap_ {public static void main (String[] args) {TreeMap treeMap = new TreeMap (new Comparator () {@Override public int compare (Object o1, Object o2) {return ((String) o1).length() - ((String) o2).length();"a" , "a" );"ddd" , "d" );"ab" , "a" );"abc" , "a" ); "bbbbb" , "a" );
如何选择
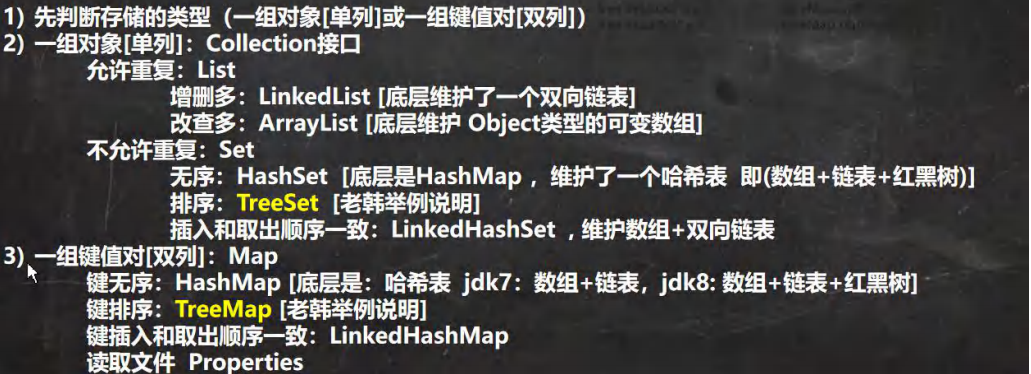
先判断存储的类型(一组对象[单列 ]或一组键值对[双列 )
一组对象[单列 ]:Collection接口
允许重复:List
增删多: LinkedList[底层维护了一个双向链表]
改查多: ArrayList[底层维护Object类型的可变数组]
不允许重复:SetHashSet [底层是HashMap,维护了一个哈希表即(数组+链表+红黑树)]
排序:TreeSet
插入和取出顺序一致:LinkedHashSet,维护数组+双向链表
一组键值对[双列 ]:Map
键无序: HashMap [底层是:哈希表 jdk7: 数组+链表,jdk8:数组+链表+红黑树]
键排序:TreeMap
键插入和取出顺序一致:LinkedHashMap
读取文件 Properties
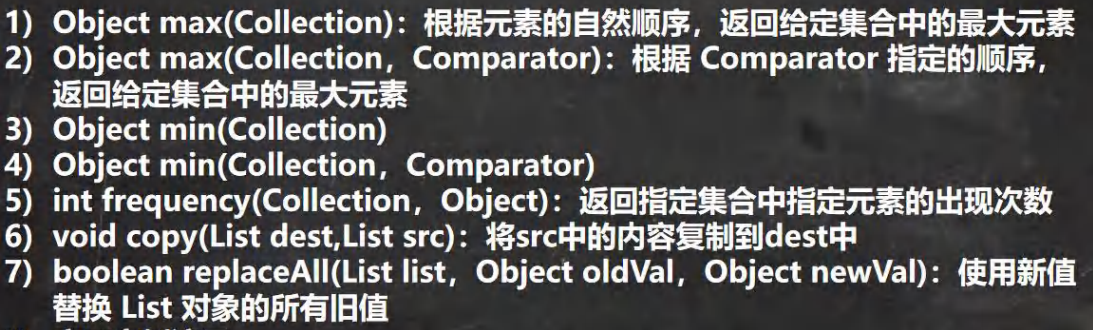
Collections 工具类
1 2 3 4 5 6 7 8 9 10 11 12 13 14 15 16 17 18 19 20 21 22 23 24 25 26 27 28 29 30 31 32 33 34 35 36 37 38 39 40 41 42 43 44 45 46 47 48 49 50 51 52 53 54 55 56 57 58 59 60 61 62 63 64 65 66 67 68 69 70 71 72 73 74 75 76 77 78 79 80 81 82 83 84 85 86 87 88 89 90 91 92 93 94 95 package com.ep.collections_;import java.util.ArrayList;import java.util.Collections;import java.util.Comparator;import java.util.List;@SuppressWarnings({"all"}) public class CollectionMethod {public static void main (String[] args) {List list = new ArrayList ();"aaaa" );"aaaa" );"aaaa" );"bbb" );"cc" );"d" );"eeee" );"原list=" +list);"逆序:" +list);for (int i = 0 ; i < 5 ; i++) {"随机排序:" + list);"自然排序:" + list);new Comparator () {@Override public int compare (Object o1, Object o2) {return ((String) o2).length() - ((String) o1).length();"定制排序:" + list);0 ,list.size() - 1 );"交换后:" +list);"最大值:" + Collections.max(list));String max = Collections.max(list, new Comparator <String>() {@Override public int compare (String o1, String o2) {return o2.length() - o1.length();"定制排序最大值:" + max);"aaaa" ));ArrayList dest = new ArrayList ();for (int i = 0 ; i < list.size(); i++) {"" );"dest=" + dest);"aaaa" ,"AAAA" );
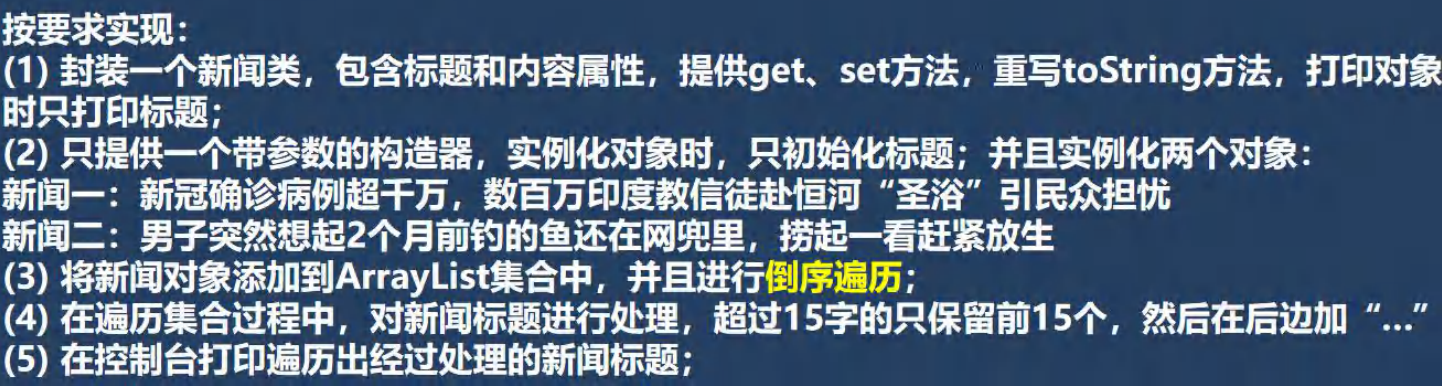
集合作业练习 练习1:
1 2 3 4 5 6 7 8 9 10 11 12 13 14 15 16 17 18 19 20 21 22 23 24 25 26 27 28 29 30 31 32 33 34 35 36 37 38 39 40 41 42 43 44 45 46 47 48 49 50 51 52 53 54 55 56 57 58 59 60 61 62 63 64 65 66 67 68 69 70 71 72 73 74 75 76 77 78 79 80 81 82 83 84 package com.ep.collection_.homework;import java.util.ArrayList;import java.util.Collections;import java.util.Iterator;public class HomeWork1 {public static void main (String[] args) {News news1 = new News ("新冠确诊病例超千万,数百万印度教信徒赴恒河\"圣浴\"引民众担忧" );News news2 = new News ("男子突然想起2个月前钓的鱼还在网兜里,捞起一看赶紧放生" );ArrayList arrayList = new ArrayList ();Iterator iterator = arrayList.iterator();while (iterator.hasNext()) {Object next = iterator.next();News news = (News) next;public static String processTitle (String title) {if (title == null ) {return "" ;if (title.length() > 15 ) {return title.substring(0 ,15 ) + "..." ;else {return title;class News {private String title;private String Content;public News (String title) {this .title = title;public String getTitle () {return title;public void setTitle (String title) {this .title = title;public String getContent () {return Content;public void setContent (String content) {@Override public String toString () {return "News{" +"title='" + title + '\'' +'}' ;
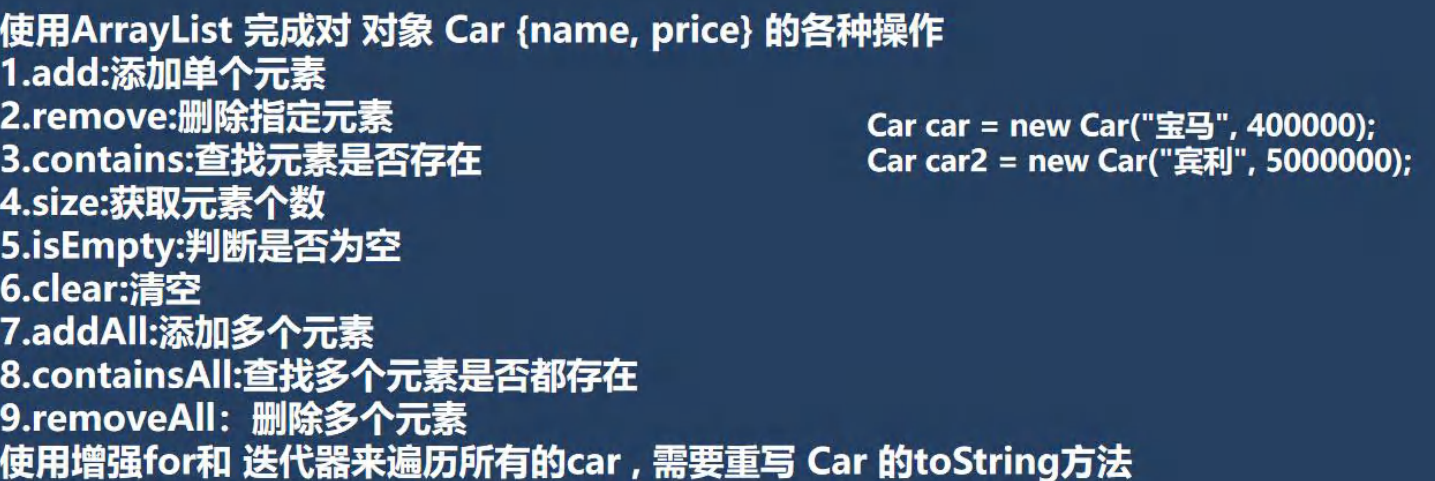
练习2
1 2 3 4 5 6 7 8 9 10 11 12 13 14 15 16 17 18 19 20 21 22 23 24 25 26 27 28 29 30 31 32 33 34 35 36 37 38 39 40 41 42 43 44 45 46 47 48 49 50 51 52 53 54 55 56 57 58 59 60 61 62 63 64 65 66 67 68 69 70 71 72 73 package com.ep.collection_.homework;import java.util.ArrayList;import java.util.List;public class HomeWork2 {public static void main (String[] args) {ArrayList list = new ArrayList ();Car car = new Car ("宝马" , 400000 );Car car2 = new Car ("宾利" , 900000 );0 ); "元素个数:" + list.size()); "是否为空:" + list.isEmpty()); List list2 = new ArrayList ();class Car {private String name;private double price;public Car (String name, double price) {this .name = name;this .price = price;public String getName () {return name;public void setName (String name) {this .name = name;public double getPrice () {return price;public void setPrice (double price) {this .price = price;@Override public String toString () {return "Car{" +"name='" + name + '\'' +", price=" + price +'}' ;
练习3
1 2 3 4 5 6 7 8 9 10 11 12 13 14 15 16 17 18 19 20 21 22 23 24 25 26 27 28 29 30 31 32 33 34 35 36 37 38 39 40 41 42 43 44 45 46 package com.ep.collection_.homework;import java.util.HashMap;import java.util.Iterator;import java.util.Map;import java.util.Set;public class HomeWork3 {public static void main (String[] args) {HashMap map = new HashMap ();"jack" ,650 );"tom" ,1200 );"smith" ,2900 );"jack" ,2600 ); Set entrySet = map.entrySet();for (Object o : entrySet) {Entry entry = (Map.Entry) o;100 ); Set keySet = map.keySet();Iterator iterator = keySet.iterator();while (iterator.hasNext()) {Object key = iterator.next();"-" + map.get(key));for (Object value : map.values()) {
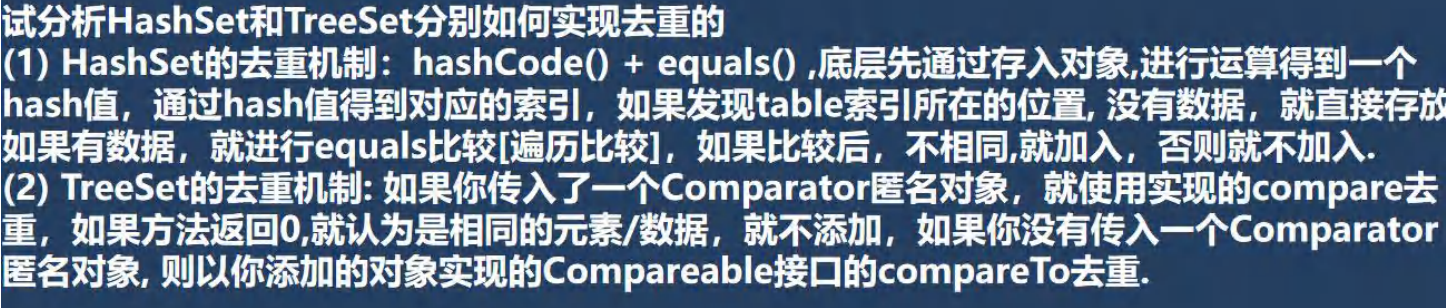
4.HashSet和TreeSet如何实现去重
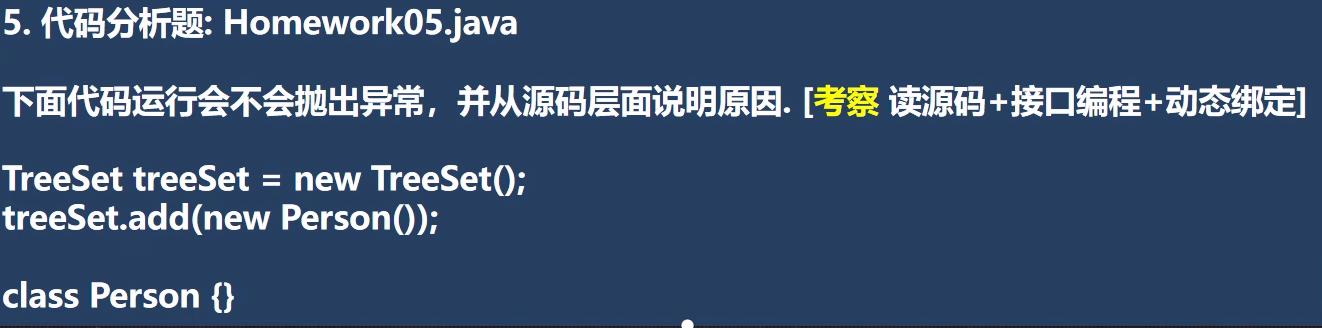
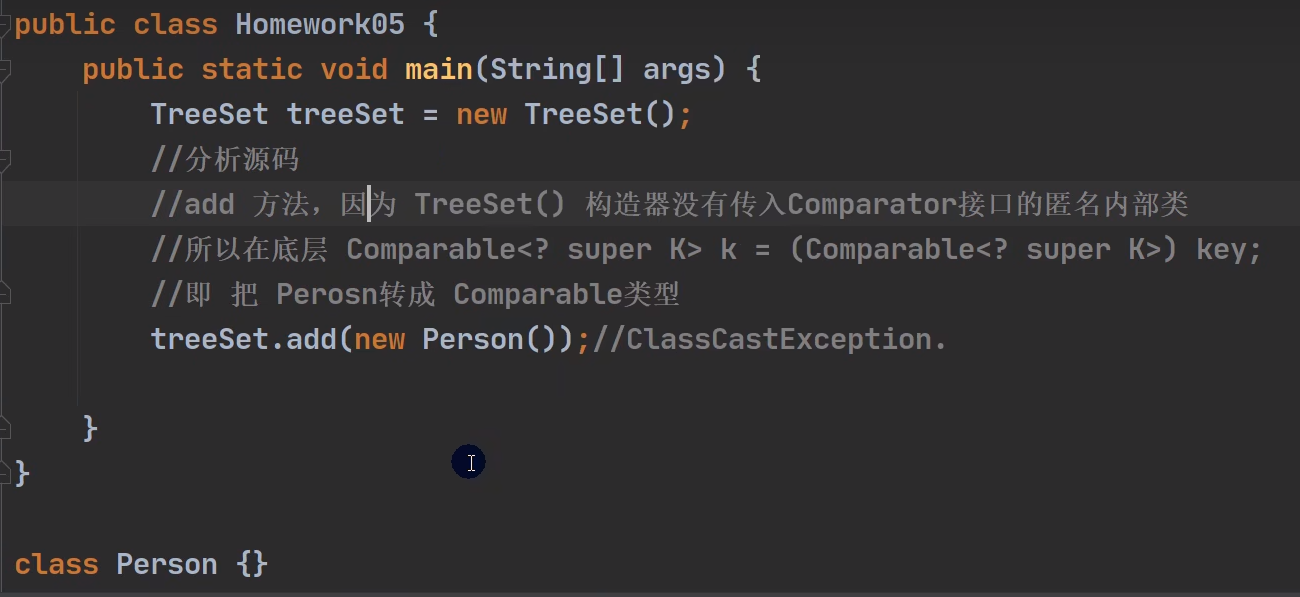
5.代码分析
会报ClassCastException异常
解决方法:
Person类实现ComParable接口,实现里面的方法
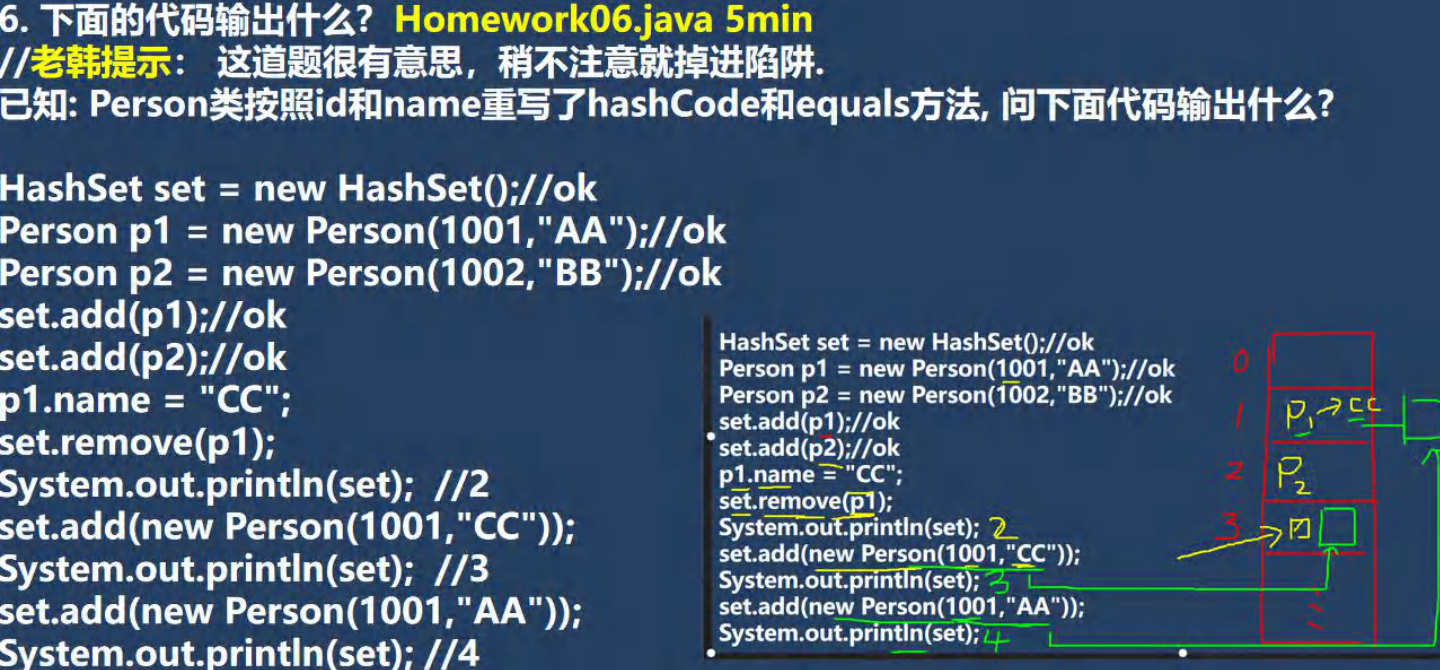
6.代码分析
1 2 3 4 5 6 7 8 9 10 11 12 13 14 15 16 17 18 19 20 21 22 23 24 25 26 27 28 29 30 31 32 33 34 35 36 37 38 39 40 41 42 43 44 45 46 47 48 49 50 51 52 53 54 55 56 57 58 59 60 61 62 63 64 65 66 67 68 69 70 71 72 73 package com.ep.collection_.homework;import java.util.HashSet;import java.util.Objects;public class HomeWork6 {public static void main (String[] args) {Person person1 = new Person (1001 ,"AA" );Person person2 = new Person (1002 ,"BB" );HashSet set = new HashSet ();"CC" );new Person (1001 ,"CC" )); new Person (1001 ,"AA" ));class Person {private Integer id;private String name;public Person (Integer id, String name) {this .id = id;this .name = name;public Integer getId () {return id;public void setId (Integer id) {this .id = id;public String getName () {return name;public void setName (String name) {this .name = name;@Override public boolean equals (Object o) {if (this == o) return true ;if (o == null || getClass() != o.getClass()) return false ;Person person = (Person) o;return Objects.equals(id, person.id) && Objects.equals(name, person.name);@Override public int hashCode () {return Objects.hash(id, name);@Override public String toString () {return "Person{" +"id=" + id +", name='" + name + '\'' +'}' ;
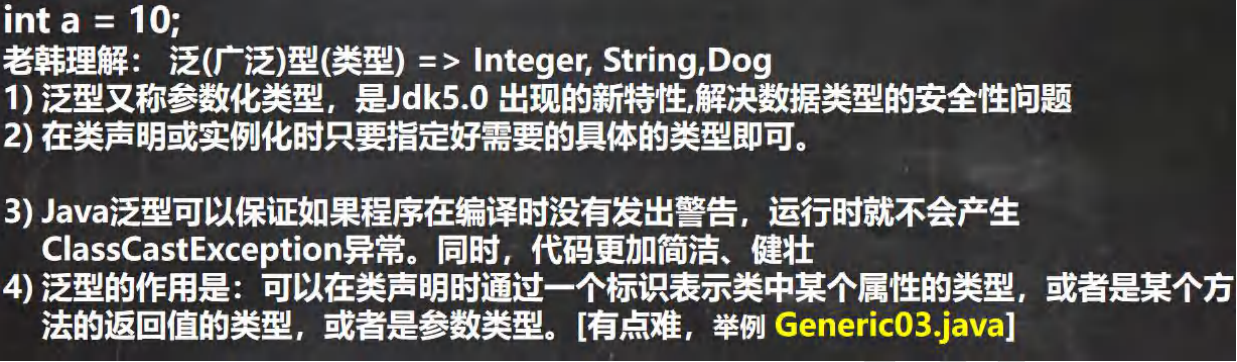
泛型 使用传统方法的问题分析
基本使用 1 2 3 4 5 6 7 8 9 10 11 12 13 14 15 16 17 18 19 20 21 22 23 24 25 26 27 28 29 30 31 32 33 34 35 36 37 38 39 40 41 42 43 44 45 46 47 48 49 50 51 52 53 54 55 56 57 58 package com.ep.generic;import java.util.ArrayList;public class Generic01 {public static void main (String[] args) {new ArrayList <>();new Dog ("大黄" ,1 ));new Dog ("小黄" , 2 ));for (Dog dog : arrayList) {class Dog {private String name;private Integer age;public Dog (String name, Integer age) {this .name = name;this .age = age;public String getName () {return name;public void setName (String name) {this .name = name;public Integer getAge () {return age;public void setAge (Integer age) {this .age = age;@Override public String toString () {return "Dog{" +"name='" + name + '\'' +", age=" + age +'}' ;
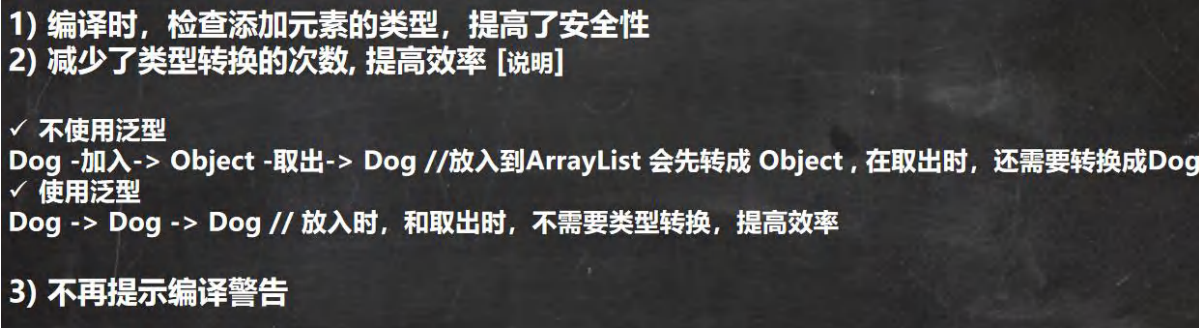
泛型的好处
泛型介绍
1 2 3 4 5 6 7 8 9 10 11 12 13 14 15 16 17 18 19 20 21 22 23 24 25 26 27 28 29 package com.ep.generic;public class Generic02 {public static void main (String[] args) {new Person <>("aaa" );class Person <E> {public Person (E name) { this .name = name;public E getName () { return name;public void t () {
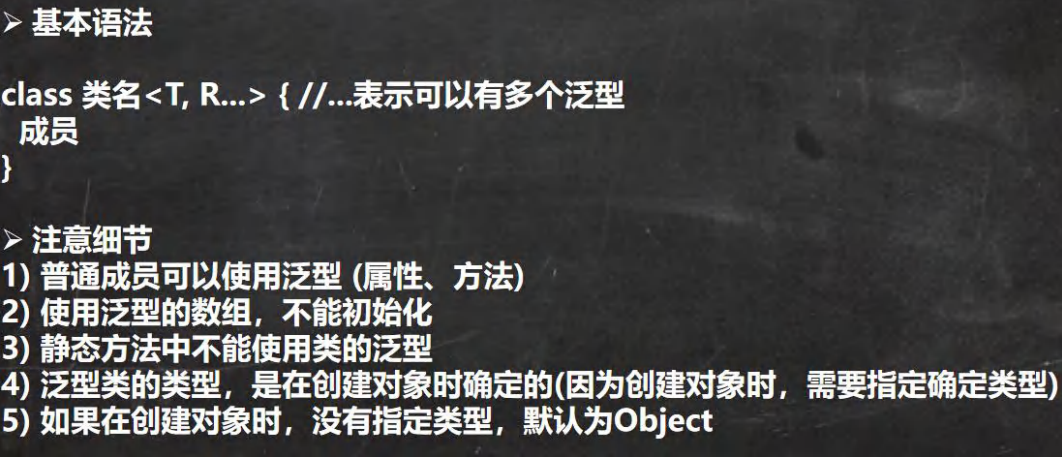
泛型使用细节
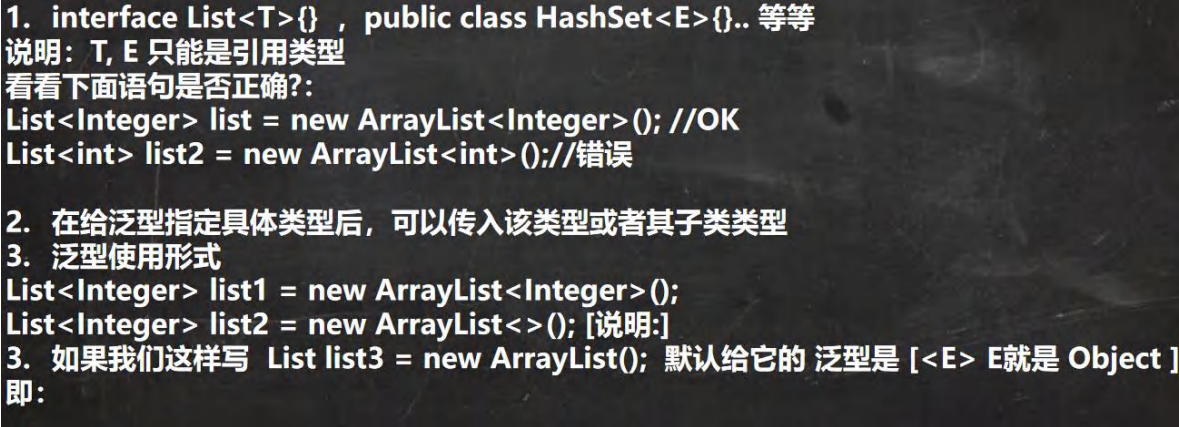
给泛型指向数据类型是,要求是引用类型 ,不能是基本数据类型
在给泛型指定具体类型后,可以传入该类型或者其子类类型
泛型推荐简写
1 2 3 4 5 6 7 8 9 10 11 12 13 14 15 16 17 18 19 20 21 22 23 24 25 26 27 28 29 30 31 32 33 34 35 36 37 38 39 40 41 42 43 44 45 package com.ep.generic;import java.util.ArrayList;import java.util.List;public class GenericDetail {public static void main (String[] args) {new ArrayList <>();new P <>(new A ());new P <>(new B ());new ArrayList <Integer>();new ArrayList <Integer>();new ArrayList <>();ArrayList arrayList2 = new ArrayList ();class A {}class B extends A {}class P <E> {public P (E s) {this .s = s;public void t () {
自定义泛型类
1 2 3 4 5 6 7 8 9 10 11 12 13 14 15 16 17 18 19 20 21 22 23 24 25 26 27 28 29 30 31 32 33 34 35 36 37 38 39 40 41 42 43 44 45 46 47 48 49 50 51 52 53 54 55 56 57 58 59 60 61 62 63 64 65 66 67 68 69 70 71 72 73 74 75 76 77 78 79 80 81 82 83 84 85 86 87 88 89 90 91 92 93 94 package com.ep.generic;public class CustomGeneric {public static void main (String[] args) {new Tiger <>("john" );10.9 ); Tiger g2 = new Tiger ("john~~" );"yy" ); "g2=" + g2);class Tiger <T,R,M> {public Tiger (R r) {this .r = r;public Tiger (String name, T t, R r, M m) { this .name = name;this .t = t;this .r = r;this .m = m;public String getName () {return name;public void setName (String name) {this .name = name;public T getT () {return t;public void setT (T t) {this .t = t;public R getR () {return r;public void setR (R r) {this .r = r;public M getM () {return m;public void setM (M m) {this .m = m;@Override public String toString () {return "Tiger{" +"name='" + name + '\'' +", t=" + t +", r=" + r +", m=" + m +'}' ;
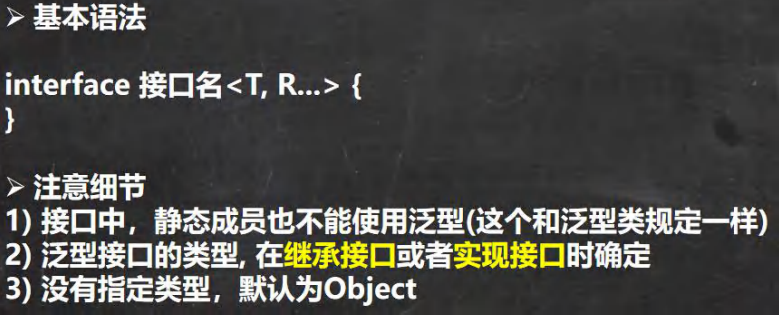
自定义泛型接口
接口的成员都是静态性质的
1 2 3 4 5 6 7 8 9 10 11 12 13 14 15 16 17 18 19 20 21 22 23 24 25 26 27 28 29 30 31 32 33 34 35 36 37 38 39 40 41 42 43 44 45 46 47 48 49 50 51 52 53 54 55 56 57 58 59 60 61 62 63 64 65 66 67 68 69 70 71 72 73 74 75 76 77 78 79 80 81 82 83 84 85 86 87 88 89 90 91 92 93 94 95 96 97 98 package com.ep.generic;public class CustomInterfaceGeneric {public static void main (String[] args) {interface IUsb <T,R> {int n = 10 ;get (T t) ;void hi (R r) ;void run (R r1, R r2, T u1, T u2) ;default R method (T t) {return null ;interface IA extends IUsb <String ,Double>{class AA implements IA {@Override public Double get (String s) {return null ;@Override public void hi (Double aDouble) {@Override public void run (Double r1, Double r2, String u1, String u2) {class BB implements IUsb <Integer,Float>{@Override public Float get (Integer integer) {return null ;@Override public void hi (Float aFloat) {@Override public void run (Float r1, Float r2, Integer u1, Integer u2) {class CC implements IUsb { @Override public Object get (Object o) {return null ;@Override public void hi (Object o) {@Override public void run (Object r1, Object r2, Object u1, Object u2) {
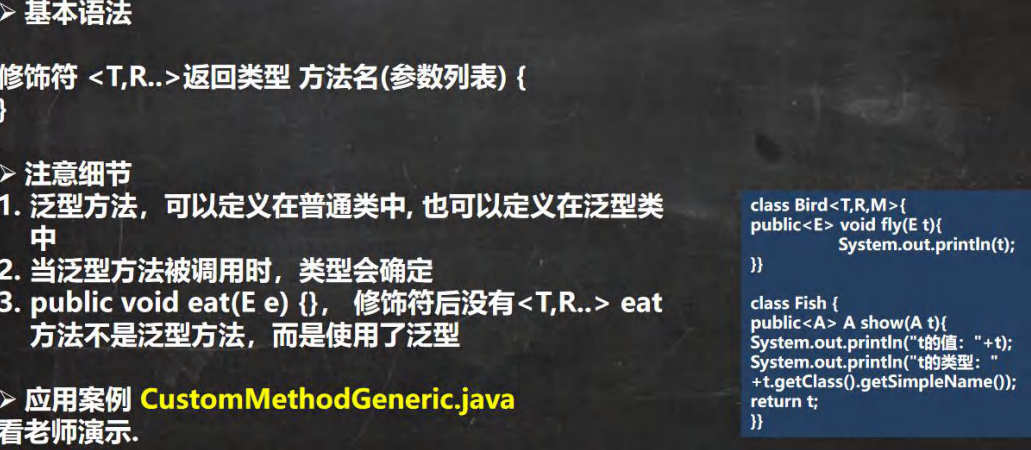
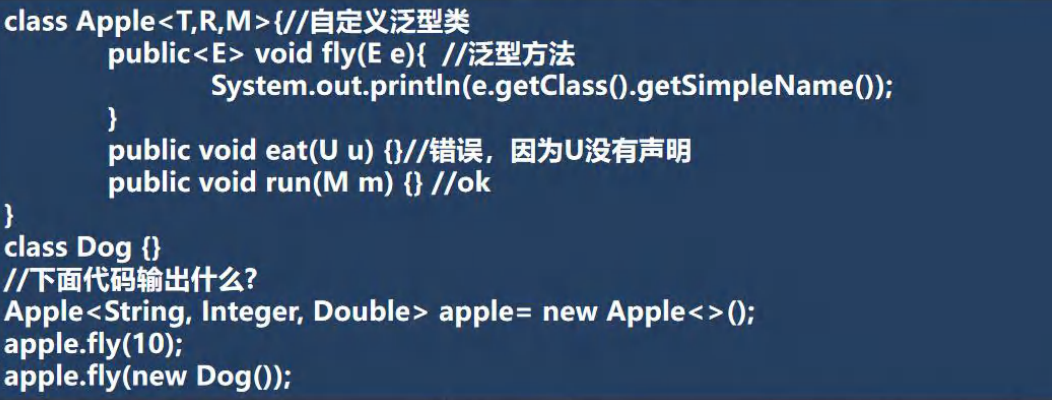
自定义泛型方法
1 2 3 4 5 6 7 8 9 10 11 12 13 14 15 16 17 18 19 20 21 22 23 24 25 26 27 28 29 30 31 32 33 34 35 36 37 38 39 40 41 42 package com.ep.generic;public class CustomMethodGeneric {public static void main (String[] args) {Car car = new Car ();"保时捷" ,911 ); class Car {public void run () { public <T,R> void fly (T t, R r) {class Fish <T,R>{ public void run () {public <U,M> void eat (U u, M m) {public void hi (T t) {public <K> void hello (K k, R r) {
泛型的继承和通配符
1 2 3 4 5 6 7 8 9 10 11 12 13 14 15 16 17 18 19 20 21 22 23 24 25 26 27 28 29 30 31 32 33 34 35 36 37 38 39 40 41 42 43 44 45 46 47 48 49 50 51 52 53 54 55 56 57 58 59 60 61 62 63 64 65 66 67 68 69 70 71 72 73 74 package com.ep.generic;import java.util.ArrayList;import java.util.List;public class GenericExtends {public static void main (String[] args) {new ArrayList <>();new ArrayList <>();new ArrayList <>();new ArrayList <>();new ArrayList <>();public static void printCollection1 (List<?> c) {for (Object object : c) { public static void printCollection2 (List<? extends AAA> c) {for (Object object : c) {public static void printCollection3 (List<? super AAA> c) {for (Object object : c) {class AAA {class BBB extends AAA {class CCC extends BBB {
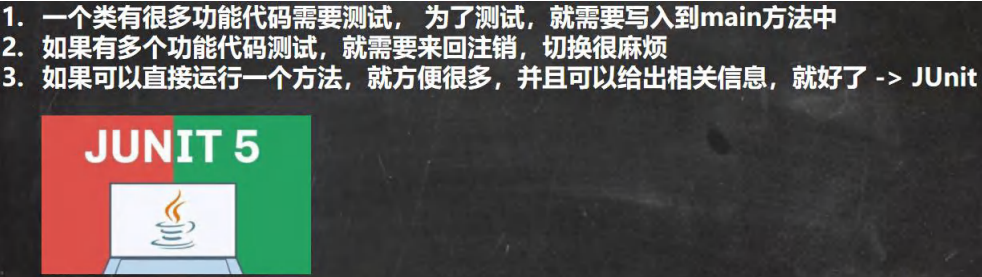
Junit单元测试
只需要在方法上加@Test注解 ,需要导Junit的包
1 2 3 4 5 6 7 8 9 10 11 12 13 14 15 16 17 import org.junit.jupiter.api.Test;public class junitTest {@Test public void m1 () {"m1方法调用" );@Test public void m2 () {"m2方法调用" );
多线程基础 程序(program):是为完成特定任务、用某种语言编写的一组指令的集合。
进程:
线程:线程由进程创建的,是进程的一个实体
一个进程可以拥有多个线程
==单线程==:同一个时刻,只允许执行一个线程
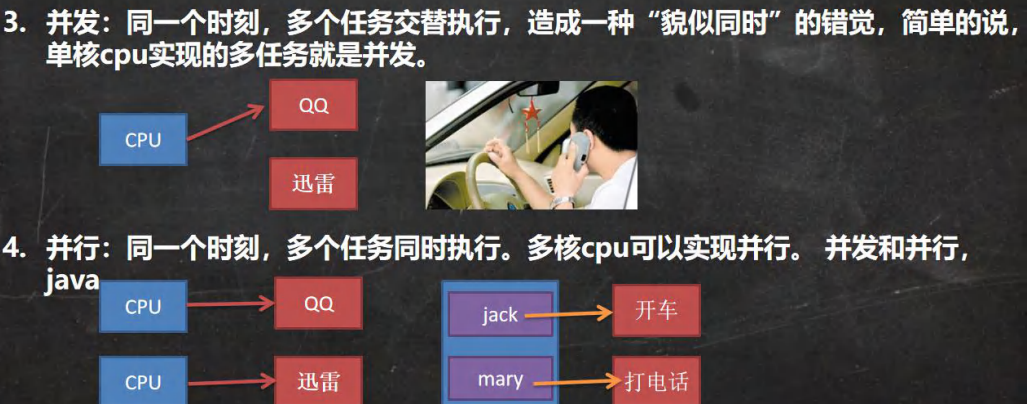
==多线程==:同一个时刻,可以执行多个线程,比如:一个qq进程,可以同时打开多个聊天窗口,一个迅雷进程,可以同时下载多个文件
==并发==:同一个时刻,多个任务交替执行,造成一种“貌似同时”的错觉,简单的说,单核cpu实现的多任务就是并发。
==并行==:同一个时刻,多个任务同时执行。多核cpu可以实现并行。并发和并行,
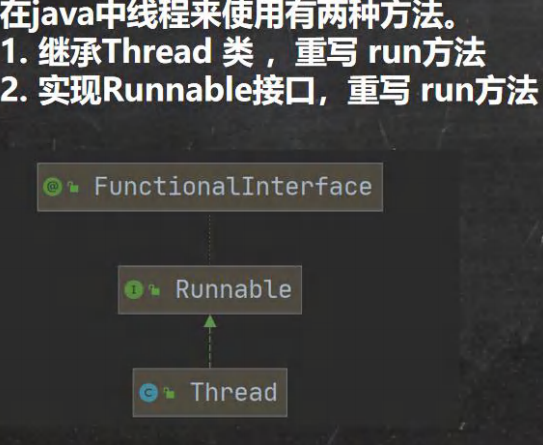
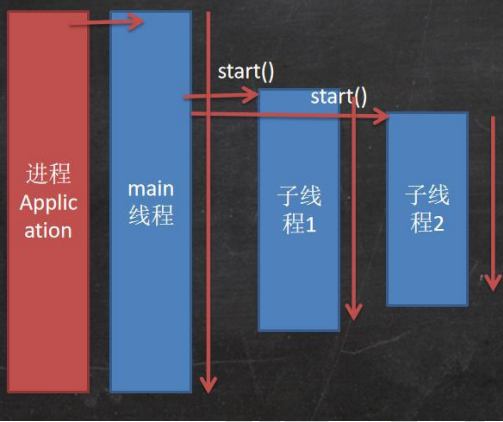
线程基本使用 创建线程的两种方式
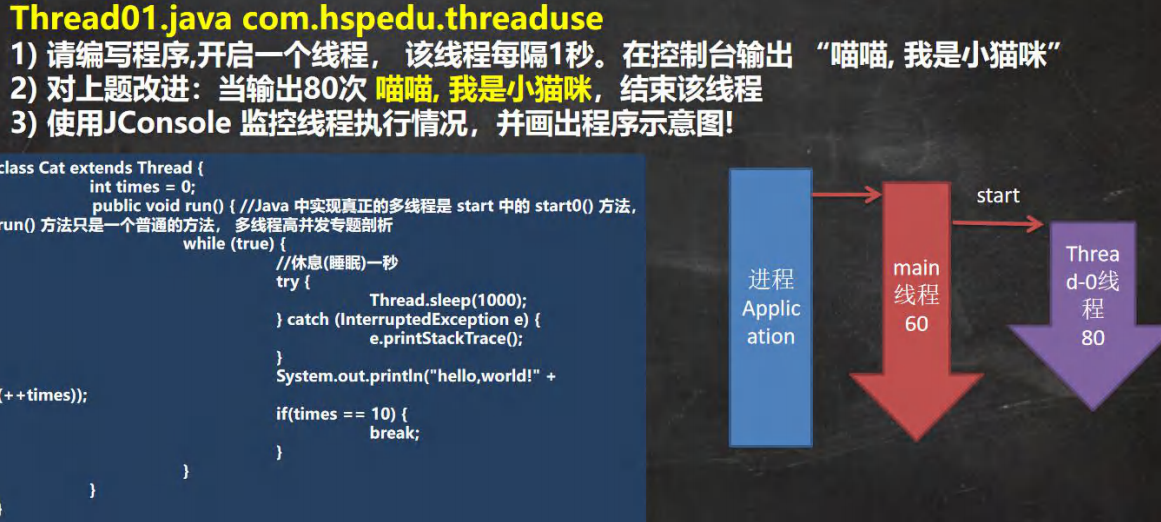
线程应用案例 1-继承 Thread 类
1 2 3 4 5 6 7 8 9 10 11 12 13 14 15 16 17 18 19 20 21 22 23 24 25 26 27 28 29 30 31 32 33 34 35 36 37 38 39 40 41 42 43 44 45 46 47 48 49 50 51 52 53 54 55 56 57 58 59 60 61 62 63 64 65 66 67 package com.ep.thread_;public class Thread01 {public static void main (String[] args) throws InterruptedException {Cat cat = new Cat ();for (int i = 0 ; i < 8 ; i++) {"主线程继续执行" + i + Thread.currentThread().getName());1000 );class Cat extends Thread {Integer time = 0 ;@Override public void run () {while (true ) {"喵喵, 我是小猫咪" + (++time) + " 线程名=" + Thread.currentThread().getName());try {1000 );catch (InterruptedException e) {throw new RuntimeException (e);if ( time == 8 ) { break ;
线程应用案例 2-实现 Runnable 接口
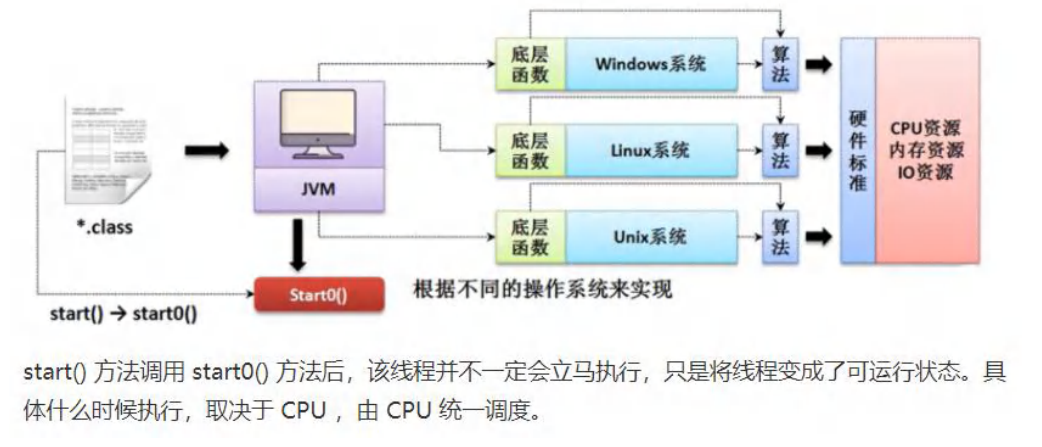
1 2 3 4 5 6 7 8 9 10 11 12 13 14 15 16 17 18 19 20 21 22 23 24 25 26 27 28 29 30 31 32 33 34 35 36 37 38 39 40 41 42 43 44 45 46 47 48 49 50 51 52 53 54 55 56 57 58 package com.ep.thread_;public class Thread02 {public static void main (String[] args) {Dog dog = new Dog ();Thread thread = new Thread (dog);class ThreadProxy implements Runnable {private Runnable target = null ;@Override public void run () {if (target != null ) {public ThreadProxy (Runnable target) {this .target = target;public void start () {public void start0 () {class Dog implements Runnable { int count = 0 ;@Override public void run () {while (true ) {"hi" + (++count) + Thread.currentThread().getName());try {1000 );catch (InterruptedException e) {throw new RuntimeException (e);if (count == 10 ) {break ;
1 2 3 4 5 6 7 8 9 10 11 12 13 14 15 16 17 18 19 20 21 22 23 24 25 26 27 28 29 30 31 32 33 34 35 36 37 38 39 40 41 42 43 44 45 46 47 48 49 50 51 52 53 54 55 package com.ep.thread_;public class Thread03 {public static void main (String[] args) {T1 t1 = new T1 ();T2 t2 = new T2 ();Thread thread = new Thread (t1);Thread thread1 = new Thread (t2);class T1 implements Runnable {int count = 0 ;@Override public void run () {while (true ) {"T1正在执行" + (++count) + Thread.currentThread().getName());try {1000 );catch (InterruptedException e) {throw new RuntimeException (e);if (count == 10 ) {break ;class T2 implements Runnable {int count = 0 ;@Override public void run () {while (true ) {"T2正在执行" + (++count) + Thread.currentThread().getName());try {1000 );catch (InterruptedException e) {throw new RuntimeException (e);if (count == 10 ) {break ;
继承 Thread vs 实现 Runnable 的区别
多线程售票 1 2 3 4 5 6 7 8 9 10 11 12 13 14 15 16 17 18 19 20 21 22 23 24 25 26 27 28 29 30 31 32 33 34 35 36 37 38 39 40 41 42 43 44 45 46 47 48 49 50 51 52 53 54 55 56 57 58 59 60 61 62 63 64 65 66 67 68 69 package com.ep.thread_;public class ThreadSellTicket {public static void main (String[] args) {"===使用实现接口方式来售票=====" );SellTicket02 sellTicket02 = new SellTicket02 ();new Thread (sellTicket02).start(); new Thread (sellTicket02).start(); new Thread (sellTicket02).start(); class SellTicket01 extends Thread {private static int ticketNum = 100 ; @Override public void run () {while (true ) {if (ticketNum <= 0 ) {"售票结束..." );break ;try {50 );catch (InterruptedException e) {throw new RuntimeException (e);"窗口 " + Thread.currentThread().getName() + " 售出一张票" + " 剩余票数=" + (--ticketNum));class SellTicket02 implements Runnable {private int ticketNum = 100 ; @Override public void run () {while (true ) {if (ticketNum <= 0 ) {"售票结束..." );break ;try {50 );catch (InterruptedException e) {throw new RuntimeException (e);"窗口 " + Thread.currentThread().getName() + " 售出一张票" + " 剩余票数=" + (--ticketNum));
线程终止
1 2 3 4 5 6 7 8 9 10 11 12 13 14 15 16 17 18 19 20 21 22 23 24 25 26 27 28 29 30 31 32 33 34 35 36 37 38 39 40 41 package com.ep.thread_;public class ThreadExit {public static void main (String[] args) throws InterruptedException {T t = new T ();10 *1000 ); false ); class T extends Thread {private Integer time = 0 ;private Boolean Loop = true ;@Override public void run () {while (Loop) {"T" + (++time) + " 线程名=" + Thread.currentThread().getName());try {1000 );catch (InterruptedException e) {throw new RuntimeException (e);public void setLoop (Boolean loop) {
线程常用方法
1 2 3 4 5 6 7 8 9 10 11 12 13 14 15 16 17 18 19 20 21 22 23 24 25 26 27 28 29 30 31 32 33 34 35 36 37 38 39 package com.ep.thread_;public class ThreadMethod01 {public static void main (String[] args) {ThreadDemo1 threadDemo1 = new ThreadDemo1 ();"自定义线程名" ); class ThreadDemo1 extends Thread {private int count = 0 ;@Override public void run () {while (true ) {for (int i = 0 ; i < 10 ; i++) {"正在执行..." + i);try {"休眠中..." );200000 );catch (InterruptedException e) {"interrupt执行了...." );
1 2 3 4 5 6 7 8 9 10 11 12 13 14 15 16 17 18 19 20 21 22 23 24 25 26 27 28 29 30 31 32 33 34 35 36 37 38 39 40 41 42 package com.ep.thread_;public class ThreadMethod02 {public static void main (String[] args) throws InterruptedException {ChildThread childThread = new ChildThread ();for (int i = 0 ; i < 20 ; i++) {try {1000 );catch (InterruptedException e) {throw new RuntimeException (e);if (i == 5 ) {"主线程正在执行------" + i);class ChildThread extends Thread {@Override public void run () {for (int i = 0 ; i < 20 ; i++) {try {1000 );catch (InterruptedException e) {throw new RuntimeException (e);"子线程正在执行....." + i);
用户线程和守护线程
1 2 3 4 5 6 7 8 9 10 11 12 13 14 15 16 17 18 19 20 21 22 23 24 25 26 27 28 29 30 31 32 33 34 package com.ep.thread_;public class ThreadMethod03 {public static void main (String[] args) throws InterruptedException {DaemonThread daemonThread = new DaemonThread ();true ); for (int i = 0 ; i < 10 ; i++) {"主线程工作中=======" + i);1000 );class DaemonThread extends Thread {@Override public void run () {for (;;) {try {1000 );catch (InterruptedException e) {throw new RuntimeException (e);"守护线程正在执行中...." );
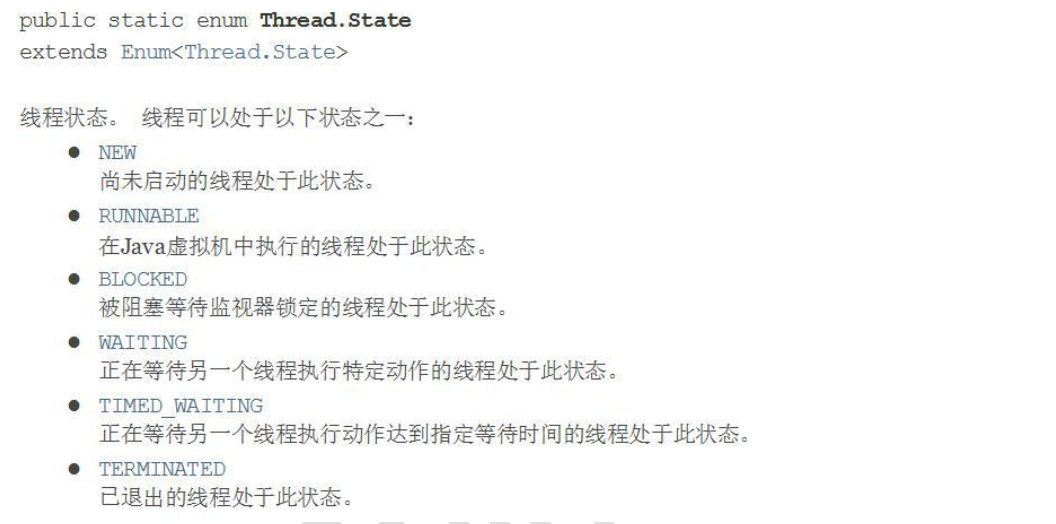
线程的生命周期 JDK 中用 Thread.State 枚举表示了线程的几种状态
线程状态转换图
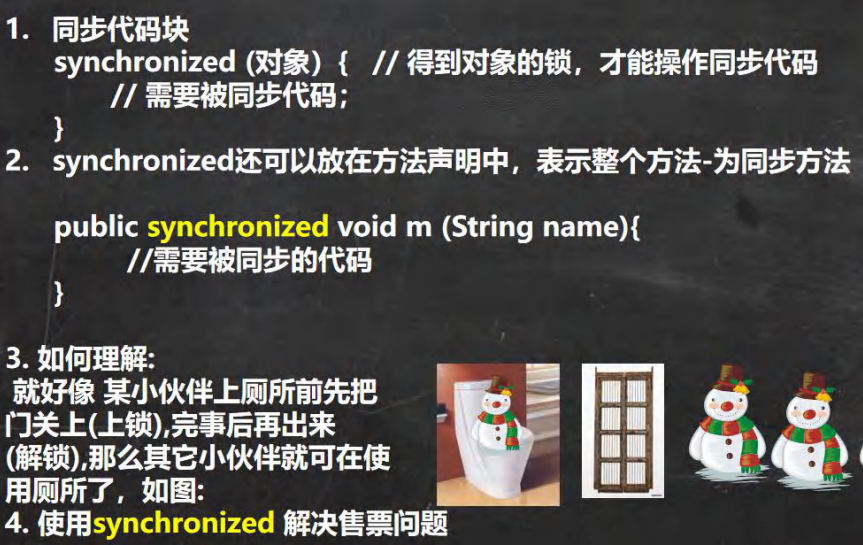
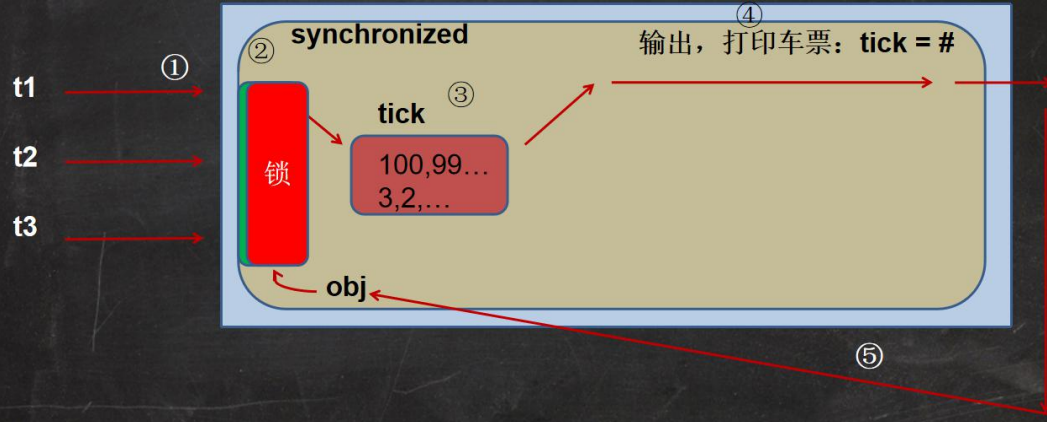
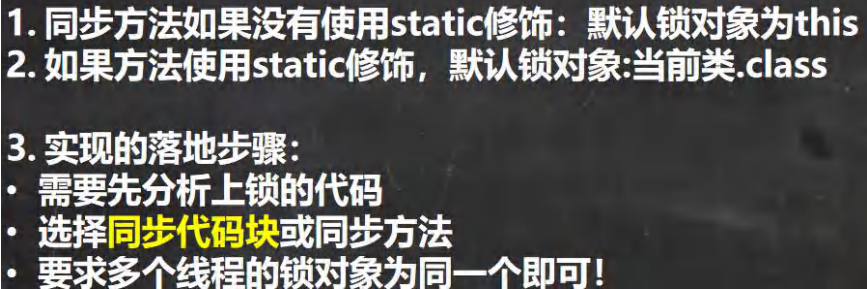
Synchronized 线程同步机制
同步具体方法-Synchronized
互斥锁
1 2 3 4 5 6 7 8 9 10 11 12 13 14 15 16 17 18 19 20 21 22 23 24 25 26 27 28 29 30 31 32 33 34 35 36 37 38 39 40 41 42 43 44 45 46 47 48 49 50 51 52 53 54 55 56 57 public class ThreadSellTicket {public static void main (String[] args) {"===使用实现接口方式来售票=====" );SellTicket03 sellTicket03 = new SellTicket03 ();new Thread (sellTicket03).start(); new Thread (sellTicket03).start(); new Thread (sellTicket03).start(); class SellTicket03 implements Runnable {private int ticketNum = 100 ; Object object = new Object ();private Boolean loop = true ;public synchronized static void m1 () {public static void m2 () {synchronized (SellTicket03.class) {"m2" );public void sell () { synchronized ( object) { if (ticketNum <= 0 ) {"售票结束..." );false ;return ;try {50 );catch (InterruptedException e) {throw new RuntimeException (e);"窗口 " + Thread.currentThread().getName() + " 售出一张票" + " 剩余票数=" + (--ticketNum));@Override public void run () {while (loop) {
线程的死锁
多个线程都占用了对方的锁资源,但不肯相让,导致了死锁,在编程是一定要避免死锁的发生.
1 2 3 4 5 6 7 8 9 10 11 12 13 14 15 16 17 18 19 20 21 22 23 24 25 26 27 28 29 30 31 32 33 34 35 36 37 38 39 40 41 42 43 44 45 46 47 48 49 50 51 52 package com.ep.thread_;public class DeadLock {public static void main (String[] args) {DeadLockDemo A = new DeadLockDemo (true );"A 线程" );DeadLockDemo B = new DeadLockDemo (false );"B 线程" );class DeadLockDemo extends Thread {static Object o1 = new Object ();static Object o2 = new Object ();boolean flag;public DeadLockDemo (boolean flag) {this .flag = flag;@Override public void run () {if (flag) {synchronized (o1) {" 进入 1" );synchronized (o2) { " 进入 2" );else {synchronized (o2) {" 进入 3" );synchronized (o1) { " 进入 4" );
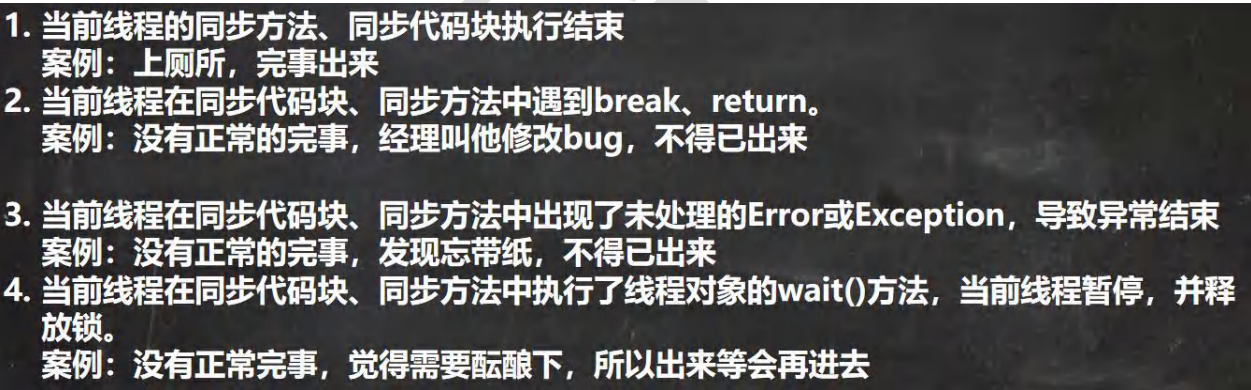
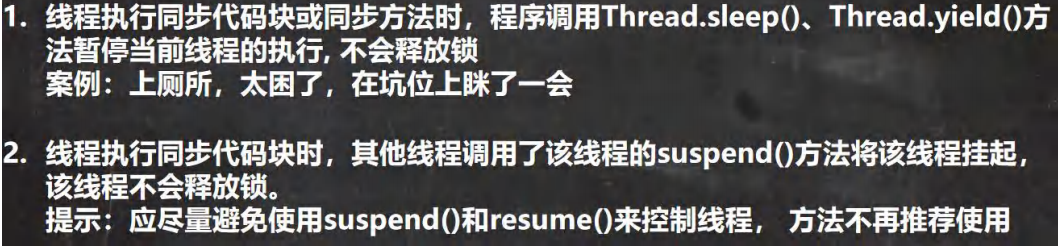
释放锁 下面操作会释放锁
下面操作不会释放锁
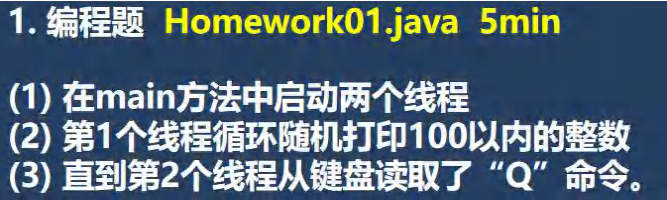
作业
1 2 3 4 5 6 7 8 9 10 11 12 13 14 15 16 17 18 19 20 21 22 23 24 25 26 27 28 29 30 31 32 33 34 35 36 37 38 39 40 41 42 43 44 45 46 47 48 49 50 51 52 53 54 55 56 57 58 59 60 61 package com.ep.thread_;import java.util.Scanner;public class HomeWork01 {public static void main (String[] args) {Thread001 thread001 = new Thread001 ();Thread002 thread002 = new Thread002 ();new Thread (thread002).start();class Thread001 extends Thread {private Boolean loop = true ;public void setLoop (Boolean loop) {this .loop = loop;@Override public void run () {while (loop){"随机数:" + ((int )Math.random() * 100 + 1 ));try {1000 );catch (InterruptedException e) {throw new RuntimeException (e);class Thread002 implements Runnable {private Thread001 t;public void setT (Thread001 t) {this .t = t;@Override public void run () {Scanner scanner = new Scanner (System.in);char input = ' ' ;while (input != 'Q' ) {0 );if (input == 'Q' ) {false );
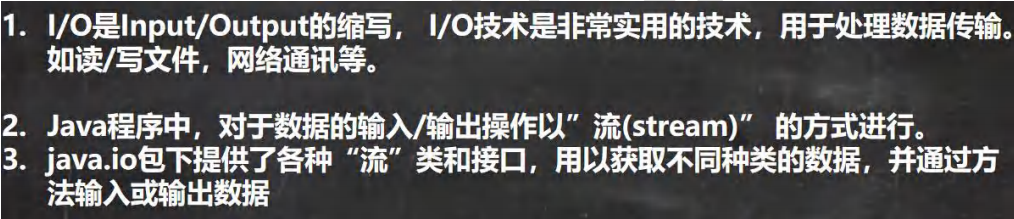
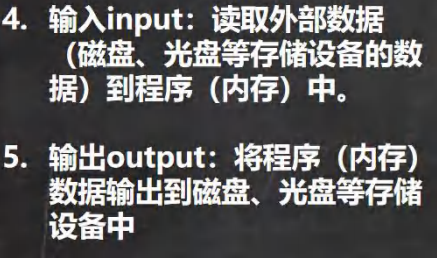
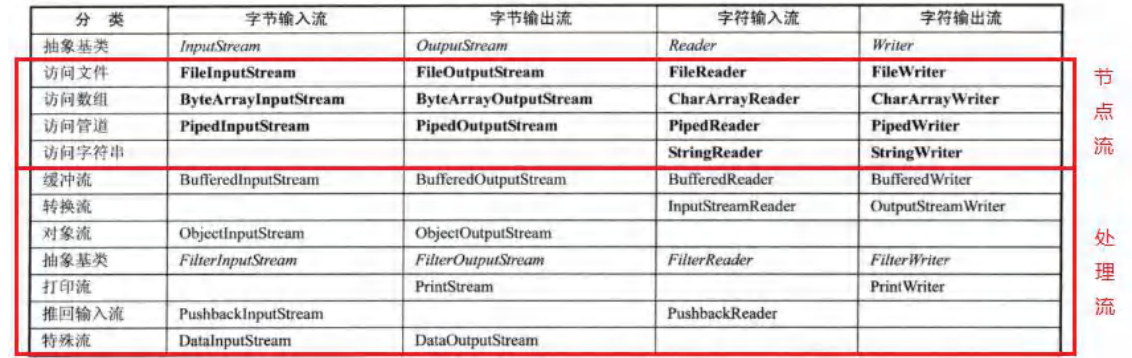
IO 流 文件流
常用的文件操作 创建文件对象相关构造器和方法
1 2 3 4 5 6 7 8 9 10 11 12 13 14 15 16 17 18 19 20 21 22 23 24 25 26 27 28 29 30 31 32 33 34 35 36 37 38 39 40 41 42 43 44 package com.ep.file;import org.junit.Test;import java.io.File;import java.io.IOException;public class FileCreate {public static void main (String[] args) {@Test public void create01 () throws IOException {String filePath = "e:\\news.txt" ;File file = new File (filePath);@Test public void create02 () throws IOException {File parentFile = new File ("e://" );File file = new File (parentFile, "news2.txt" );@Test public void create03 () throws IOException {String parentPath = "e:\\" ;String fileName = "new4.txt" ;File file = new File (parentPath, fileName);
获取文件的相关信息
1 2 3 4 5 6 7 8 9 10 11 12 13 14 public class FileInfo {public static void main (String[] args) {File file = new File ("e:\\news.txt" ); "文件名字=" + file.getName());"文件绝对路径=" + file.getAbsolutePath());"文件父级目录=" + file.getParent());"文件大小(字节)=" + file.length());"文件是否存在=" + file.exists());"是不是一个文件=" + file.isFile());"是不是一个目录=" + file.isDirectory());
目录的操作和文件删除
1 2 3 4 5 6 7 8 9 10 11 12 13 14 15 16 17 18 19 20 21 22 23 24 25 26 27 28 29 30 31 32 33 34 35 36 37 38 39 40 41 42 43 44 45 46 47 48 49 50 51 52 package com.ep.file;import org.junit.Test;import java.io.File;public class MkdirFile {public static void main (String[] args) {@Test public void m1 () {File file = new File ("e://news.txt" );if (file.exists()) {else {"文件不存在" );@Test public void m2 () {File file = new File ("e://demo" );if (file.exists()) {if (file.delete()) { "删除成功" );else {"删除失败" );else {"文件不存在" );@Test public void m3 () {File file = new File ("e://demo//a//b//c" );if (file.exists()) {if (file.delete()) {"删除成功" );else {"删除是啊比" );else {"文件不存在" );
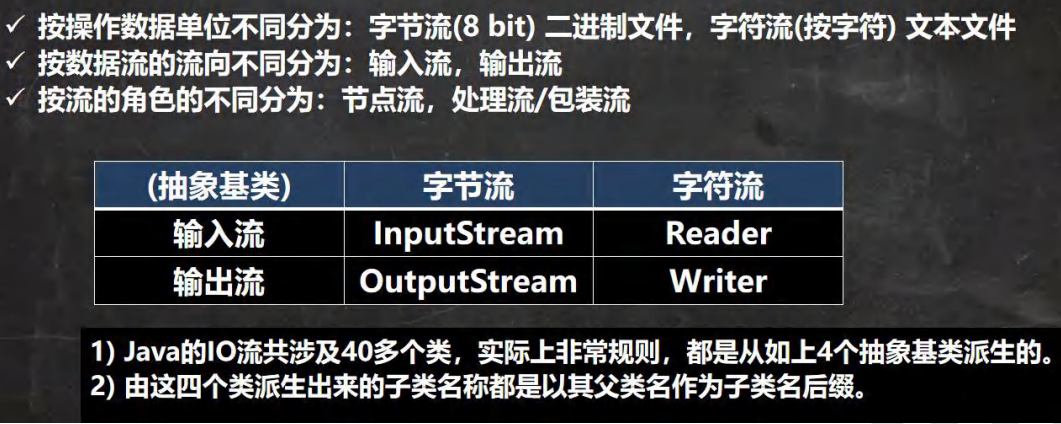
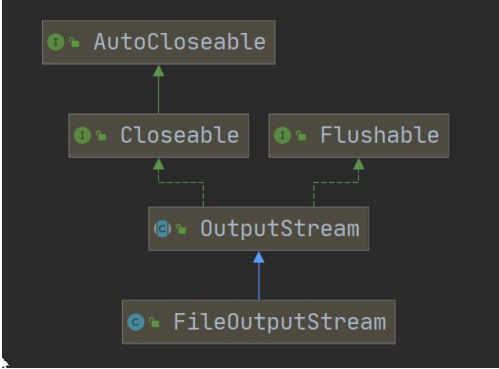
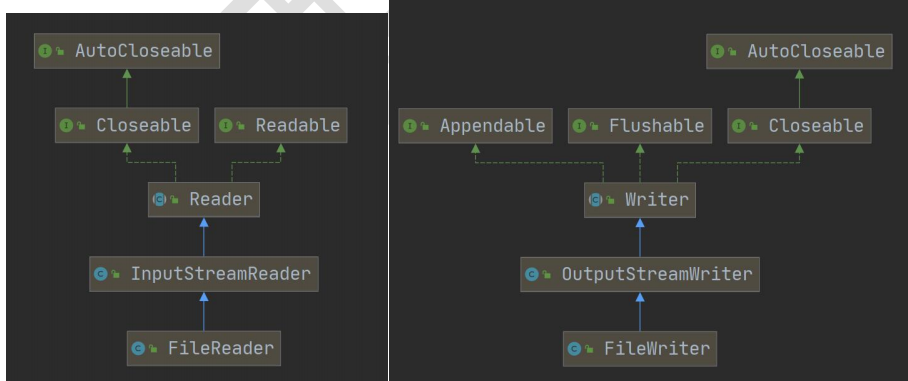
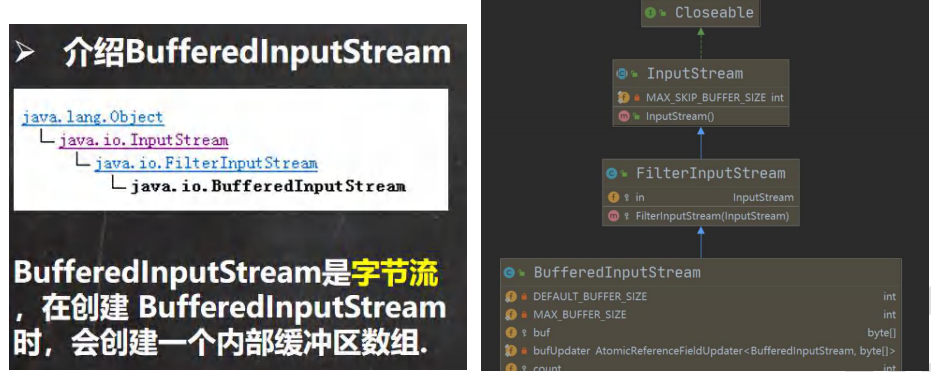
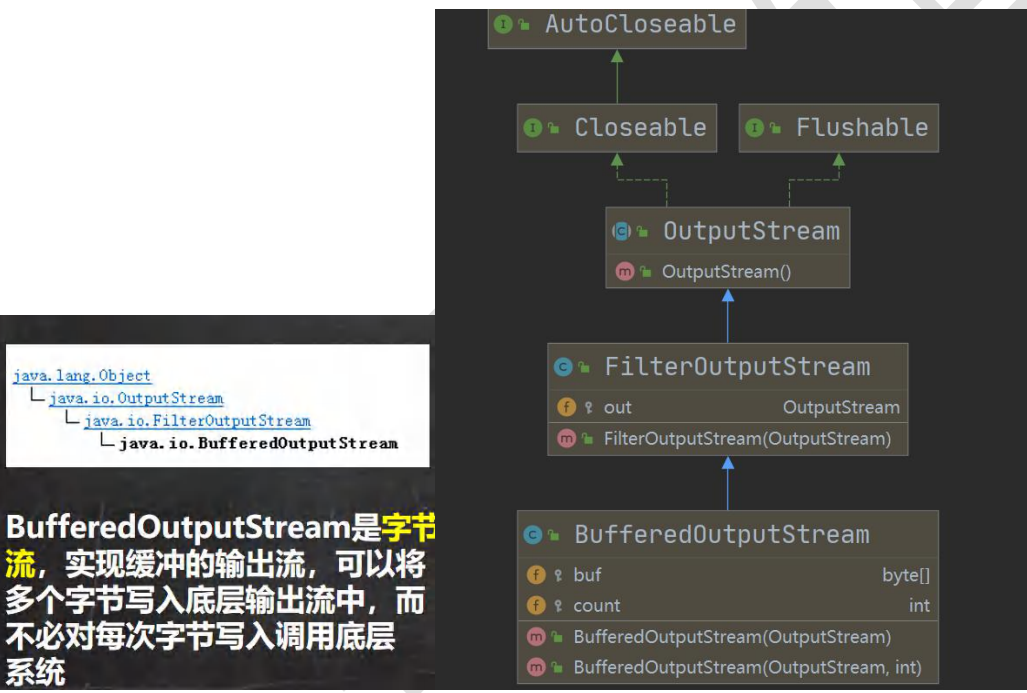
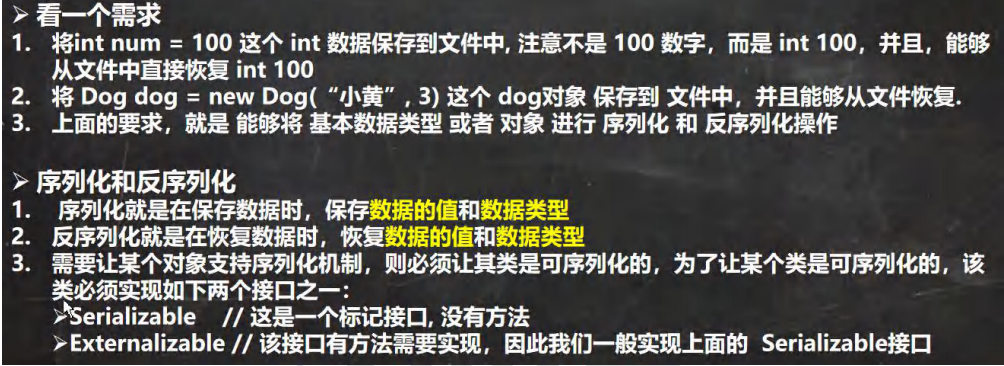
IO 流原理及流的分类
流的分类
1 2 3 4 5 6 7 8 9 10 11 12 13 14 15 16 17 18 19 20 21 22 23 24 25 26 27 28 29 30 31 32 33 34 35 36 37 38 39 40 41 42 43 44 45 46 47 48 49 50 51 52 53 54 55 56 57 58 59 60 61 62 63 64 65 66 67 68 69 70 71 72 73 74 75 76 77 package com.ep.file;import org.junit.Test;import java.io.FileInputStream;import java.io.IOException;public class FileInputStream_ {public static void main (String[] args) {@Test public void readFile01 () {String filePath = "e:\\hello.txt" ;int readData = 0 ;FileInputStream fileInputStream = null ;try {new FileInputStream (filePath);while ((readData = fileInputStream.read()) != -1 ){char ) readData); catch (IOException e) {throw new RuntimeException (e);finally {try {catch (IOException e) {throw new RuntimeException (e);@Test public void readFile02 () {String filePath = "e:\\hello.txt" ;byte [] buf = new byte [8 ]; int readLength = 0 ;FileInputStream fileInputStream = null ;try {new FileInputStream (filePath);while ((readLength = fileInputStream.read(buf)) != -1 ){new String (buf,0 ,readLength));catch (IOException e) {throw new RuntimeException (e);finally {try {catch (IOException e) {throw new RuntimeException (e);
FileOutputStream
1 2 3 4 5 6 7 8 9 10 11 12 13 14 15 16 17 18 19 20 21 22 23 24 25 26 27 28 29 30 31 32 33 34 35 36 37 38 39 40 41 42 43 44 45 46 47 48 package com.ep.file;import org.junit.Test;import java.io.FileOutputStream;import java.io.IOException;public class FileOutputStream_ {public static void main (String[] args) {@Test public void write () {String filePath = "e:\\a.txt" ;FileOutputStream fileOutputStream = null ;try {new FileOutputStream (filePath, true );String str = "hello,word" ;0 ,3 );catch (IOException e) {throw new RuntimeException (e);finally {try {catch (IOException e) {throw new RuntimeException (e);
文件拷贝
1 2 3 4 5 6 7 8 9 10 11 12 13 14 15 16 17 18 19 20 21 22 23 24 25 26 27 28 29 30 31 32 33 34 35 36 37 38 39 40 41 42 43 44 45 package com.ep.file;import java.io.FileInputStream;import java.io.FileOutputStream;import java.io.IOException;public class FileCopy {public static void main (String[] args) {String srcFilePath = "e:\\a.png" ;String destFilePath = "e:\\a2.png" ;FileInputStream fileInputStream = null ;FileOutputStream fileOutputStream = null ;try {new FileInputStream (srcFilePath);new FileOutputStream (destFilePath);byte [] buf = new byte [1024 ];int readLen = 0 ;while ((readLen = fileInputStream.read(buf)) != -1 ) {0 ,readLen); "拷贝结束" );catch (IOException e) {throw new RuntimeException (e);finally {try {catch (IOException e) {throw new RuntimeException (e);
FileReader 和 FileWriter 介绍
FileReader
1 2 3 4 5 6 7 8 9 10 11 12 13 14 15 16 17 18 19 20 21 22 23 24 25 26 27 28 29 30 31 32 33 34 35 36 37 38 39 40 41 42 43 44 45 46 47 48 49 50 51 52 53 54 55 56 57 58 59 60 61 62 63 64 65 66 67 package com.ep.file;import org.junit.Test;import java.io.FileReader;import java.io.IOException;public class FileReader_ {public static void main (String[] args) {@Test public void readFile01 () {String filePath = "e:\\story.txt" ;FileReader fileReader = null ;int data = 0 ;try {new FileReader (filePath);while ((data = fileReader.read()) != -1 ) {char )data);catch (IOException e) {throw new RuntimeException (e);finally {try {catch (IOException e) {throw new RuntimeException (e);@Test public void readFile02 () {String filePath = "e:\\story.txt" ;FileReader fileReader = null ;int readLen = 0 ;char [] buf = new char [8 ];try {new FileReader (filePath);while ((readLen = fileReader.read(buf)) != -1 ) {new String (buf,0 , readLen));catch (IOException e) {throw new RuntimeException (e);finally {try {catch (IOException e) {throw new RuntimeException (e);
FileWriter
1 2 3 4 5 6 7 8 9 10 11 12 13 14 15 16 17 18 19 20 21 22 23 24 25 26 27 28 29 30 31 32 33 34 35 36 37 38 39 40 package com.ep.file;import java.io.FileWriter;import java.io.IOException;public class FileWriter_ {public static void main (String[] args) {String filePath = "e:\\note.txt" ;FileWriter fileWriter = null ;char [] chars = {'a' , 'b' , 'c' };try {new FileWriter (filePath); 'H' );"我是张三" .toCharArray(), 0 , 3 );" 你好北京~" );"天生我材必有用" ,0 , 3 );catch (IOException e) {throw new RuntimeException (e);finally {try {catch (IOException e) {throw new RuntimeException (e);
节点流和处理流
节点流和处理流一览图
节点流和处理流的区别和联系
处理流的功能主要体现在以下两个方面:
处理流-BufferedReader 和 BufferedWriter
BufferedReader 1 2 3 4 5 6 7 8 9 10 11 12 13 14 15 16 17 18 19 20 21 22 23 24 25 26 27 28 29 30 31 32 33 34 35 36 37 38 39 40 41 42 43 package com.ep.file;import java.io.BufferedReader;import java.io.FileReader;public class BuffReader_ {public static void main (String[] args) throws Exception {String filePath = "e:\\story.txt" ;BufferedReader bufferedReader = new BufferedReader (new FileReader (filePath));while ((line = bufferedReader.readLine()) != null ) {
BufferedWriter 1 2 3 4 5 6 7 8 9 10 11 12 13 14 15 16 17 18 19 20 21 22 23 24 25 26 27 package com.ep.file;import java.io.BufferedWriter;import java.io.FileWriter;public class BufferedWritter_ {public static void main (String[] args) throws Exception {String filePath = "e://note.txt" ;BufferedWriter bufferedWriter = new BufferedWriter (new FileWriter (filePath, true ));"hello1, java" );"hello2, java" );"hello3, java" );
文件拷贝
BufferedReader 和 BufferedWriter 是按照字符操作
不要去操作 二进制文件[声音,视频,doc, pdf ], 可能造成文件损坏
1 2 3 4 5 6 7 8 9 10 11 12 13 14 15 16 17 18 19 20 21 22 23 24 25 26 27 28 29 30 31 32 33 34 35 36 37 38 39 40 package com.ep.file;import java.io.*;public class BufferedCopy {public static void main (String[] args) {String srcFilePath = "e://a.txt" ;String destFilePath = "e://a4.txt" ;BufferedWriter bufferedWriter = null ;BufferedReader bufferedReader = null ;try {new BufferedReader (new FileReader (srcFilePath));new BufferedWriter (new FileWriter (destFilePath));while ((line = bufferedReader.readLine()) != null ) {catch (Exception e) {throw new RuntimeException (e);finally {try {catch (IOException e) {throw new RuntimeException (e);
文件拷贝 1 2 3 4 5 6 7 8 9 10 11 12 13 14 15 16 17 18 19 20 21 22 23 24 25 26 27 28 29 30 31 32 33 34 35 36 37 38 39 40 41 42 43 44 45 package com.ep.file;import java.io.*;public class BufferedCopy02 {public static void main (String[] args) {String srcFilePath = "e://a.txt" ;String destFilePath = "e://a4.txt" ;BufferedInputStream bufferedInputStream = null ;BufferedOutputStream bufferedOutputStream = null ;try {new BufferedInputStream (new FileInputStream (srcFilePath));new BufferedOutputStream (new FileOutputStream (destFilePath));byte [] bytes = new byte [1024 ];int readLen = 0 ;while ((readLen = bufferedInputStream.read(bytes)) != -1 ) {0 , readLen);catch (Exception e) {throw new RuntimeException (e);finally {try {catch (IOException e) {throw new RuntimeException (e);
对象流
ObjectOutputStream 提供 序列化功能
ObjectInputStream 提供 反序列化功能
ObjectOutputStream 1 2 3 4 5 6 7 8 9 10 11 12 13 14 15 16 17 18 19 20 21 22 23 24 25 26 27 28 29 30 31 32 33 34 35 36 37 38 39 40 41 42 43 44 45 46 47 48 49 50 51 52 53 54 55 56 57 58 59 60 61 62 63 64 65 66 67 68 69 70 71 72 73 74 75 76 package com.ep.file;import java.io.FileOutputStream;import java.io.IOException;import java.io.ObjectOutputStream;import java.io.Serializable;public class ObjectOutputStream_ {public static void main (String[] args) {String filePath = "e:\\data.dat" ;ObjectOutputStream oos = null ;try {new ObjectOutputStream (new FileOutputStream (filePath));100 ); true );'a' );9.5 );"你好啊" );Dog dog = new Dog ("大黄" , 18 );catch (IOException e) {throw new RuntimeException (e);finally {try {catch (IOException e) {throw new RuntimeException (e);class Dog implements Serializable {private String name;private int age;private static final long serialVersionUID = 1L ;public Dog (String name, int age) {this .name = name;this .age = age;public String getName () {return name;public void setName (String name) {this .name = name;public int getAge () {return age;public void setAge (int age) {this .age = age;@Override public String toString () {return "Dog{" +"name='" + name + '\'' +", age=" + age +'}' ;
1 2 3 4 5 6 7 8 9 10 11 12 13 14 15 16 17 18 19 20 21 22 23 24 25 26 27 28 29 30 31 32 33 package com.ep.file;import java.io.FileInputStream;import java.io.IOException;import java.io.ObjectInputStream;public class ObjectInputStream_ {public static void main (String[] args) throws IOException, ClassNotFoundException {String filePath = "e:\\data.dat" ;ObjectInputStream ois = new ObjectInputStream (new FileInputStream (filePath));Object object = ois.readObject();Dog dog = (Dog) object;
转换流
1 2 3 4 5 6 7 8 9 10 11 12 13 14 15 16 17 18 19 20 21 22 23 24 25 26 27 28 29 30 31 package com.ep.file;import java.io.*;public class InputStreamReader_ {public static void main (String[] args) throws IOException {String filePath = "e:\\a.txt" ;BufferedReader bufferedReader = new BufferedReader (new InputStreamReader (new FileInputStream (filePath), "gbk" ));String s = bufferedReader.readLine();
OutputStreamReader 1 2 3 4 5 6 7 8 9 10 11 public class OutputStreamReader_ {public static void main (String[] args) throws IOException {OutputStreamWriter oss = new OutputStreamWriter (new FileOutputStream ("e://a.txt" ), "gbk" );"你好,java" );
打印流
PrintStream 1 2 3 4 5 6 7 8 9 10 11 12 13 14 15 16 17 18 19 20 21 22 23 24 25 26 27 28 29 30 31 32 33 34 35 36 37 38 package com.ep.file;import java.io.IOException;import java.io.PrintStream;public class PrintStream_ {public static void main (String[] args) throws IOException {PrintStream out = System.out;"你好啊" );"你好" .getBytes());new PrintStream ("e://f1.txt" ));"这段文字会写到文件中" );
PrintWriter 1 2 3 4 5 6 7 8 9 10 public class PrintWriter_ {public static void main (String[] args) throws IOException {PrintWriter printWriter = new PrintWriter (new FileWriter ("e://f2.txt" ));"hi, 北京你好~~~~" );
Properties 类 传统方式读取properties文件
1 2 3 4 5 6 7 8 9 10 11 12 13 14 15 public class Properties01 { public static void main (String[] args) throws IOException { BufferedReader br = new BufferedReader (new FileReader ("src\\mysql.properties" )); String line = "" ; while ((line = br.readLine()) != null ) { "=" ); if ("ip" .equals(split[0 ])) { 0 ] + "值是: " + split[1 ]);
1 2 3 4 5 6 7 8 9 10 11 12 13 14 15 16 17 18 19 20 21 22 23 24 25 26 27 package com.ep.properties_;import java.io.FileReader;import java.io.IOException;import java.util.Properties;public class properties01 {public static void main (String[] args) throws IOException {Properties properties = new Properties ();new FileReader ("src//main//java//com//ep//properties_//mysql.properties" ));String user = properties.getProperty("user" );String pwd = properties.getProperty("pwd" );
1 2 3 4 5 6 7 8 9 10 11 12 13 14 15 16 17 18 19 20 21 22 23 24 25 26 27 28 package com.ep.properties_;import java.io.FileOutputStream;import java.io.IOException;import java.util.Properties;public class Properties02 {public static void main (String[] args) throws IOException {Properties properties = new Properties ();"user" ,"root" );"pwd" ,"8888" );"name" ,"张三" ); new FileOutputStream ("src//main//java//com//ep//properties_//mysql2.properties" ), null );"保存配置文件成功~" );
网络编程 InetAddress 类
1 2 3 4 5 6 7 8 9 10 11 12 13 14 15 16 17 18 19 20 public class InetAddress_ {public static void main (String[] args) throws UnknownHostException {InetAddress localHost = InetAddress.getLocalHost();InetAddress host = InetAddress.getByName("www.baidu.com" );String hostName = host.getHostName();String hostAddress = host.getHostAddress();
Socket
TCP 网络通信编程
应用案例 1(使用字节流)
服务端
1 2 3 4 5 6 7 8 9 10 11 12 13 14 15 16 17 18 19 20 21 22 23 24 25 26 27 28 29 30 31 32 33 34 35 36 37 38 39 40 41 42 43 44 package com.ep.network_.socket;import java.io.IOException;import java.io.InputStream;import java.net.ServerSocket;import java.net.Socket;public class SocketTCP01Server {public static void main (String[] args) throws IOException {ServerSocket serverSocket = new ServerSocket (9999 );"服务端,在 9999 端口监听,等待连接.." );Socket socket = serverSocket.accept();"服务端 socket =" + socket.getClass());InputStream inputStream = socket.getInputStream();byte [] buf = new byte [1024 ];int readLen = 0 ;while ((readLen = inputStream.read(buf)) != -1 ) {new String (buf,0 , readLen));
客户端
1 2 3 4 5 6 7 8 9 10 11 12 13 14 15 16 17 18 19 20 21 22 23 24 25 26 27 28 29 30 31 32 package com.ep.network_.socket;import java.io.IOException;import java.io.OutputStream;import java.net.InetAddress;import java.net.Socket;public class SocketTCP01Client {public static void main (String[] args) throws IOException {Socket socket = new Socket (InetAddress.getLocalHost(),9999 );"客户端 socket 返回=" + socket.getClass());OutputStream outputStream = socket.getOutputStream();"你好啊,socket" .getBytes());
应用案例 2(使用字节流)
1 2 3 4 5 6 7 8 9 10 11 12 13 14 15 16 17 18 19 20 21 22 23 24 25 26 27 28 29 30 31 32 33 34 35 36 37 38 39 40 41 42 43 44 45 46 47 48 49 50 51 52 package com.ep.network_.socket;import java.io.IOException;import java.io.InputStream;import java.io.OutputStream;import java.net.ServerSocket;import java.net.Socket;public class SocketTCP02Server {public static void main (String[] args) throws IOException {ServerSocket serverSocket = new ServerSocket (9999 );"服务端,在 9999 端口监听,等待连接.." );Socket socket = serverSocket.accept();"服务端 socket =" + socket.getClass());InputStream inputStream = socket.getInputStream();byte [] buf = new byte [1024 ];int readLen = 0 ;while ((readLen = inputStream.read(buf)) != -1 ) {new String (buf,0 , readLen)); OutputStream outputStream1 = socket.getOutputStream();"hello,Client.服务器端已经收到你的消息" .getBytes());
1 2 3 4 5 6 7 8 9 10 11 12 13 14 15 16 17 18 19 20 21 22 23 24 25 26 27 28 29 30 31 32 33 34 35 36 37 38 39 40 41 42 43 44 45 package com.ep.network_.socket;import java.io.IOException;import java.io.InputStream;import java.io.OutputStream;import java.net.InetAddress;import java.net.Socket;public class SocketTCP02Client {public static void main (String[] args) throws IOException {Socket socket = new Socket (InetAddress.getLocalHost(),9999 );"客户端 socket 返回=" + socket.getClass());OutputStream outputStream = socket.getOutputStream();"你好啊,socket" .getBytes());InputStream inputStream = socket.getInputStream();byte [] buf = new byte [1024 ];int readLen = 0 ;while ((readLen = inputStream.read(buf)) != -1 ) {new String (buf,0 , readLen));
应用案例 3(使用字符流)
1 2 3 4 5 6 7 8 9 10 11 12 13 14 15 16 17 18 19 20 21 22 23 24 25 26 27 28 29 30 31 32 33 34 35 36 37 38 39 40 41 42 43 44 45 46 47 48 49 50 51 package com.ep.network_.socket;import java.io.*;import java.net.ServerSocket;import java.net.Socket;public class SocketTCP03Server {public static void main (String[] args) throws IOException {ServerSocket serverSocket = new ServerSocket (9999 );"服务端,在 9999 端口监听,等待连接.." );Socket socket = serverSocket.accept();"服务端 socket =" + socket.getClass());InputStream inputStream = socket.getInputStream();BufferedReader bufferedReader = new BufferedReader (new InputStreamReader (inputStream));String s = bufferedReader.readLine();OutputStream outputStream1 = socket.getOutputStream();BufferedWriter bufferedWriter = new BufferedWriter (new OutputStreamWriter (outputStream1));"hello,Client.服务器端已经收到你的消息" );
1 2 3 4 5 6 7 8 9 10 11 12 13 14 15 16 17 18 19 20 21 22 23 24 25 26 27 28 29 30 31 32 33 34 35 36 37 38 39 40 41 42 43 package com.ep.network_.socket;import java.io.*;import java.net.InetAddress;import java.net.Socket;public class SocketTCP03Client {public static void main (String[] args) throws IOException {Socket socket = new Socket (InetAddress.getLocalHost(),9999 );"客户端 socket 返回=" + socket.getClass());OutputStream outputStream = socket.getOutputStream();BufferedWriter bufferedWriter = new BufferedWriter (new OutputStreamWriter (outputStream));"你好啊,socket" );InputStream inputStream = socket.getInputStream();BufferedReader bufferedReader = new BufferedReader (new InputStreamReader (inputStream));String s = bufferedReader.readLine();
网络上传文件
StreamUtils
1 2 3 4 5 6 7 8 9 10 11 12 13 14 15 16 17 18 19 20 21 22 23 24 25 26 27 28 29 30 31 32 33 34 35 36 37 38 39 40 41 42 43 44 45 46 package com.ep.network_.utils;import java.io.BufferedReader;import java.io.ByteArrayOutputStream;import java.io.InputStream;import java.io.InputStreamReader;public class StreamUtils {public static byte [] streamToByteArray(InputStream is) throws Exception{ByteArrayOutputStream bos = new ByteArrayOutputStream ();byte [] b = new byte [1024 ];int len;while ((len=is.read(b))!=-1 ){0 , len);byte [] array = bos.toByteArray();return array;public static String streamToString (InputStream is) throws Exception{BufferedReader reader = new BufferedReader (new InputStreamReader (is));new StringBuilder ();while ((line=reader.readLine())!=null ){ "\r\n" );return builder.toString();
TCPFileUploadServer
1 2 3 4 5 6 7 8 9 10 11 12 13 14 15 16 17 18 19 20 21 22 23 24 25 26 27 28 29 30 31 32 33 34 35 36 37 38 39 40 41 42 43 44 45 46 47 package com.ep.network_.upload;import com.ep.network_.utils.StreamUtils;import java.io.*;import java.net.ServerSocket;import java.net.Socket;public class TCPFileUploadServer {public static void main (String[] args) throws Exception {ServerSocket serverSocket = new ServerSocket (8888 );"服务端在 8888 端口监听...." );Socket socket = serverSocket.accept();BufferedInputStream bis = new BufferedInputStream (socket.getInputStream());byte [] bytes = StreamUtils.streamToByteArray(bis);String destFilePath = "src\\abc.png" ;BufferedOutputStream bos = new BufferedOutputStream (new FileOutputStream (destFilePath));BufferedWriter bufferedWriter = new BufferedWriter (new OutputStreamWriter (socket.getOutputStream()));"服务器端收到图片" );
TCPFileUploadClient
1 2 3 4 5 6 7 8 9 10 11 12 13 14 15 16 17 18 19 20 21 22 23 24 25 26 27 28 29 30 31 32 33 34 35 36 37 38 39 40 41 42 43 44 package com.ep.network_.upload;import com.ep.network_.utils.StreamUtils;import java.io.BufferedInputStream;import java.io.BufferedOutputStream;import java.io.FileInputStream;import java.io.InputStream;import java.net.InetAddress;import java.net.Socket;public class TCPFileUploadClient {public static void main (String[] args) throws Exception {Socket socket = new Socket (InetAddress.getLocalHost(), 8888 );String filePath = "e:\\abc.png" ;BufferedInputStream bis = new BufferedInputStream (new FileInputStream (filePath));byte [] bytes = StreamUtils.streamToByteArray(bis);BufferedOutputStream bos = new BufferedOutputStream (socket.getOutputStream());InputStream inputStream = socket.getInputStream();String s = StreamUtils.streamToString(inputStream);
反射(reflection) 入门
1 2 3 4 5 6 7 8 9 10 11 12 13 14 15 16 17 18 19 20 21 22 23 24 25 26 27 28 29 30 31 32 33 34 35 36 37 38 39 40 41 package com.ep.reflection_;import java.io.FileInputStream;import java.io.IOException;import java.lang.reflect.InvocationTargetException;import java.lang.reflect.Method;import java.util.Properties;public class ReflectionQuestion {public static void main (String[] args) throws IOException, ClassNotFoundException, InstantiationException, IllegalAccessException, NoSuchMethodException, InvocationTargetException {Properties properties = new Properties ();new FileInputStream ("src//re.properties" ));String classfullpath = properties.get("classfullpath" ).toString();String methodName = properties.get("method" ).toString();"classfullpath=" + classfullpath);"method=" + methodName);Class cls = Class.forName(classfullpath);Object o = cls.newInstance();Method method = cls.getMethod(methodName);
反射机制
Java 反射机制原理示意图!!!
Java 反射机制可以完成
反射相关的主要类
注意类,重写构造方法,一定要再写一下无参构造方法
1 2 3 4 5 6 7 8 9 10 11 12 13 14 15 16 17 18 19 20 21 22 23 24 25 26 27 28 29 30 31 32 33 34 35 36 37 38 39 40 41 42 43 44 45 46 47 48 package com.ep.reflection_;import java.io.FileInputStream;import java.lang.reflect.Constructor;import java.lang.reflect.Field;import java.lang.reflect.Method;import java.util.Properties;public class Reflection01 {public static void main (String[] args) throws Exception {Properties properties = new Properties ();new FileInputStream ("src//re.properties" ));String classfullpath = properties.get("classfullpath" ).toString();String methodName = properties.get("method" ).toString();Class cls = Class.forName(classfullpath);Object o = cls.newInstance();Method method = cls.getMethod(methodName);Field ageField = cls.getField("age" );Constructor constructor = cls.getConstructor();Constructor constructor1 = cls.getConstructor(String.class);
反射优点和缺点
反射调用优化-关闭访问检查
1 2 3 4 Class cls = Class.forName("com.ep.Cat" ); Object o = cls.newInstance(); Method hi = cls.getMethod("hi" ); true );
Class 类 基本介绍
常用方法
1 2 3 4 5 6 7 8 9 10 11 12 13 14 15 16 17 18 19 20 21 22 23 24 25 26 27 28 29 30 31 32 33 34 35 36 37 38 39 package com.ep.reflection_.class_;import com.ep.reflection_.Cat;import java.lang.reflect.Field;public class Class02 {public static void main (String[] args) throws ClassNotFoundException, InstantiationException, IllegalAccessException, NoSuchFieldException {String classAllPath = "com.ep.reflection_.Cat" ;Cat cat = (Cat) cls.newInstance();Field nameField = cls.getField("name" );"=======所有的字段属性====" );for (Field field : cls.getFields()) {
获取 Class 类对象
1 2 3 4 5 6 7 8 9 10 11 12 13 14 15 16 17 18 19 20 21 22 23 24 25 26 27 28 29 30 31 32 33 34 35 36 37 38 39 40 41 42 43 44 45 46 47 48 49 50 51 52 53 package com.ep.reflection_.class_;import com.ep.reflection_.Cat;public class getClass {public static void main (String[] args) throws ClassNotFoundException {String classAllPath = "com.ep.reflection_.Cat" ; Class cls2 = Cat.class;Cat cat = new Cat ();Class cls3 = cat.getClass();ClassLoader classLoader = cat.getClass().getClassLoader();Class cls4 = classLoader.loadClass(classAllPath);int .class;char .class;boolean .class;
如下类型有 Class 对象
类加载
类加载时机
类加载过程图
类加载各阶段完成任务
加载阶段
连接阶段-验证
连接阶段-准备
连接阶段-解析
Initialization(初始化)
通过反射获取类的结构信息 java.lang.Class 类
java.lang.reflect.Field 类
java.lang.reflect.Method 类
java.lang.reflect.Constructor 类
通过反射创建对象
测试 1:通过反射创建某类的对象,要求该类中必须有 public 的无参构造
测试 2:通过调用某个特定构造器的方式,实现创建某类的对象
1 2 3 4 5 6 7 8 9 10 11 12 13 14 15 16 17 18 19 20 21 22 23 24 25 26 27 28 29 30 31 32 33 34 35 36 37 38 39 40 41 42 43 44 45 46 47 48 49 50 51 52 53 54 55 56 57 58 59 60 61 62 package com.ep.reflection_;import java.lang.reflect.Constructor;import java.lang.reflect.InvocationTargetException;public class ReflectCreateInstance {public static void main (String[] args) throws ClassNotFoundException, InstantiationException, IllegalAccessException, NoSuchMethodException, InvocationTargetException {"com.ep.reflection_.User" );Object o = cls.newInstance();Object o1 = constructor.newInstance( "李四" );int .class, String.class);true );Object o2 = declaredConstructor.newInstance(1 , "王五" );class User { private int age = 10 ;private String name = "张三" ;public User () {public User (String name) {this .name = name;private User (int age, String name) {this .age = age;this .name = name;public String toString () {return "User [age=" + age + ", name=" + name + "]" ;
通过反射访问类中的成员
1 2 3 4 5 6 7 8 9 10 11 12 13 14 15 16 17 18 19 20 21 22 23 24 25 26 27 28 29 30 31 32 33 34 35 36 37 38 39 40 41 42 43 44 45 package com.ep.reflection_;import java.lang.reflect.Field;public class ReflecAccessProperty {public static void main (String[] args) throws ClassNotFoundException, InstantiationException, IllegalAccessException, NoSuchFieldException {"com.ep.reflection_.Student" );Object o = studentClass.newInstance(); Field ageField = studentClass.getField("age" );18 );Field name = studentClass.getDeclaredField("name" );true );null ,"张三" );null )); class Student {public int age;private static String name;public Student () {public String toString () {return "Student [age=" + age + ", name=" + name + "]" ;
通过反射访问类的方法
1 2 3 4 5 6 7 8 9 10 11 12 13 14 15 16 17 18 19 20 21 22 23 24 25 26 27 28 29 30 31 32 33 34 35 36 37 38 39 40 41 42 43 44 45 46 47 48 49 50 51 52 53 54 55 56 57 58 59 60 61 62 package com.ep.reflection_;import java.lang.reflect.InvocationTargetException;import java.lang.reflect.Method;public class ReflecAccessMethod {public static void main (String[] args) throws ClassNotFoundException, InstantiationException, IllegalAccessException, NoSuchMethodException, InvocationTargetException {"com.ep.reflection_.Boss" );Object o = bossClass.newInstance();Method hi = bossClass.getMethod("hi" , String.class);"张三" );Method say = bossClass.getDeclaredMethod("say" , int .class, String.class, char .class);true );1 , "李四" , '男' ));null ,2 ,"张三" , '女' ));Object reVal = say.invoke(null , 300 , "王五" , '男' );"reVal 的运行类型=" + reVal.getClass());Method m1 = bossClass.getDeclaredMethod("m1" );Object reVal2 = m1.invoke(o);"reVal2 的运行类型=" + reVal2.getClass());class Monster {}class Boss {public int age;private static String name;public Boss () {public Monster m1 () {return new Monster ();private static String say (int n, String s, char c) {return n + " " + s + " " + c;public void hi (String s) {"hi " + s);
正则表达式 入门体验:
1 2 3 4 5 6 7 8 9 10 11 12 13 14 15 16 17 18 19 20 21 22 23 24 25 26 27 28 29 30 31 package com.ep.regexp;import java.util.regex.Matcher;import java.util.regex.Pattern;public class Regexp_ {public static void main (String[] args) {String content = "</i><span class=\"refresh-text_1-d1i\">换一换</span></a></div>" +"</div><div class=\"opr-toplist1-table_3K7iH\"><div>" +"<div class=\"toplist1-tr_4kE4D\">" +"<div class=\"toplist1-td_3zMd4 opr-toplist1-link_2YUtD\">" +"<span class=\"c-index-single toplist1-hot_2RbQT c-color-red toplist1-hot-normal_12THH\" style=\"opacity:1;\"><i class=\"c-icon icon-top_4eWFz\">\uE662</i></span><a target=\"_blank\" title=\"中国探月未来已来\" href=\"/s?wd=%E4%B8%AD%E5%9B%BD%E6%8E%A2%E6%9C%88%E6%9C%AA%E6%9D%A5%E5%B7%B2%E6%9D%A5&rsv_idx=2&tn=baiduhome_pg&usm=6&ie=utf-8&rsv_pq=a0a7c60a000bb8de&oq=1&rsv_t=c46eXOFH6I1ZTI4TBKaqzEMnM2CSghlBdsza4L85Px5VaFjdgenaUxdgvyVpPKy4Apyn&rqid=a0a7c60a000bb8de&rsf=6b09c17bb5c330f4b81b97b89bec9db9_1_15_1&rsv_dl=0_right_fyb_pchot_20811&sa=0_right_fyb_pchot_20811\" class=\"c-font-medium c-color-t opr-toplist1-subtitle_3FULy\" data-click=\"{'clk_info': 'index: 1, page: 1'}\">中国探月未来已来</a></div></div><div class=\"toplist1-tr_4kE4D\"><div class=\"toplist1-td_3zMd4 opr-toplist1-link_2YUtD\"><span class=\"c-index-single toplist1-hot_2RbQT c-index-single-hot1\" style=\"opacity:1;\">1</span><a target=\"_blank\" title=\"乌方:乌军已突破至乌俄边境地区\" href=\"/s?wd=%E4%B9%8C%E6%96%B9%EF%BC%9A%E4%B9%8C%E5%86%9B%E5%B7%B2%E7%AA%81%E7%A0%B4%E8%87%B3%E4%B9%8C%E4%BF%84%E8%BE%B9%E5%A2%83%E5%9C%B0%E5%8C%BA&rsv_idx=2&tn=baiduhome_pg&usm=6&ie=utf-8&rsv_pq=a0a7c60a000bb8de&oq=1&rsv_t=c46eXOFH6I1ZTI4TBKaqzEMnM2CSghlBdsza4L85Px5VaFjdgenaUxdgvyVpPKy4Apyn&rqid=a0a7c60a000bb8de&rsf=6b09c17bb5c330f4b81b97b89bec9db9_1_15_2&rsv_dl=0_right_fyb_pchot_20811&sa=0_right_fyb_pchot_20811\" class=\"c-font-medium c-color-t opr-toplist1-subtitle_3FULy\" data-click=\"{'clk_info': 'index: 2, page: 1'}\">乌方:乌军已突破至乌俄边境地区</a><span class=\"c-text c-text-hot opr-toplist1-label_3Mevn\">热</span></div></div><div class=\"toplist1-tr_4kE4D\"><div class=\"toplist1-td_3zMd4 opr-toplist1-link_2YUtD\"><span class=\"c-index-single toplist1-hot_2RbQT c-index-single-hot2\" style=\"opacity:1;\">2</span><a target=\"_blank\" title=\"外籍男子骚扰女性被拘7日限期出境\" href=\"/s?wd=%E5%A4%96%E7%B1%8D%E7%94%B7%E5%AD%90%E9%AA%9A%E6%89%B0%E5%A5%B3%E6%80%A7%E8%A2%AB%E6%8B%987%E6%97%A5%E9%99%90%E6%9C%9F%E5%87%BA%E5%A2%83&rsv_idx=2&tn=baiduhome_pg&usm=6&ie=utf-8&rsv_pq=a0a7c60a000bb8de&oq=1&rsv_t=c46eXOFH6I1ZTI4TBKaqzEMnM2CSghlBdsza4L85Px5VaFjdgenaUxdgvyVpPKy4Apyn&rqid=a0a7c60a000bb8de&rsf=6b09c17bb5c330f4b81b97b89bec9db9_1_15_3&rsv_dl=0_right_fyb_pchot_20811&sa=0_right_fyb_pchot_20811\" class=\"c-font-medium c-color-t opr-toplist1-subtitle_3FULy\" data-click=\"{'clk_info': 'index: 3, page: 1'}\">外籍男子骚扰女性被拘7日限期出境</a><span class=\"c-text c-text-hot opr-toplist1-label_3Mevn\">热</span></div></div><div class=\"toplist1-tr_4kE4D\"><div class=\"toplist1-td_3zMd4 opr-toplist1-link_2YUtD\"><span class=\"c-index-single toplist1-hot_2RbQT c-index-single-hot3\" style=\"opacity:1;\">3</span><a target=\"_blank\" title=\"消防员为震区老乡手写感谢信\" href=\"/s?wd=%E6%B6%88%E9%98%B2%E5%91%98%E4%B8%BA%E9%9C%87%E5%8C%BA%E8%80%81%E4%B9%A1%E6%89%8B%E5%86%99%E6%84%9F%E8%B0%A2%E4%BF%A1&rsv_idx=2&tn=baiduhome_pg&usm=6&ie=utf-8&rsv_pq=a0a7c60a000bb8de&oq=1&rsv_t=c46eXOFH6I1ZTI4TBKaqzEMnM2CSghlBdsza4L85Px5VaFjdgenaUxdgvyVpPKy4Apyn&rqid=a0a7c60a000bb8de&rsf=6b09c17bb5c330f4b81b97b89bec9db9_1_15_4&rsv_dl=0_right_fyb_pchot_20811&sa=0_right_fyb_pchot_20811\" class=\"c-font-medium c-color-t opr-toplist1-subtitle_3FULy\" data-click=\"{'clk_info': 'index: 4, page: 1'}\">消防员为震区老乡手写感谢信</a></div></div><div class=\"toplist1-tr_4kE4D\"><div class=\"toplist1-td_3zMd4 opr-toplist1-link_2YUtD\"><span class=\"c-index-single toplist1-hot_2RbQT toplist1-hot-normal_12THH\" style=\"opacity:1;\">4</span><a target=\"_blank\" title=\"老人赶集卖的鸭被闷死 路人纷纷买下\" href=\"/s?wd=%E8%80%81%E4%BA%BA%E8%B5%B6%E9%9B%86%E5%8D%96%E7%9A%84%E9%B8%AD%E8%A2%AB%E9%97%B7%E6%AD%BB%20%E8%B7%AF%E4%BA%BA%E7%BA%B7%E7%BA%B7%E4%B9%B0%E4%B8%8B&rsv_idx=2&tn=baiduhome_pg&usm=6&ie=utf-8&rsv_pq=a0a7c60a000bb8de&oq=1&rsv_t=e966suftTwhfvF%2B4kx5q4iSVPInibMp2RJIAQrHE1aaQeK8zR51%2BAbjkA%2BhyOju979wr&rqid=a0a7c60a000bb8de&rsf=6b09c17bb5c330f4b81b97b89bec9db9_1_15_5&rsv_dl=0_right_fyb_pchot_20811&sa=0_right_fyb_pchot_20811\" class=\"c-font-medium c-color-t opr-toplist1-subtitle_3FULy\" data-click=\"{'clk_info': 'index: 5, page: 1'}\">老人赶集卖的鸭被闷死 路人纷纷买下</a></div>; //1. 先创建一个 Pattern 对象 , 模式对象, 可以理解成就是一个正则表达式对象 // Pattern pattern = Pattern.compile(" [a-zA-Z]+"); // Pattern pattern = Pattern.compile(" [0 -9 ]+"); // Pattern pattern = Pattern.compile(" ([a-zA-Z]+)|([0 -9 ]+)"); Pattern pattern = Pattern.compile(" a target=\"_blank\" title=\"(\\S*)\"" );Matcher matcher = pattern.matcher(content);int i = 0 ;while (matcher.find()) {":" + matcher.group(1 ));
正则表达式底层实现 1 2 3 4 5 6 7 8 9 10 11 12 13 14 15 16 17 18 19 20 21 22 23 24 25 26 27 28 29 30 31 32 33 34 35 36 37 38 39 40 41 42 43 44 45 46 47 48 49 50 51 52 53 54 55 56 57 58 59 60 61 62 63 64 65 package com.ep.regexp;import java.util.regex.Matcher;import java.util.regex.Pattern;public class RegTheory {public static void main (String[] args) {String content = "1998 年 12 月 8 日,第二代 Java 平台的企业版 J2EE 发布。1999 年 6 月,Sun 公司发布了" "第二代 Java 平台(简称为 Java2)的 3 个版本:J2ME(Java2 Micro Edition,Java2 平台的微型" "版),应用于移动、无线及有限资源的环境;J2SE(Java 2 Standard Edition,Java 2 平台的" "标准版),应用于桌面环境;J2EE(Java 2Enterprise Edition,Java 2 平台的企业版),应" "用 3443 于基于 Java 的应用服务器。Java 2 平台的发布,是 Java 发展过程中最重要的一个" "里程碑,标志着 Java 的应用开始普及 9889 " ;String regStr = "(\\d\\d)(\\d\\d)" ;Pattern pattern = Pattern.compile(regStr);Matcher matcher = pattern.matcher(content);while (matcher.find()) {0 ));"第一组: " + matcher.group(1 ));"第二组: " + matcher.group(2 ));
正则表达式语法
元字符-字符匹配符
1 2 3 4 5 6 7 8 9 10 11 12 13 14 15 16 17 18 19 20 21 22 23 24 25 26 27 28 29 30 31 32 33 34 35 36 37 38 39 40 41 42 package com.ep.regexp;import java.util.regex.Matcher;import java.util.regex.Pattern;public class RegExp02 {public static void main (String[] args) {String content = "a11c8abc _ABCy @\n" ;String regStr = "." ;Pattern pattern = Pattern.compile(regStr);Matcher matcher = pattern.matcher(content);while (matcher.find()) {"找到 " + matcher.group(0 ));
元字符-选择匹配符
元字符-限定符 用于指定其前面的字符和组合项连续出现多少次
1 2 3 4 5 6 7 8 9 10 11 12 13 14 15 16 17 18 19 20 21 22 23 24 25 26 27 28 29 30 31 32 33 34 35 package com.ep.regexp;import java.util.regex.Matcher;import java.util.regex.Pattern;public class RegExp03 {public static void main (String[] args) {String content = "a211111aaaaaahello" ;String regStr = "a1?" ; Pattern pattern = Pattern.compile(regStr);Matcher matcher = pattern.matcher(content);while (matcher.find()) {0 ));
元字符-定位符
1 2 3 4 5 6 7 8 9 10 11 12 13 14 15 16 17 18 19 20 21 22 23 24 25 26 27 28 29 30 31 32 package com.ep.regexp;import java.util.regex.Matcher;import java.util.regex.Pattern;public class RegExp04 {public static void main (String[] args) {String content = "123-abc" ;String regStr = "abc\\B" ;Pattern pattern = Pattern.compile(regStr);Matcher matcher = pattern.matcher(content);while (matcher.find()) {"找到:" + matcher.group(0 ));
分组 捕获分组
1 2 3 4 5 6 7 8 9 10 11 12 13 14 15 16 17 18 19 20 21 22 23 24 25 26 27 28 29 30 31 32 33 34 35 36 37 package com.ep.regexp;import java.util.regex.Matcher;import java.util.regex.Pattern;public class RegExp05 {public static void main (String[] args) {String content = "abcd99996665ds45656sd4565s5" ;String regStr = "(?<g1>\\d\\d)(?<g2>\\d\\d)" ;Pattern pattern = Pattern.compile(regStr);Matcher matcher = pattern.matcher(content);while (matcher.find()) {"找到=" + matcher.group(0 ));"第 1 个分组内容=" + matcher.group(1 ));"第 1 个分组内容[通过组名]=" + matcher.group("g1" ));"第 2 个分组内容=" + matcher.group(2 ));"第 2 个分组内容[通过组名]=" + matcher.group("g2" ));
非捕获分组
1 2 3 4 5 6 7 8 9 10 11 12 13 14 15 16 17 18 19 20 21 22 23 24 25 26 27 package com.ep.regexp;import java.util.regex.Matcher;import java.util.regex.Pattern;public class RegExp06 {public static void main (String[] args) {String content = "hello 张三教育 jack 张三老师 张三同学 hello 张三学生" ;String regStr = "张三(?!教育|老师|同学)" ; Pattern pattern = Pattern.compile(regStr);Matcher matcher = pattern.matcher(content);while (matcher.find()) {"找到:" + matcher.group(0 ));
非贪婪匹配 1 2 3 4 5 6 7 8 9 10 11 12 13 14 15 16 17 18 19 20 21 22 23 package com.ep.regexp;import java.util.regex.Matcher;import java.util.regex.Pattern;public class RegExp07 {public static void main (String[] args) {String content = "abc111111" ;String regStr = "\\d+?" ; Pattern pattern = Pattern.compile(regStr);Matcher matcher = pattern.matcher(content);while (matcher.find()) {"找到 " + matcher.group(0 ));
应用实例
1 2 3 4 5 6 7 8 9 10 11 12 13 14 15 16 17 18 19 20 21 22 23 24 25 26 27 28 29 30 31 32 33 34 35 36 37 38 39 40 41 42 package com.ep.regexp;import java.util.regex.Matcher;import java.util.regex.Pattern;public class RegExp08 {public static void main (String[] args) {String content = "https://www.bilibili.com/account/history?spm_id_from=333.1007.0.0" ;String regStr = "^((http|https)://)([\\w-]+\\.)+[\\w-]+(/[\\w-?=&/%.#]*)?$" ; Pattern pattern = Pattern.compile(regStr);Matcher matcher = pattern.matcher(content);if (matcher.find()) {"满足格式" );else {"不满足格式" );
正则表达式三个常用类 pattern类 
1 2 3 4 5 6 7 8 9 10 11 12 13 14 15 16 17 18 19 20 21 22 23 24 package com.ep.regexp;import java.util.regex.Pattern;public class PatternMethod {public static void main (String[] args) {String content = "hello abc hello," ;String regStr = "hello.*" ;boolean matches = Pattern.matches(regStr, content);if (matches) {"整体匹配成功" );else {"匹配不成功" );
Matcher类
1 2 3 4 5 6 7 8 9 10 11 12 13 14 15 16 17 18 19 20 21 22 23 24 25 26 27 28 29 30 31 32 33 34 35 36 package com.ep.regexp;import java.util.regex.Matcher;import java.util.regex.Pattern;public class MatcherMethod {public static void main (String[] args) {String content = "hello edu jack edutom hello smith hello" ;String regStr = "hello" ;Pattern pattern = Pattern.compile(regStr);Matcher matcher = pattern.matcher(content);while (matcher.find()) {"================" );"找到:" + content.substring(matcher.start(), matcher.end()));"整体匹配:" + matcher.matches());String newContent = matcher.replaceAll("你好" );
反向引用
1 2 3 4 5 6 7 8 9 10 11 12 13 14 15 16 17 18 19 20 21 22 23 24 25 26 27 28 29 30 31 32 33 34 35 36 package com.ep.regexp;import java.util.regex.Matcher;import java.util.regex.Pattern;public class RegExp09 {public static void main (String[] args) {String content = "12321-333999111" ;String regStr = "\\d{5}-(\\d)\\1{2}(\\d)\\2{2}(\\d)\\3{2}" ;Pattern pattern = Pattern.compile(regStr);Matcher matcher = pattern.matcher(content);while (matcher.find()) {"找到:" + matcher.group(0 ));
1 2 3 4 5 6 7 8 9 10 11 12 13 14 15 16 17 18 19 20 21 22 23 24 25 26 27 28 29 30 31 package com.ep.regexp;import java.util.regex.Matcher;import java.util.regex.Pattern;public class RegExp10 {public static void main (String[] args) {String content = "我....我要....学学学学....编程 java!" ;Pattern pattern = Pattern.compile("\\." );Matcher matcher = pattern.matcher(content);"" );Pattern pattern1 = Pattern.compile("(.)\\1+" ); "$1" );
String 类中使用正则表达式 替换功能
String 类 public String replaceAll(String regex,String replacement)
判断功能
String 类 public boolean matches(String regex){} **//**使用 Pattern 和 Matcher 类
分割功能
String 类 public String[] split(String regex)
1 2 3 4 5 6 7 8 9 10 11 12 13 14 15 16 17 18 19 20 21 22 23 24 25 26 27 28 29 30 31 32 33 34 35 36 37 package com.ep.regexp;public class StringReg {public static void main (String[] args) {String content = "2000 年 5 月,JDK1.3、JDK1.4 和 J2SE1.3 相继发布," +"几周后其" + "获得了 Apple 公司 Mac OS X 的工业标准的支持。" +"2001 年 9 月 24 日,J2EE1.3 发" + "布。" + "2002 年 2 月 26 日,J2SE1.4 发布。" +"自此 Java 的计算能力有了大幅提升" ;String newContent = content.replaceAll("JDK1.3|JDK1.4" , "JDK" );String content1 = "13888889999" ;boolean matches = content1.matches("1(38|39)\\d{8}" );if (matches) {"格式正确" );else {"格式不正确" );"hello#abc-jack12smith~北京" ;"#|-|~|\\d+" );for (String str : split) {