SpringSecurity
1.概述
Spring 是非常流行和成功的 Java 应用开发框架,Spring Security 正是 Spring 家族中的成员。Spring Security 基于 Spring 框架,提供了一套 Web 应用安全性的完整解决方案。
正如你可能知道的关于安全方面的两个主要区域是“认证”和“授权”(或者访问控制),一般来说,Web 应用的安全性包括用户认证(Authentication)和用户授权(Authorization)两个部分,这两点也是 Spring Security 重要核心功能。
(1)用户认证指的是:验证某个用户是否为系统中的合法主体,也就是说用户能否访问该系统。用户认证一般要求用户提供用户名和密码。系统通过校验用户名和密码来完成认证过程。通俗点说就是系统认为用户是否能登录
(2)用户授权指的是验证某个用户是否有权限执行某个操作。在一个系统中,不同用户所具有的权限是不同的。比如对一个文件来说,有的用户只能进行读取,而有的用户可以进行修改。一般来说,系统会为不同的用户分配不同的角色,而每个角色则对应一系列的权限。通俗点讲就是系统判断用户是否有权限去做某些事情。
SpringSecurity 特点:
Shiro
Apache 旗下的轻量级权限控制框架。
特点:
因此,一般来说,常见的安全管理技术栈的组合是这样的:
• SSM + Shiro
• Spring Boot/Spring Cloud + Spring Security
2.入门程序


如果没有选择可以手动导入包
1
2
3
4
5
6
7
8
9
10
11
12
|
<dependency>
<groupId>org.springframework.boot</groupId>
<artifactId>spring-boot-starter-web</artifactId>
<version>2.7.1</version>
</dependency>
<dependency>
<groupId>org.springframework.boot</groupId>
<artifactId>spring-boot-starter-security</artifactId>
<version>2.4.1</version>
</dependency>
|
编写controller
1
2
3
4
5
6
7
8
9
10
11
12
13
| import org.springframework.web.bind.annotation.GetMapping;
import org.springframework.web.bind.annotation.RequestMapping;
import org.springframework.web.bind.annotation.RestController;
@RestController
@RequestMapping("/test")
public class TestController {
@GetMapping("/hello")
public String hello() {
return "hello";
}
}
|
访问:localhost:8080/test/hello,自动跳转到登录页面,默认用户名user,密码在控制台


登陆成功之后才会跳转

3.详解
3.1SpringSecurity 基本原理
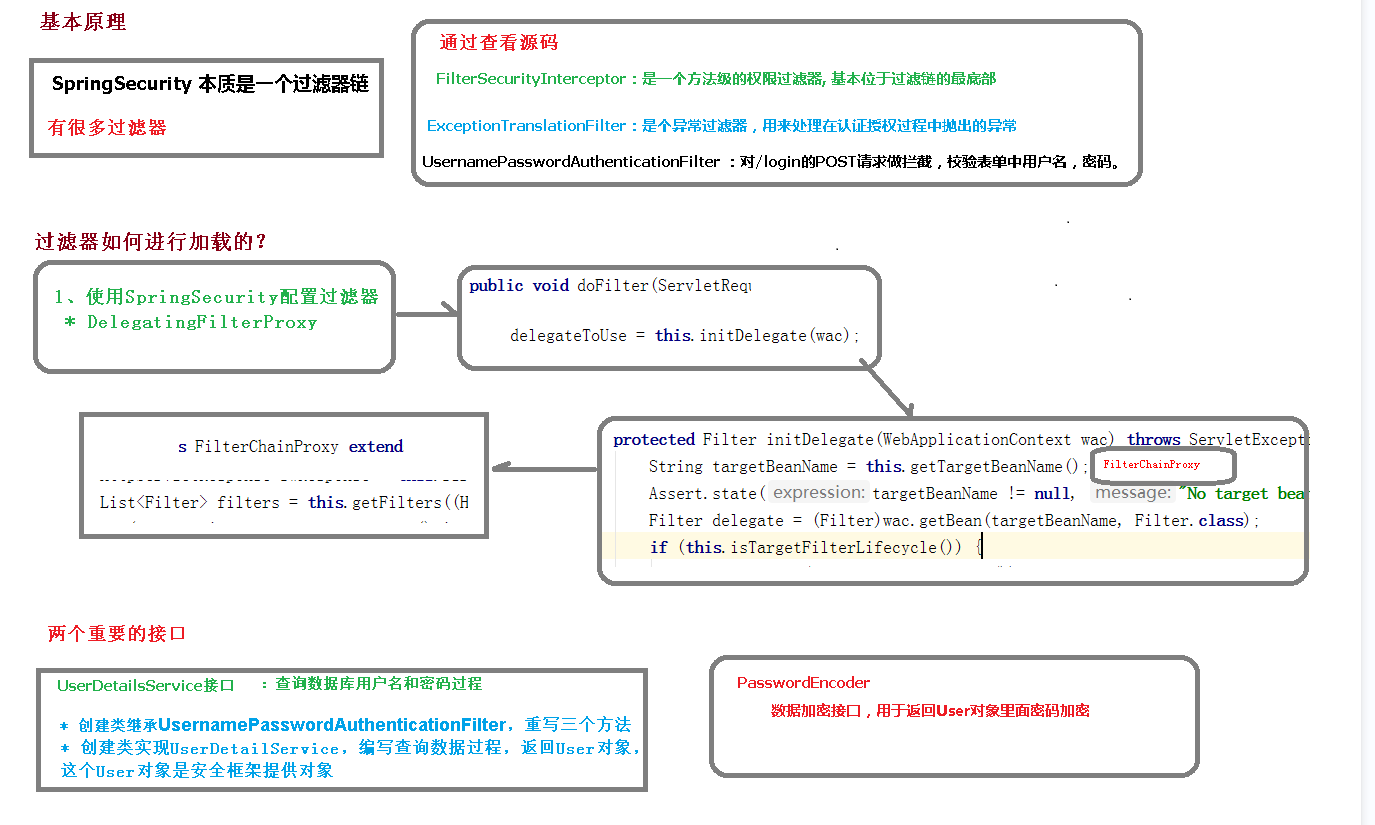
SpringSecurity 本质是一个过滤器链:
重点看三个过滤器:
FilterSecurityInterceptor:是一个方法级的权限过滤器, 基本位于过滤链的最底部。
ExceptionTranslationFilter:是个异常过滤器,用来处理在认证授权过程中抛出的异常
UsernamePasswordAuthenticationFilter :对/login 的 POST 请求做拦截,校验表单中用户名,密码。
3.2设置登陆的用户名和密码
3.2.1方式一:通过配置文件
application.properties
1
2
| spring.security.user.name=admin
spring.security.user.password=123456
|
3.2.2方式二:通过配置类
config/SecurityConfig
1
2
3
4
5
6
7
8
9
10
11
12
13
14
15
16
17
18
19
20
21
22
23
24
| import org.springframework.context.annotation.Bean;
import org.springframework.context.annotation.Configuration;
import org.springframework.security.config.annotation.authentication.builders.AuthenticationManagerBuilder;
import org.springframework.security.config.annotation.web.configuration.WebSecurityConfigurerAdapter;
import org.springframework.security.crypto.bcrypt.BCryptPasswordEncoder;
import org.springframework.security.crypto.password.PasswordEncoder;
@Configuration
public class SecurityConfig extends WebSecurityConfigurerAdapter {
@Override
protected void configure(AuthenticationManagerBuilder auth) throws Exception{
BCryptPasswordEncoder passwordEncoder = new BCryptPasswordEncoder();
String password = passwordEncoder.encode("123");
auth.inMemoryAuthentication().withUser("admin").password(password).roles("admin");
}
@Bean
PasswordEncoder password() {
return new BCryptPasswordEncoder();
}
}
|
3.2.3方式三:自定义实现类设置
第一步:创建配置类,设置使用哪个userDetailsService实现类
1
2
3
4
5
6
7
8
9
10
11
12
13
14
15
16
17
18
19
20
21
22
23
24
25
| import org.springframework.beans.factory.annotation.Autowired;
import org.springframework.context.annotation.Bean;
import org.springframework.context.annotation.Configuration;
import org.springframework.security.config.annotation.authentication.builders.AuthenticationManagerBuilder;
import org.springframework.security.config.annotation.web.configuration.WebSecurityConfigurerAdapter;
import org.springframework.security.core.userdetails.UserDetailsService;
import org.springframework.security.crypto.bcrypt.BCryptPasswordEncoder;
import org.springframework.security.crypto.password.PasswordEncoder;
@Configuration
public class SecurityConfig extends WebSecurityConfigurerAdapter {
@Autowired
private UserDetailsService userDetailsService;
@Override
protected void configure(AuthenticationManagerBuilder auth) throws Exception {
auth.userDetailsService(userDetailsService).passwordEncoder(password());
}
@Bean
PasswordEncoder password() {
return new BCryptPasswordEncoder();
}
}
|
第二步:编写实现类,返回user对象,user对象有用户名密码和操作权限
service/UserService
1
2
3
4
5
6
7
8
| @Service("userDetailsService")
public class UserService implements UserDetailsService {
@Override
public UserDetails loadUserByUsername(String username) throws UsernameNotFoundException {
List<GrantedAuthority> auths = AuthorityUtils.commaSeparatedStringToAuthorityList("roles");
return new User("admin",new BCryptPasswordEncoder().encode("123456"),auths);
}
}
|
3.3 UserDetailsService 接口讲解
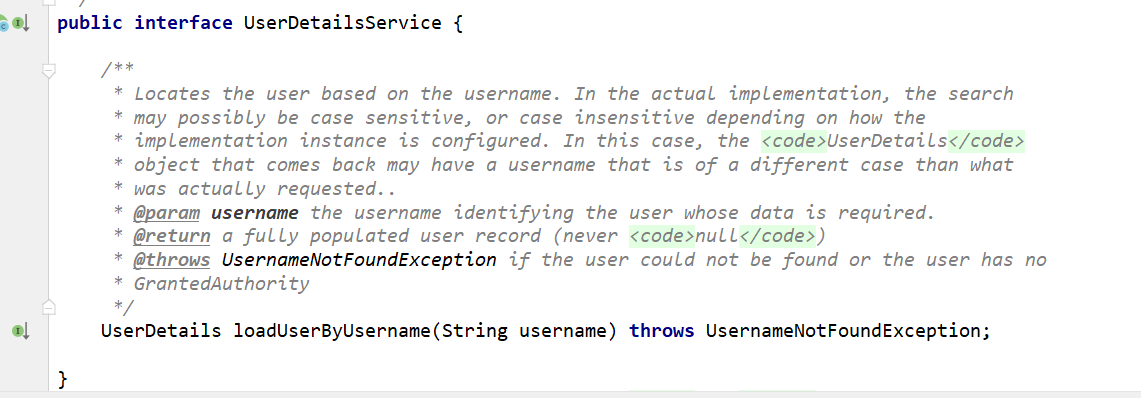
当什么也没有配置的时候,账号和密码是由 Spring Security 定义生成的。而在实际项目中账号和密码都是从数据库中查询出来的。 所以我们要通过自定义逻辑控制认证逻辑。
如果需要自定义逻辑时,只需要实现 UserDetailsService 接口即可。接口定义如下:
Ctrl+shift+n搜索即可查看该接口
返回值 UserDetails
这个类是系统默认的用户“主体
UserDetails:
1
2
3
4
5
6
7
8
9
10
11
12
13
14
|
Collection<? extends GrantedAuthority> getAuthorities();
String getPassword();
String getUsername();
boolean isAccountNonExpired();
boolean isAccountNonLocked();
boolean isCredentialsNonExpired();
boolean isEnabled();
|
User
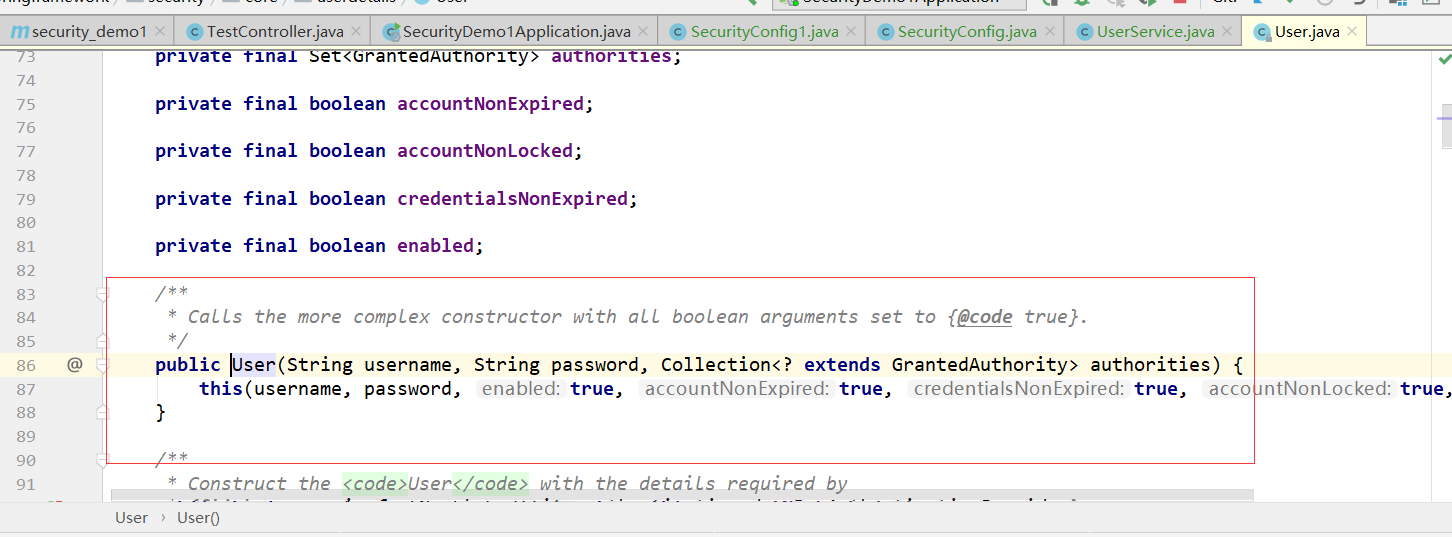
方法参数 username表示用户名。此值是客户端表单传递过来的数据。默认情况下必须叫 username,否则无法接收。
3.4PasswordEncoder 接口讲解
1
2
3
4
5
6
7
|
String encode(CharSequence rawPassword);
boolean matches(CharSequence rawPassword, String encodedPassword);
default boolean upgradeEncoding(String encodedPassword) {
return false; }
|
BCryptPasswordEncoder 是 Spring Security 官方推荐的密码解析器,平时多使用这个解析器。
BCryptPasswordEncoder 是对 bcrypt 强散列方法的具体实现。是基于 Hash 算法实现的单向加密。可以通过 strength 控制加密强度,默认 10.
查用方法演示:
1
2
3
4
5
6
7
8
9
10
11
12
13
14
| @Test
void testBCrypt() {
BCryptPasswordEncoder passwordEncoder = new BCryptPasswordEncoder();
String password = passwordEncoder.encode("abcdef");
System.out.println(password);
boolean isTrue = passwordEncoder.matches("abcdef", password);
System.out.println(isTrue);
}
|
4.WEB方案案例
4.1创建数据库
1
2
3
4
5
6
7
8
9
10
11
12
13
14
15
16
17
18
19
20
21
22
23
24
25
26
27
28
29
30
31
32
33
34
35
36
37
| CREATE TABLE users(
id BIGINT PRIMARY KEY AUTO_INCREMENT,
username VARCHAR(20) UNIQUE NOT NULL,
PASSWORD VARCHAR(100)
);
-- 密码 123456
INSERT INTO users VALUES(1,'admin','$2a$10$lZBiG.A2qM5XjMaQgrs6Hee6cnP1Ba4zw.AJ6cLyBcaDoZBz674sa');
-- 密码 123456
INSERT INTO users VALUES(2,'lisi','$2a$10$lZBiG.A2qM5XjMaQgrs6Hee6cnP1Ba4zw.AJ6cLyBcaDoZBz674sa');
CREATE TABLE role(
id BIGINT PRIMARY KEY AUTO_INCREMENT,
NAME VARCHAR(20)
);
INSERT INTO role VALUES(1,'管理员');
INSERT INTO role VALUES(2,'普通用户');
CREATE TABLE role_user(
uid BIGINT,
rid BIGINT
);
INSERT INTO role_user VALUES(1,1);
INSERT INTO role_user VALUES(2,2);
CREATE TABLE menu(
id BIGINT PRIMARY KEY AUTO_INCREMENT,
NAME VARCHAR(20),
url VARCHAR(100),
parentid BIGINT,
permission VARCHAR(20)
);
INSERT INTO menu VALUES(1,'系统管理','',0,'menu:system');
INSERT INTO menu VALUES(2,'用户管理','',0,'menu:user');
CREATE TABLE role_menu(
MID BIGINT,
rid BIGINT
);
INSERT INTO role_menu VALUES(1,1);
INSERT INTO role_menu VALUES(2,1);
INSERT INTO role_menu VALUES(2,2);
|
4.2添加依赖
1
2
3
4
5
6
7
8
9
10
11
12
13
14
15
16
17
18
19
20
21
22
23
24
25
26
27
28
29
30
31
32
33
34
35
36
37
| <dependency>
<groupId>org.springframework.boot</groupId>
<artifactId>spring-boot-starter-web</artifactId>
</dependency>
<dependency>
<groupId>org.springframework.boot</groupId>
<artifactId>spring-boot-starter-test</artifactId>
<scope>test</scope>
</dependency>
<dependency>
<groupId>org.springframework.boot</groupId>
<artifactId>spring-boot-starter-security</artifactId>
<version>2.4.1</version>
</dependency>
<dependency>
<groupId>com.baomidou</groupId>
<artifactId>mybatis-plus-boot-starter</artifactId>
<version>3.5.1</version>
</dependency>
<dependency>
<groupId>org.projectlombok</groupId>
<artifactId>lombok</artifactId>
<optional>true</optional>
</dependency>
<dependency>
<groupId>mysql</groupId>
<artifactId>mysql-connector-java</artifactId>
<scope>runtime</scope>
</dependency>
|
4.3编写实体类,mapper和配置数据库连接信息
pojo/Users
1
2
3
4
5
6
7
8
9
10
11
| import lombok.Data;
@Data
public class Users {
private Integer id;
private String username;
private String password;
}
|
mapper/UserMapper
1
2
3
4
5
6
7
8
| import com.baomidou.mybatisplus.core.mapper.BaseMapper;
import com.ep.pojo.Users;
import org.springframework.stereotype.Repository;
@Repository
public interface UserMapper extends BaseMapper<Users> {
}
|
配置数据库连接信息
1
2
3
4
| spring.datasource.driver-class-name=com.mysql.cj.jdbc.Driver
spring.datasource.url=jdbc:mysql://localhost:3306/spring_security?serverTimezone=GMT%2B8
spring.datasource.username=root
spring.datasource.password=root
|
配置springboot要扫描的包
1
2
3
4
5
6
7
8
9
| @SpringBootApplication
@MapperScan("com.ep.mapper")
public class SecurityDemo1Application {
public static void main(String[] args) {
SpringApplication.run(SecurityDemo1Application.class, args);
}
}
|
1
2
3
4
5
6
7
8
9
10
11
12
13
14
15
16
17
18
19
20
21
22
23
24
25
26
27
28
29
30
31
32
33
34
35
36
37
38
| import com.baomidou.mybatisplus.core.conditions.query.QueryWrapper;
import com.ep.mapper.UserMapper;
import com.ep.pojo.Users;
import org.springframework.beans.factory.annotation.Autowired;
import org.springframework.security.core.GrantedAuthority;
import org.springframework.security.core.authority.AuthorityUtils;
import org.springframework.security.core.userdetails.User;
import org.springframework.security.core.userdetails.UserDetails;
import org.springframework.security.core.userdetails.UserDetailsService;
import org.springframework.security.core.userdetails.UsernameNotFoundException;
import org.springframework.security.crypto.bcrypt.BCryptPasswordEncoder;
import org.springframework.stereotype.Service;
import java.util.List;
@Service("userDetailsService")
public class MyUserDetailsService implements UserDetailsService {
@Autowired
private UserMapper userMapper;
@Override
public UserDetails loadUserByUsername(String username) throws UsernameNotFoundException {
QueryWrapper<Users> queryWrapper = new QueryWrapper<>();
queryWrapper.eq("username",username);
Users users = userMapper.selectOne(queryWrapper);
if(users == null){
throw new UsernameNotFoundException("用户名不存在");
}
System.out.println(users);
List<GrantedAuthority> auths = AuthorityUtils.commaSeparatedStringToAuthorityList("role");
return new User(users.getUsername(),new BCryptPasswordEncoder().encode(users.getPassword()),auths);
}
}
|
自定义设置登陆页面
1.静态页面权限
首先来了解一下Thymeleaf的知识
1.1. Thymeleaf 简介
Thymeleaf 是一款用于渲染 XML/XHTML/HTML5 内容的模板引擎。它与 JSP,Velocity,FreeMaker 等模板引擎类似,也可以轻易地与 Spring MVC 等 Web 框架集成。与其它模板引擎相比,Thymeleaf 最大的特点是,即使不启动 Web 应用,也可以直接在浏览器中打开并正确显示模板页面 。
Thymeleaf 是新一代 Java 模板引擎,与 Velocity、FreeMarker 等传统 Java 模板引擎不同,Thymeleaf 支持 HTML 原型,其文件后缀为“.html”,因此它可以直接被浏览器打开,此时浏览器会忽略未定义的 Thymeleaf 标签属性,展示 thymeleaf 模板的静态页面效果;当通过 Web 应用程序访问时,Thymeleaf 会动态地替换掉静态内容,使页面动态显示。
1.2需求:
- 网站分为首页、登录页、用户页面、管理员页面和报错页面;
- 使用用户名加密码登录,登录错误要报错;
- 不同的用户拥有不同的权限,不同的权限可以访问不同的网页;
- 首页和登录页不需要任何权限;
- 用户页面需要USER权限;
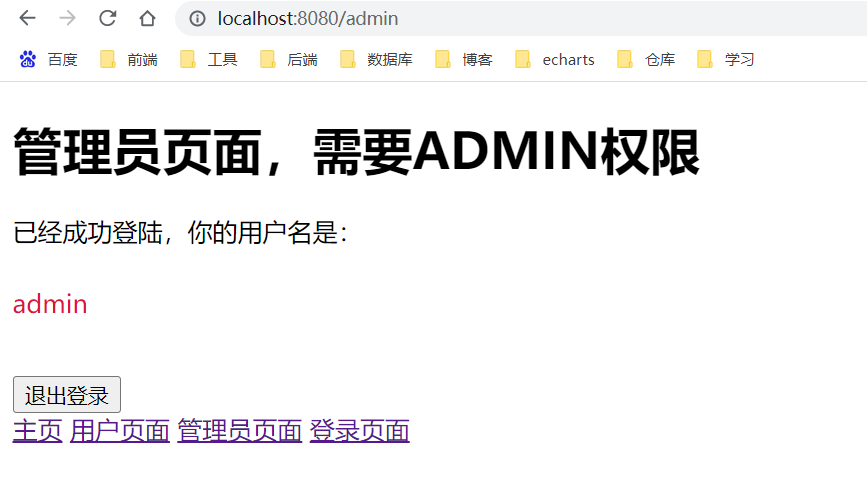
- 管理员页面需要ADMIN权限;
- 如果用户没有登录,则访问需要权限的页面时自动跳转登录页面。
1.3代码:
SpringBoot版本为2.7.2
1
2
3
4
5
6
7
8
9
10
11
12
13
14
15
16
17
18
19
20
21
22
23
24
25
26
27
28
29
30
31
32
33
|
<properties>
<project.build.sourceEncoding>UTF-8</project.build.sourceEncoding>
<project.reporting.outputEncoding>UTF-8</project.reporting.outputEncoding>
<java.version>1.8</java.version>
</properties>
<dependencies>
<dependency>
<groupId>org.springframework.boot</groupId>
<artifactId>spring-boot-starter-security</artifactId>
</dependency>
<dependency>
<groupId>org.springframework.boot</groupId>
<artifactId>spring-boot-starter-web</artifactId>
</dependency>
<dependency>
<groupId>org.springframework.boot</groupId>
<artifactId>spring-boot-starter-test</artifactId>
<scope>test</scope>
</dependency>
<dependency>
<groupId>org.springframework.security</groupId>
<artifactId>spring-security-test</artifactId>
<scope>test</scope>
</dependency>
<dependency>
<groupId>org.springframework.boot</groupId>
<artifactId>spring-boot-starter-thymeleaf</artifactId>
</dependency>
</dependencies>
|
config/SecurityConfiguration
1
2
3
4
5
6
7
8
9
10
11
12
13
14
15
16
17
18
19
20
21
22
23
24
25
26
27
28
29
30
31
32
33
34
35
36
37
38
39
40
41
42
43
44
45
| package com.ep.config;
import org.springframework.security.config.annotation.authentication.builders.AuthenticationManagerBuilder;
import org.springframework.security.config.annotation.web.builders.HttpSecurity;
import org.springframework.security.config.annotation.web.configuration.EnableWebSecurity;
import org.springframework.security.config.annotation.web.configuration.WebSecurityConfigurerAdapter;
import org.springframework.security.crypto.bcrypt.BCryptPasswordEncoder;
@EnableWebSecurity
public class SecurityConfiguration extends WebSecurityConfigurerAdapter {
@Override
protected void configure(AuthenticationManagerBuilder auth) throws Exception {
auth.inMemoryAuthentication().passwordEncoder(new BCryptPasswordEncoder())
.withUser("user").password(new BCryptPasswordEncoder().encode("123456")).roles("USER");
auth.inMemoryAuthentication().passwordEncoder(new BCryptPasswordEncoder())
.withUser("admin").password(new BCryptPasswordEncoder().encode("123456")).roles("USER", "ADMIN");
}
@Override
protected void configure(HttpSecurity http) throws Exception {
http
.authorizeRequests()
.antMatchers("/", "/index", "/error").permitAll()
.antMatchers("/user/**").hasRole("USER")
.antMatchers("/admin/**").hasRole("ADMIN")
.and()
.formLogin().loginPage("/login").defaultSuccessUrl("/user")
.and()
.logout().logoutUrl("/logout").logoutSuccessUrl("/login");
}
}
|
controller/UserController
1
2
3
4
5
6
7
8
9
10
11
12
13
14
15
16
17
18
19
|
@Controller
public class UserController {
@RequestMapping("/user")
public String user(Authentication user, Model model) {
model.addAttribute("username", user.getName());
return "user/user";
}
@RequestMapping("/admin")
public String admin(Authentication user, Model model) {
model.addAttribute("username", user.getName());
return "admin/admin";
}
}
|
controller/HomeController
1
2
3
4
5
6
7
8
9
10
11
12
| @Controller
public class HomeController {
@RequestMapping({"/", "/index"})
public String index() {
return "index";
}
@RequestMapping("/login")
public String login() {
return "login";
}
}
|
从SpringSecurity5.0以后,这种方式的密码都要使用passwordEncoder进行加密,否则就会报错。
其他静态页面:
最终实现效果:


增加三个功能:
- 修改用户名密码的参数名称
- 通过自定义一个AuthenticationProvider在系统中加入一个后门
- 将验证身份信息展示到前端
三更:
1.认证
1.1.登录校验流程:
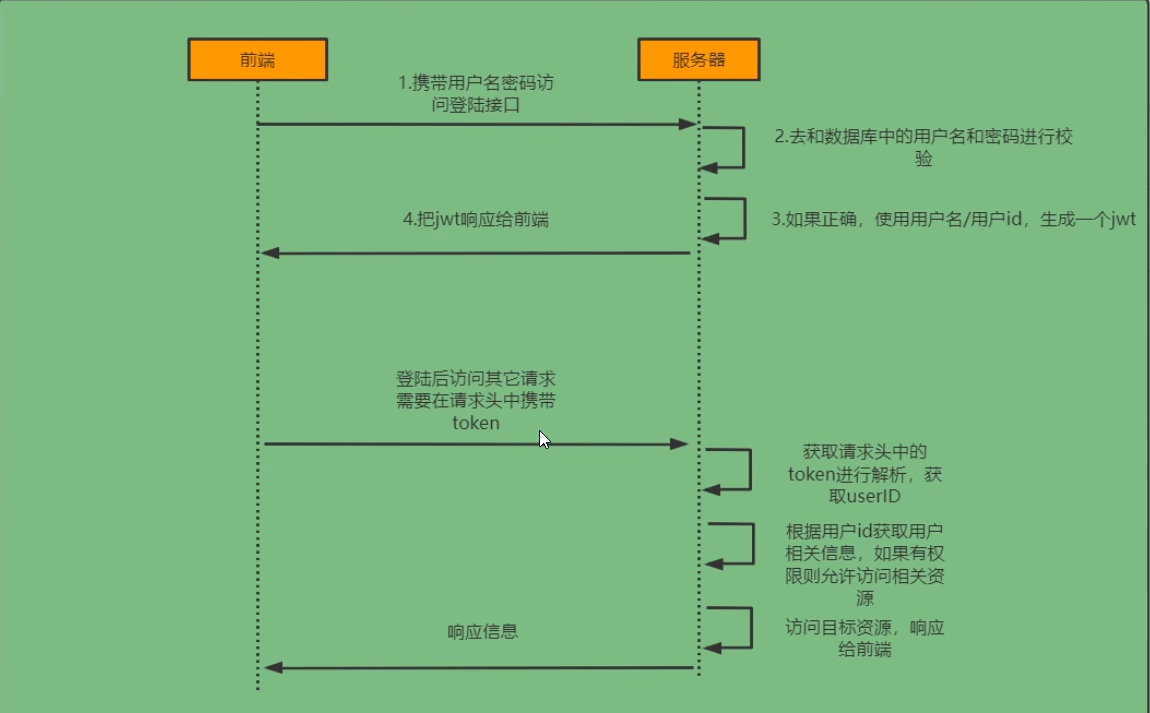
1.2.SpringSecurity完整流程
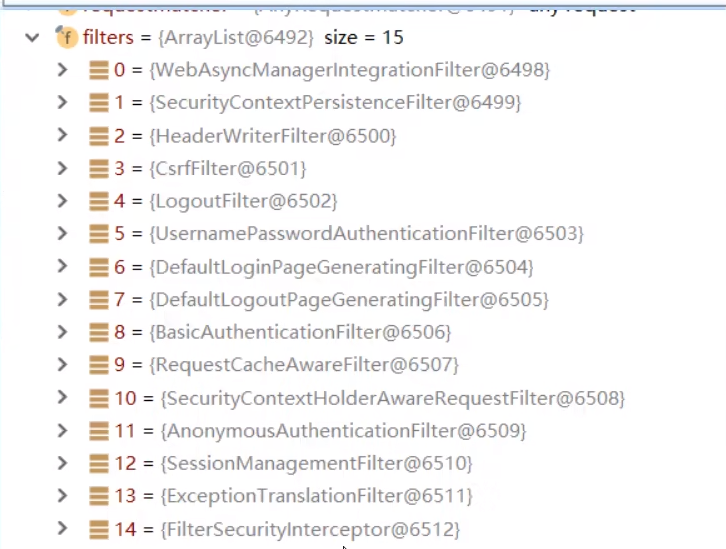
SpringSecurity的原理其实就是一个过滤器链,内部包含了提供各种功能的过滤器。这里我们可以看看入门案例中的过滤器。

UsernamePasswordAuthenticationFilter:负责处理我们在登陆页面填写了用户名密码后的登陆请求。入门案例的认证工作主要有它负责。
ExceptionTranslationFilter:处理过滤器链中抛出的任何AccessDeniedException和AuthenticationException.FilterSecuritylnterceptor:负责权限校验的过滤器。
SpringSecurity中有哪些过滤器以及顺序?
1.3认证流程图
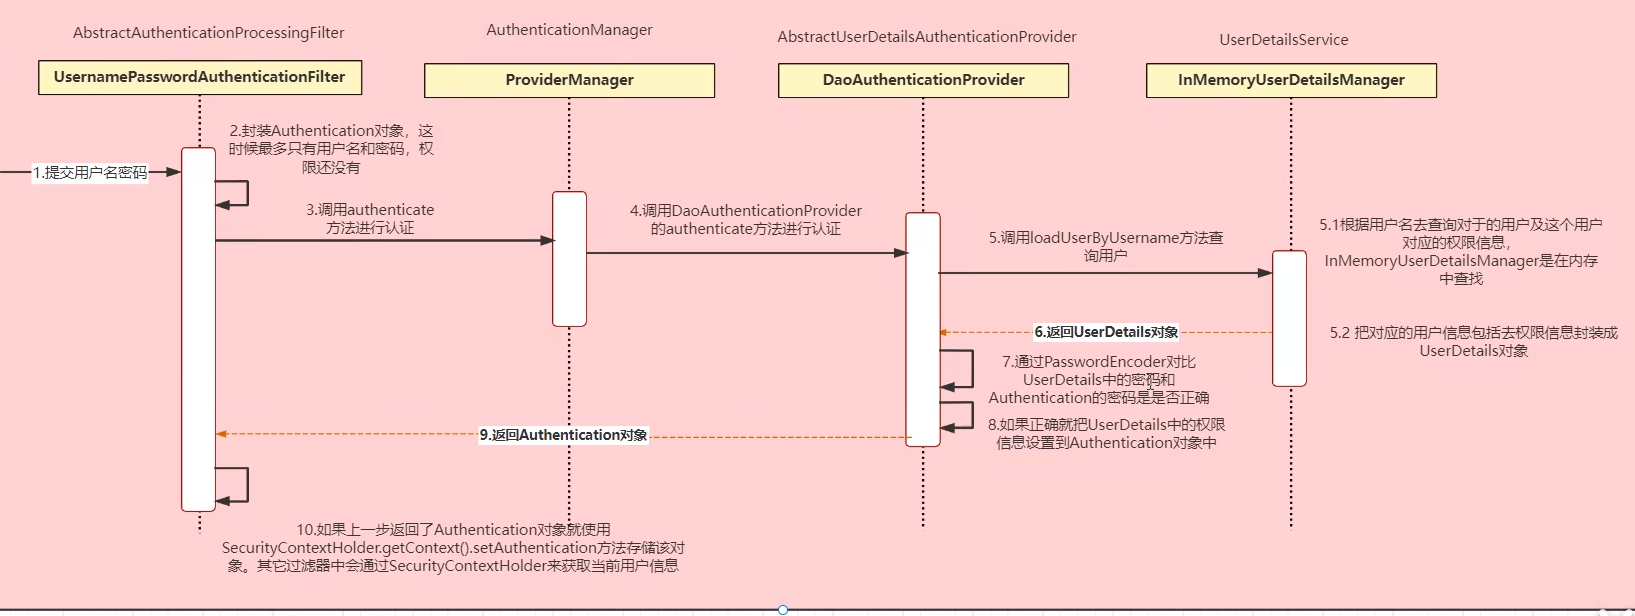
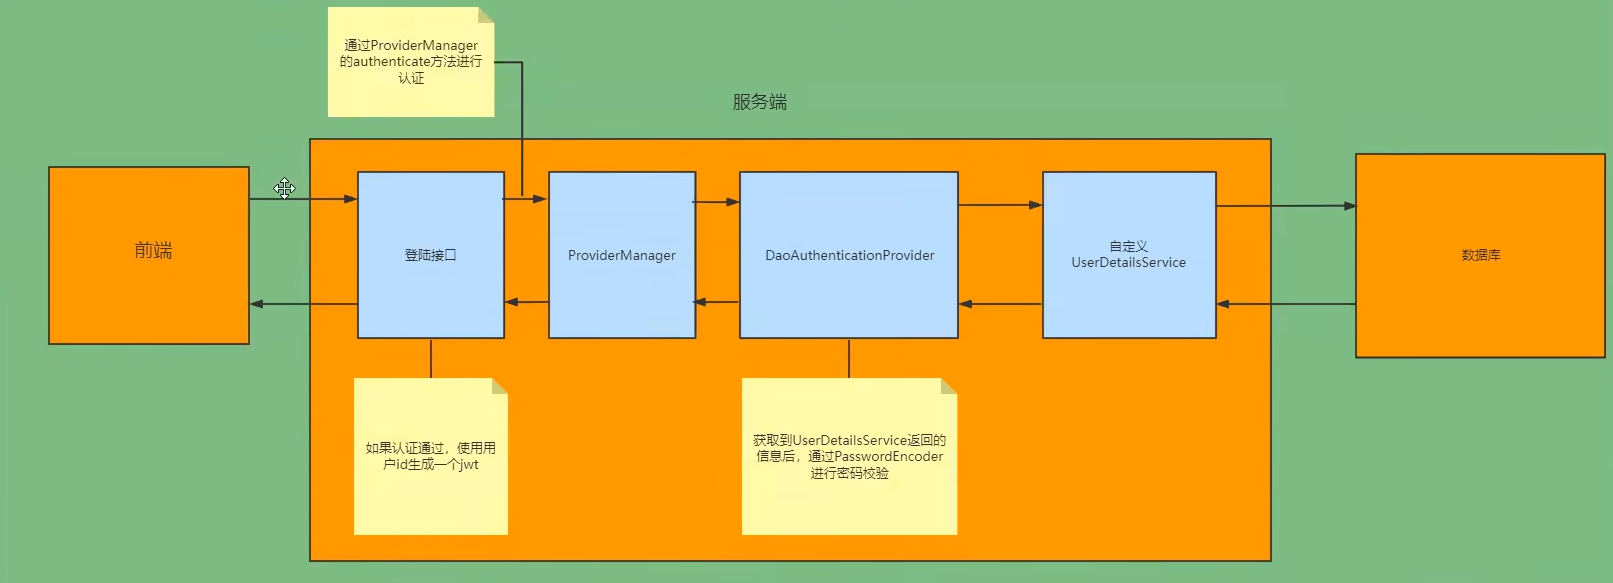
Authentication接口:它的实现类,表示当前访问系统的用户,封装了用户相关信息。AuthenticationManager接口:定义了认证Authentication的方法
UserDetailsService接口:加载用户特定数据的核心接口。里面定义了一个根据用户名查询用户信息的方法。
UserDetals接口:提供核心用户信息。通过UserDetailService根据用户名获取处理的用户信息要封装成UserDetails对象返回。然后将这些信息封装到Authentication对象中。
1.4思路分析
登录:
①自定义登录接口
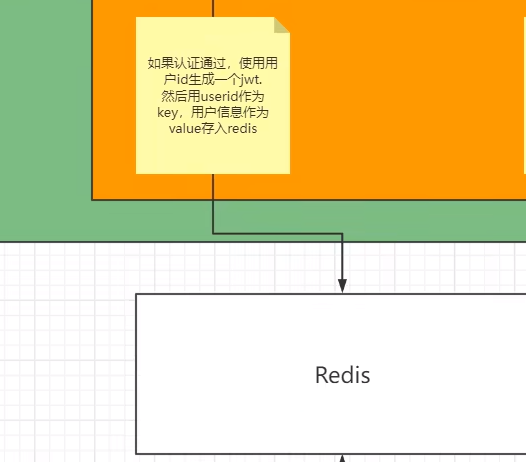
调用ProviderManager的方法进行认证如果认证通过生成jwt
把用户信息存入redis中
②自定义UserDetailsService
在这个实现类中去查询数据库
校验:
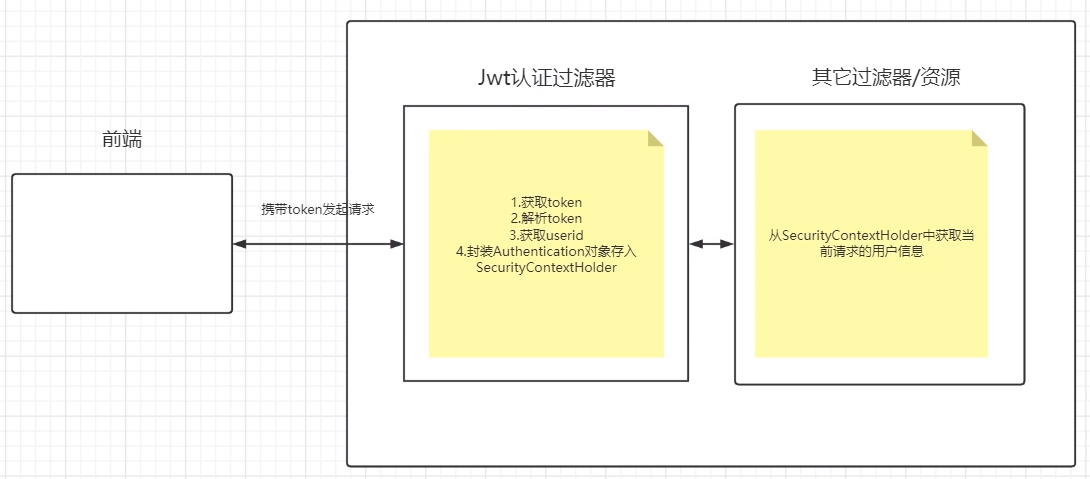
①定义Jwt认证过滤器
获取token
解析token获取其中的userid
从redis中获取用户信息存入SecurityContextHolder
1.5准备工作
建项目,勾选SpringWeb和SpringSecurity
导入依赖


